
Tour
EDEXO, screen by screen
What every screen shows and where to find it. The shots are of version 1.3 running on my own journals, so the commander is me and the systems are ones I flew through. Hover or tap a number to find its note.
Before you land
The main window, after a discovery scan and before any surface scan: body 8 c has six biological signals and nothing is known yet about which genera. Every species that can live here is listed with its chance.
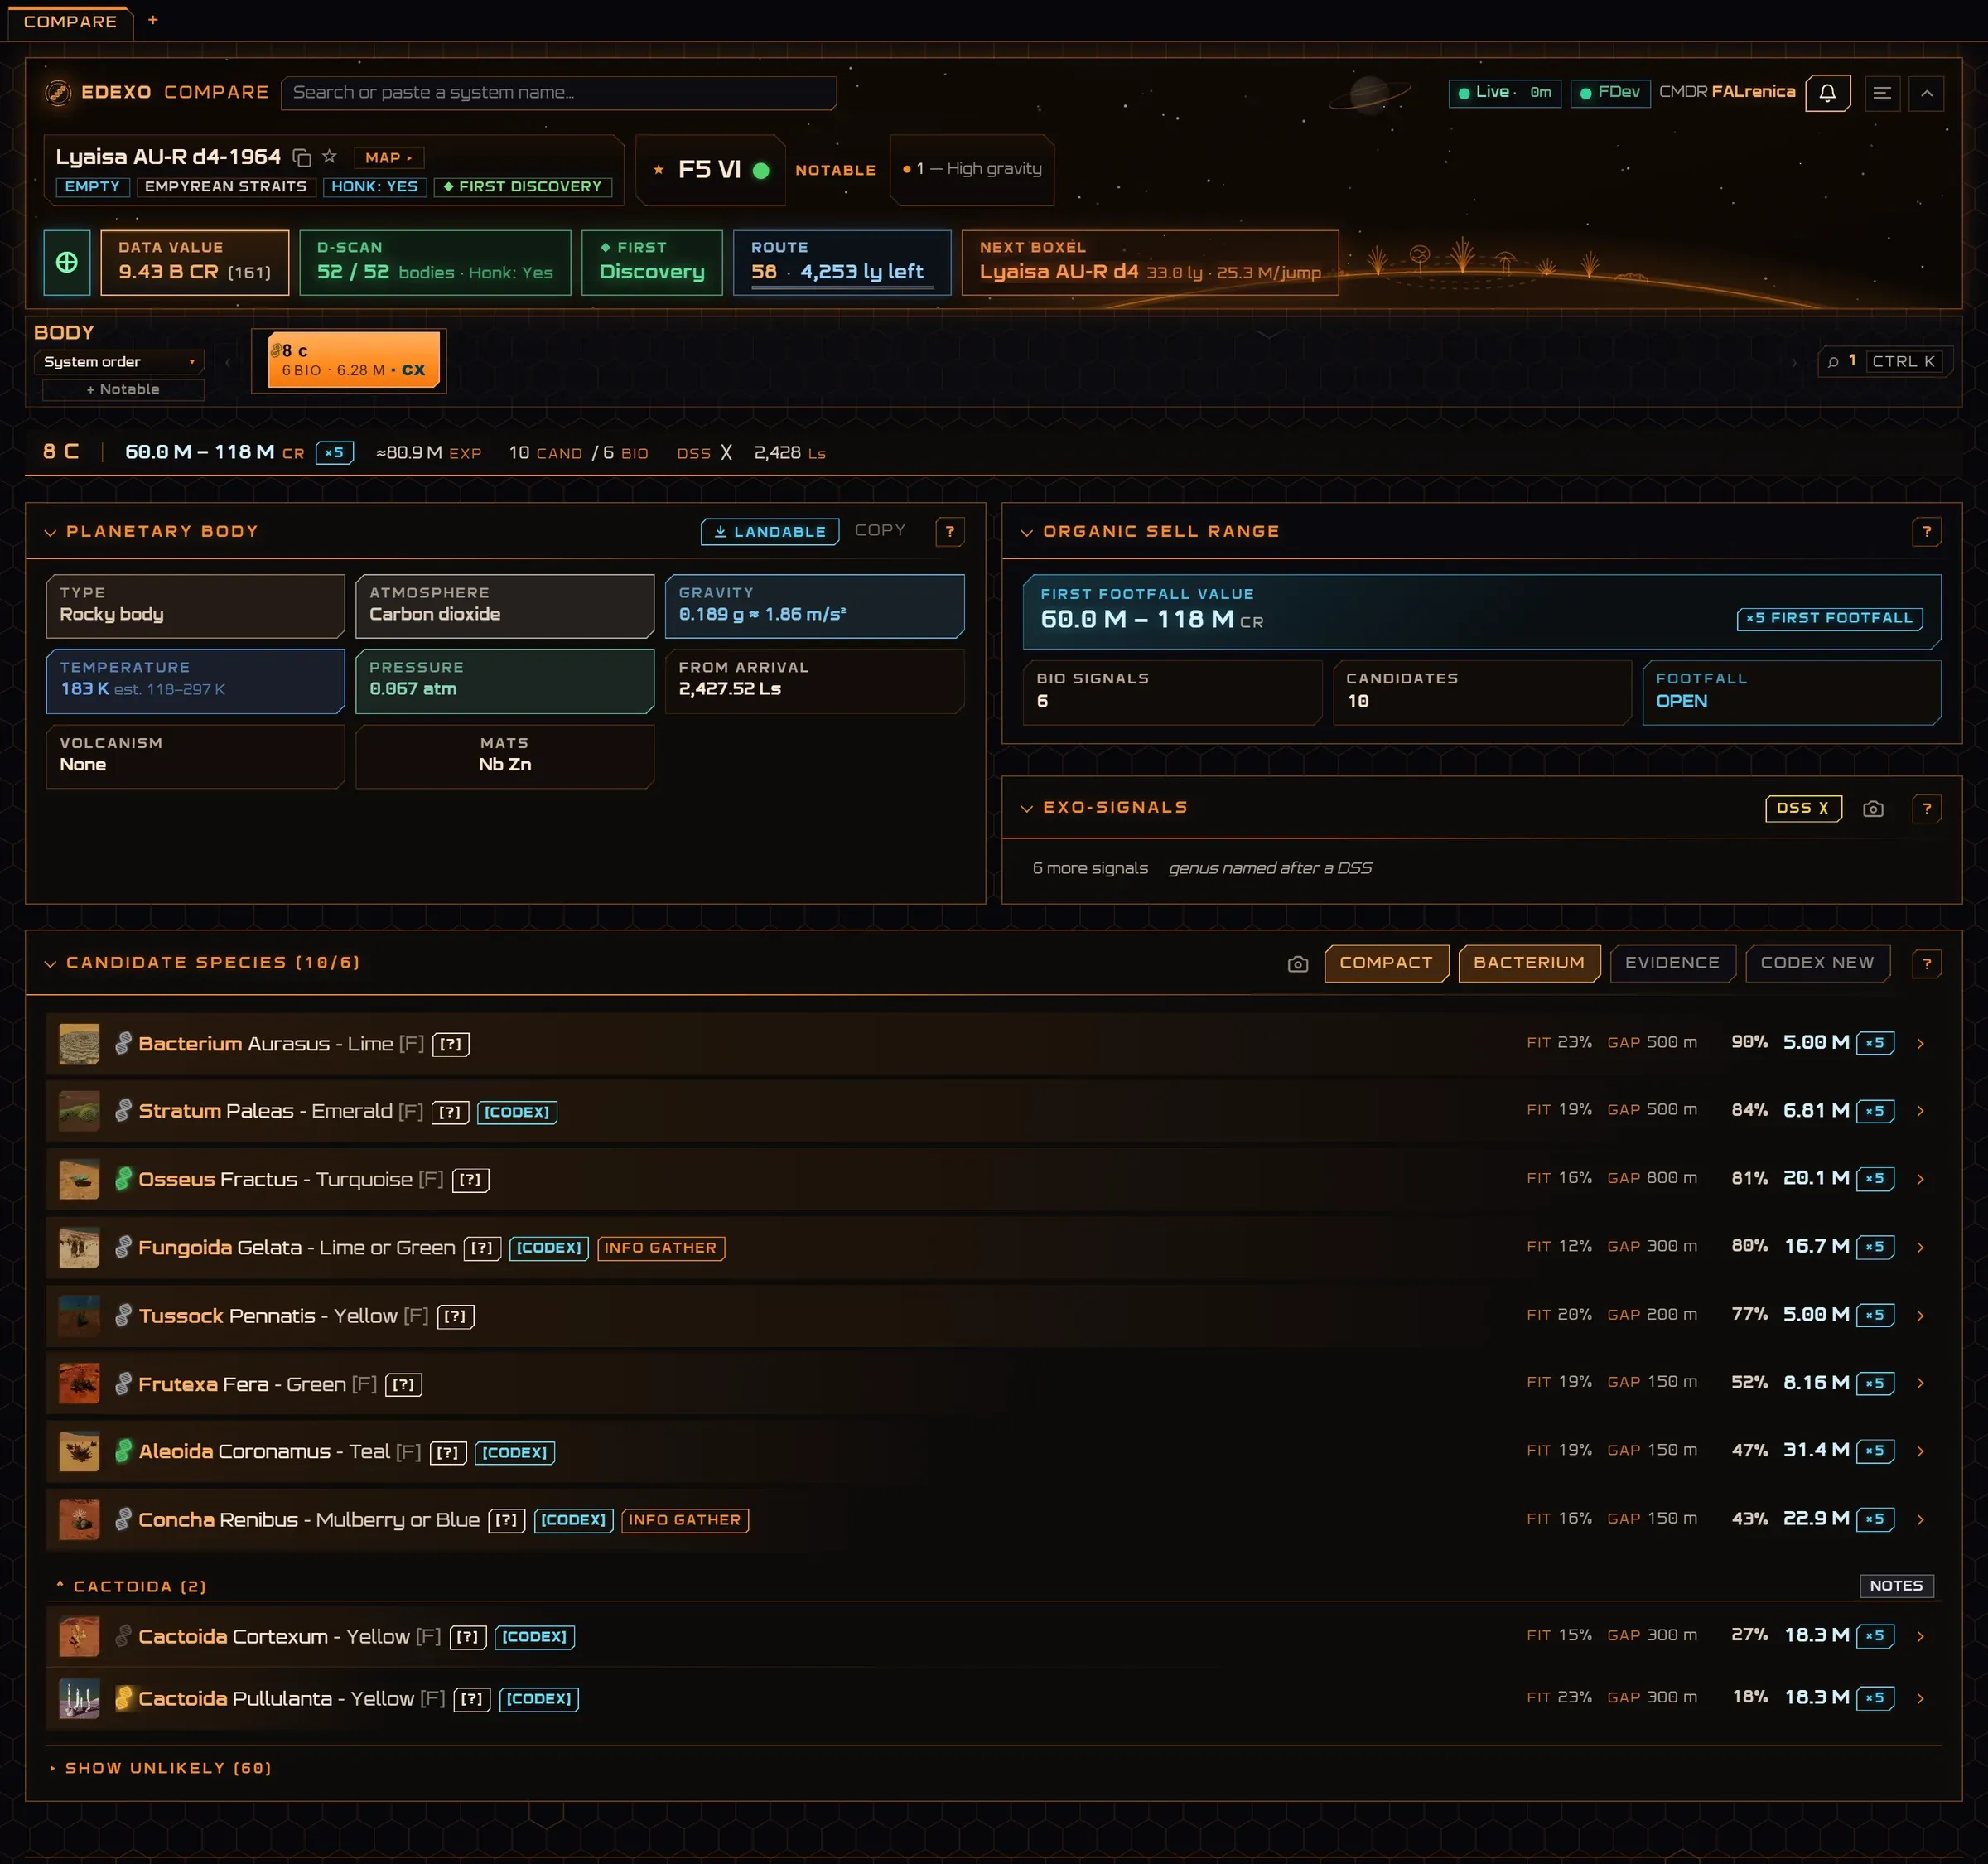
- The system. Its name, main star and tags: region, Honk done, first discovery. The ☆ bookmarks it, MAP opens the system map.
- The header tiles. Unsold data value, D-scan progress, first discovery, jumps left on the route, and the next boxel worth flying to.
- Bodies with life. One tab per body with biological signals: signal count, likely value, CX where a codex entry is still open for you.
- The body at a glance. Price range with the ×5 first-footfall bonus, the expected value (≈), candidates against signals, DSS done or not, distance from arrival.
- Planetary body. Type, atmosphere, gravity, temperature, pressure and volcanism, which is what the prediction reads.
- Organic sell range. What first footfall would pay here, and whether the footfall is still open.
- Exo-signals. Fills with the genera after a surface probe (DSS); until then it says how many signals wait to be named.
- Candidate species. Each species that can grow here, most likely first, with its photograph. [F] means the colour follows this F-class star.
- Tags. [CODEX] a colour not yet in your codex, INFO GATHER where sampling it would teach the app something, [?] why the chance is what it is.
- Fit and gap. Fit: how closely this body resembles the bodies the species was found on. Gap: the distance between the three samples.
- Chance and payout. The calibrated chance the species is one of those here, and what it pays with first footfall.
- List options. Rows or cards, bacteria shown or hidden, the evidence behind each chance, and new codex entries first.
- Grouped and unlikely. Species of one genus fold together; anything under a 1 % chance waits behind Show unlikely, never removed.
Notable bodies
Earth-likes, water and ammonia worlds, terraformables and the rest worth a look sit in the header's Notable card. Hover one for its quick facts; click it and they stay until you close them or jump.
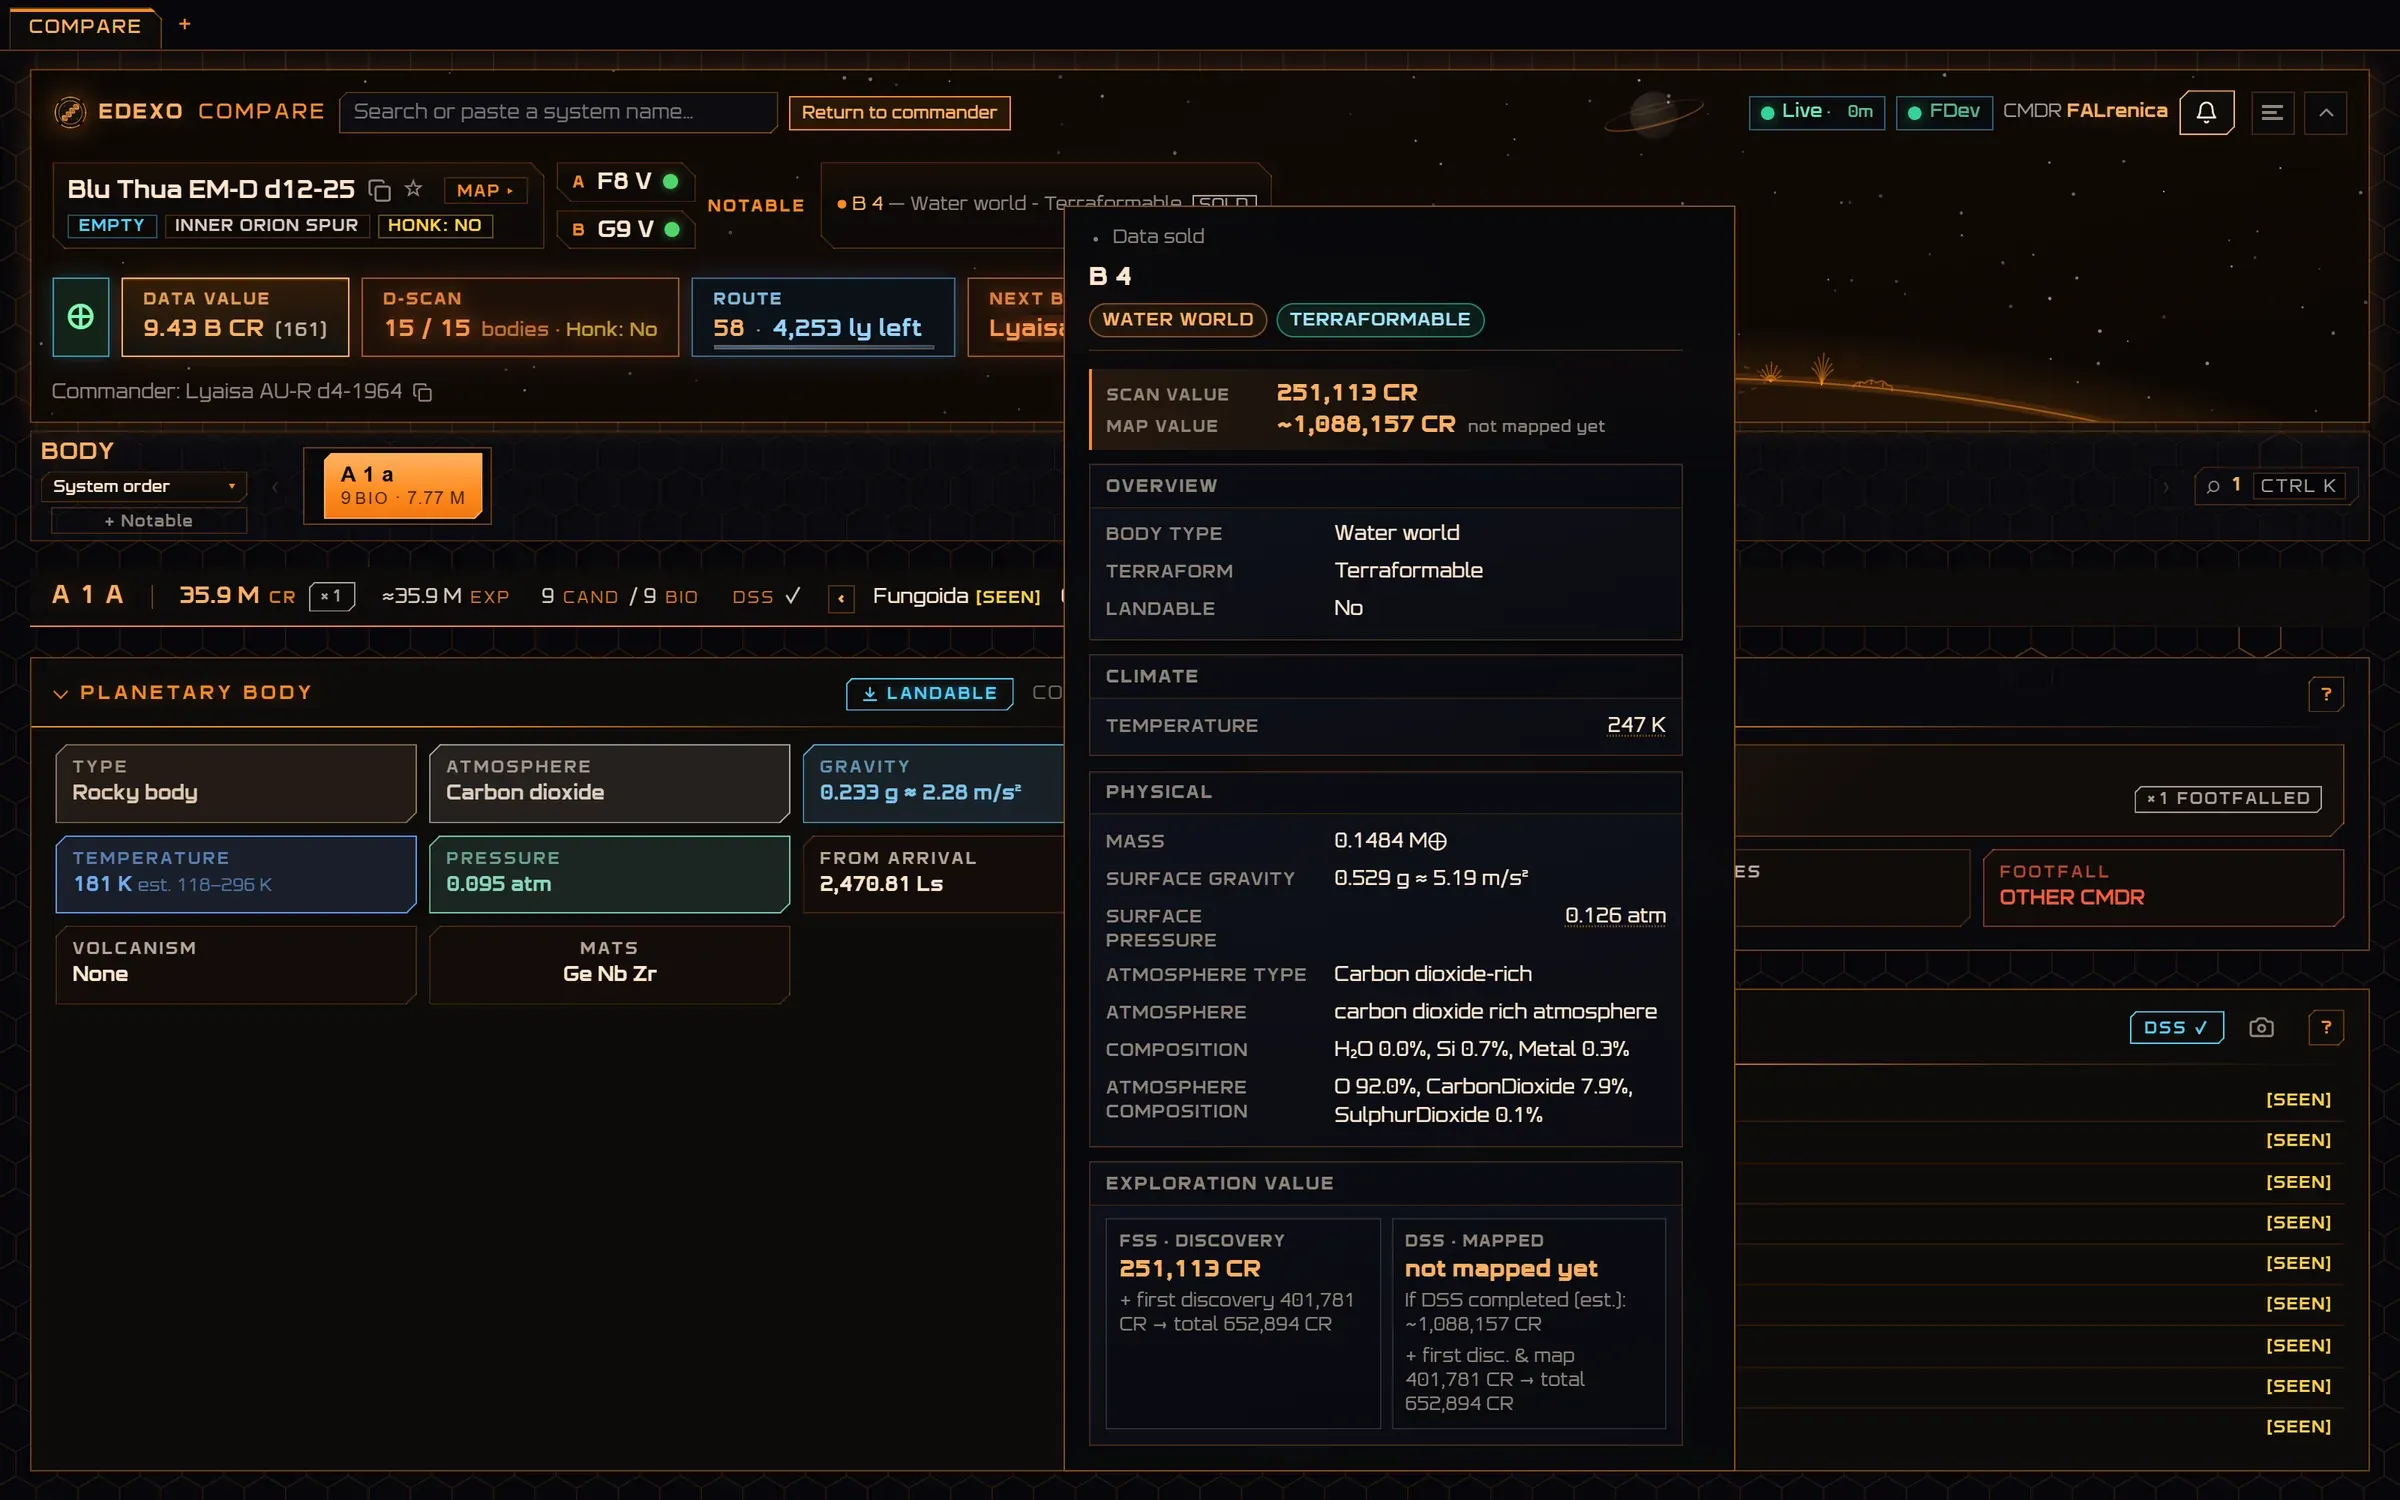
- The Notable card. Every notable body in the system, mapped or not, with what makes it notable.
- Why it is notable. Sold or not, and the features that put it on the card.
- What it is. Class and terraform state at a glance.
- What it pays. Scan value now and the mapped value if you probe it.
- First discovery. With the first-discovery and first-mapped bonus, and what a DSS would add.
Why this chance
Click a candidate to unfold its card, then Why this chance: the evidence behind the number.
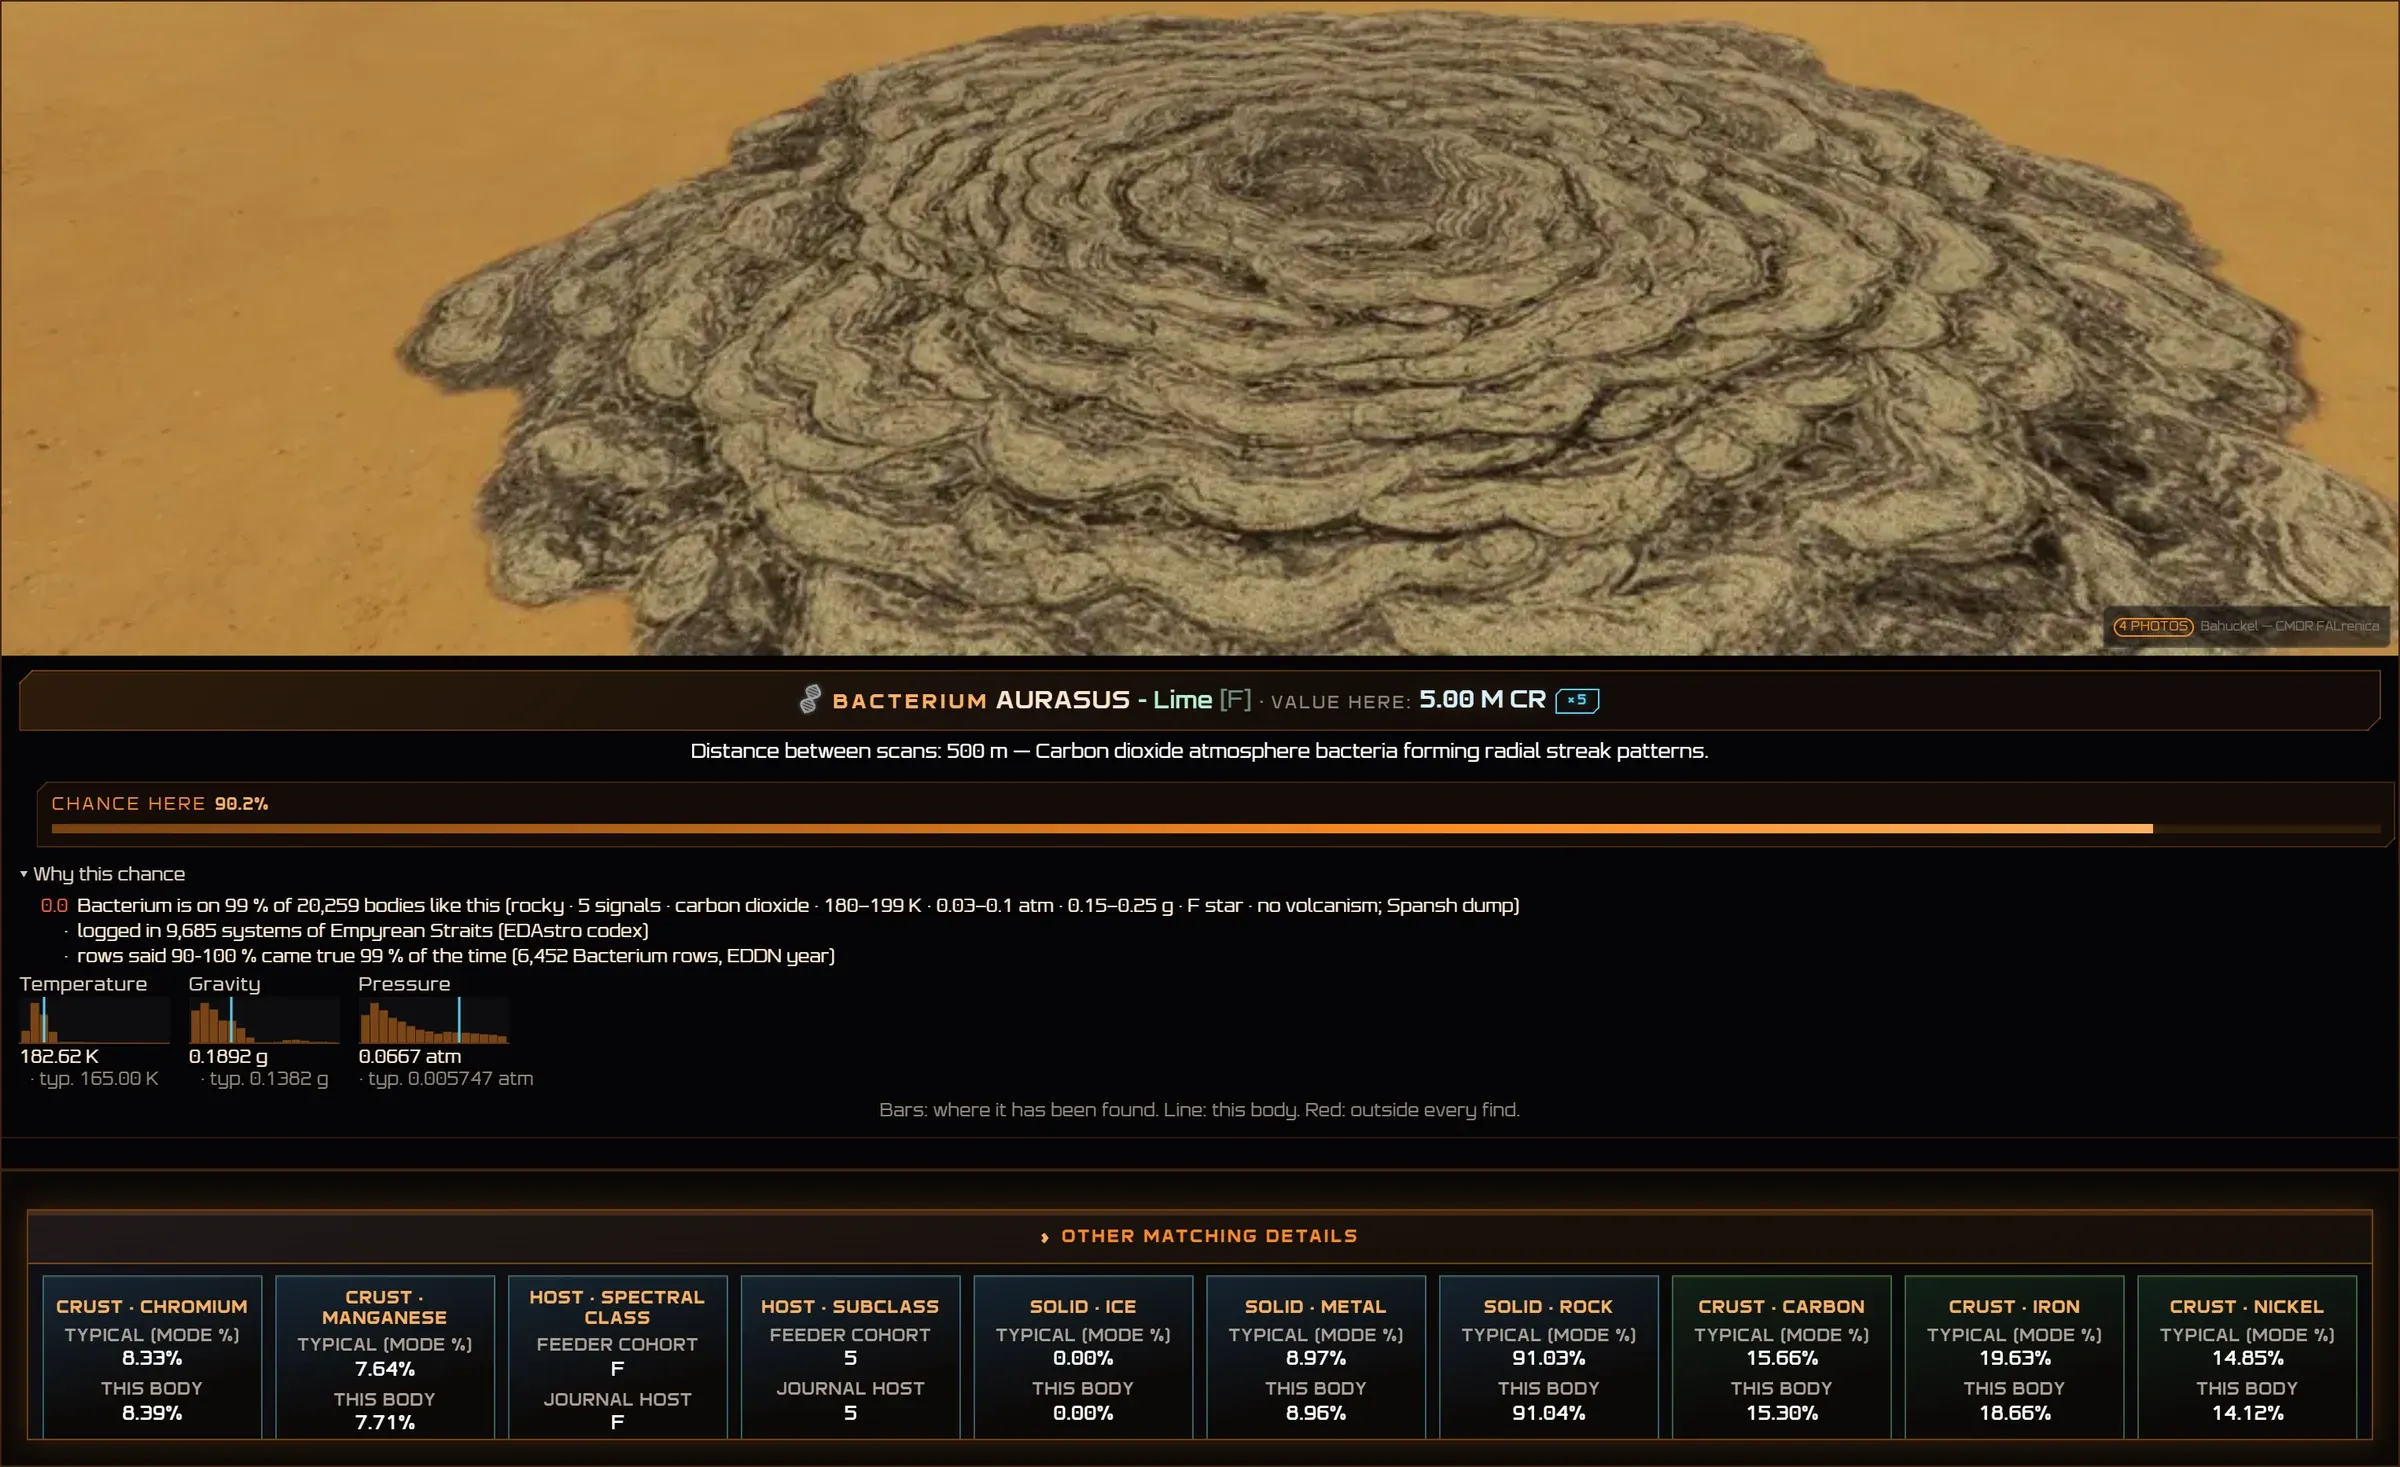
- Photograph. Of the species and colour, with who took it. Most were taken by commanders for the project.
- Species, colour and value here. With the clonal distance and what the plant looks like.
- Chance here. The same number as in the row.
- The reasons. How often this genus is on bodies like this one, how many systems of the region have it, and how often rows at this chance came true on a year of other commanders’ finds.
- Where it has been found. Temperature, gravity and pressure of every confirmed body as bars, this body as a line. Red would mean outside every find.
- Other matching details. Crust materials and the host star against what is typical for the species.
After sampling
The same window on body 2 c of Tegnae DG-X d1-9 once I had sampled all nine species. The signals are named, and each shows how far its sampling got.
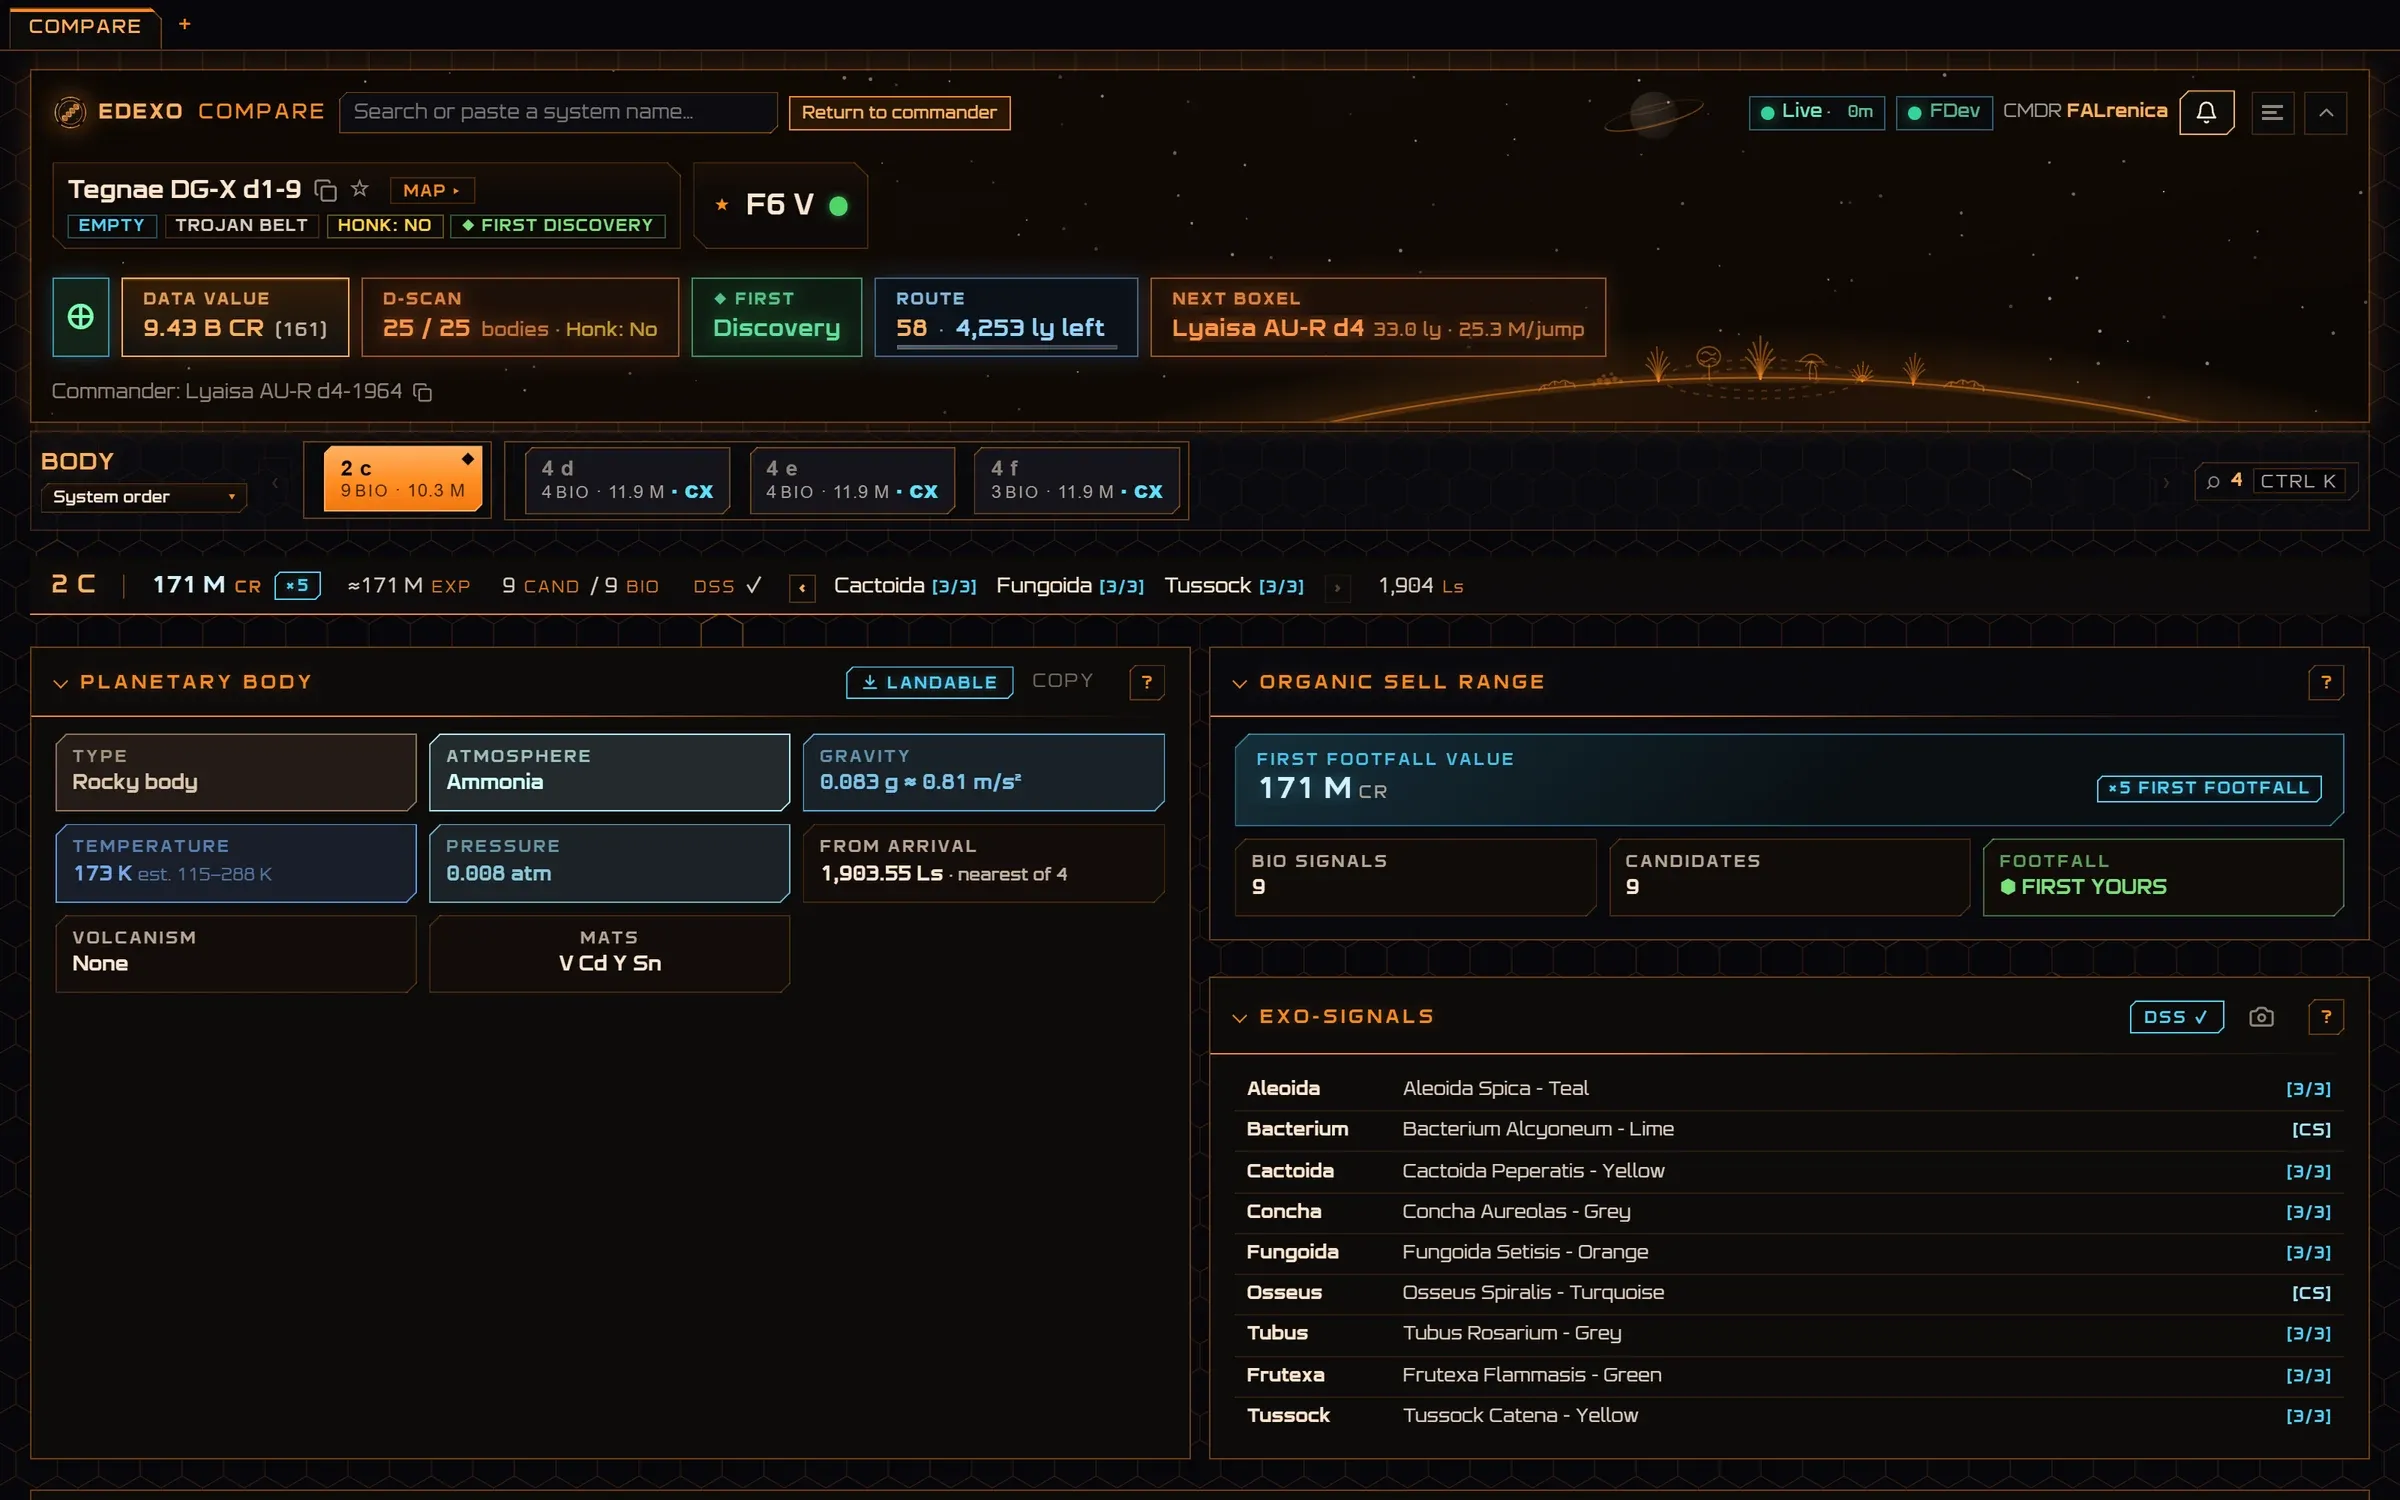
- Return to commander. Shown while you look at another system than the one you are in: one click back to your own.
- Commander. Where you are now, copied with one click.
- Sampled so far. The genera on this body with their progress, in the strip above the panels.
- Footfall. First footfall is yours here: every species pays five times its base.
- Each genus and its species. Named by the surface scan, its species by your samples.
- Progress. 3/3 analysed, CS where the composition scanner confirmed it without a sample on foot.
System map
MAP beside the system name, or the System map tab. Every body by class with its moons, drawn the way the system is built.
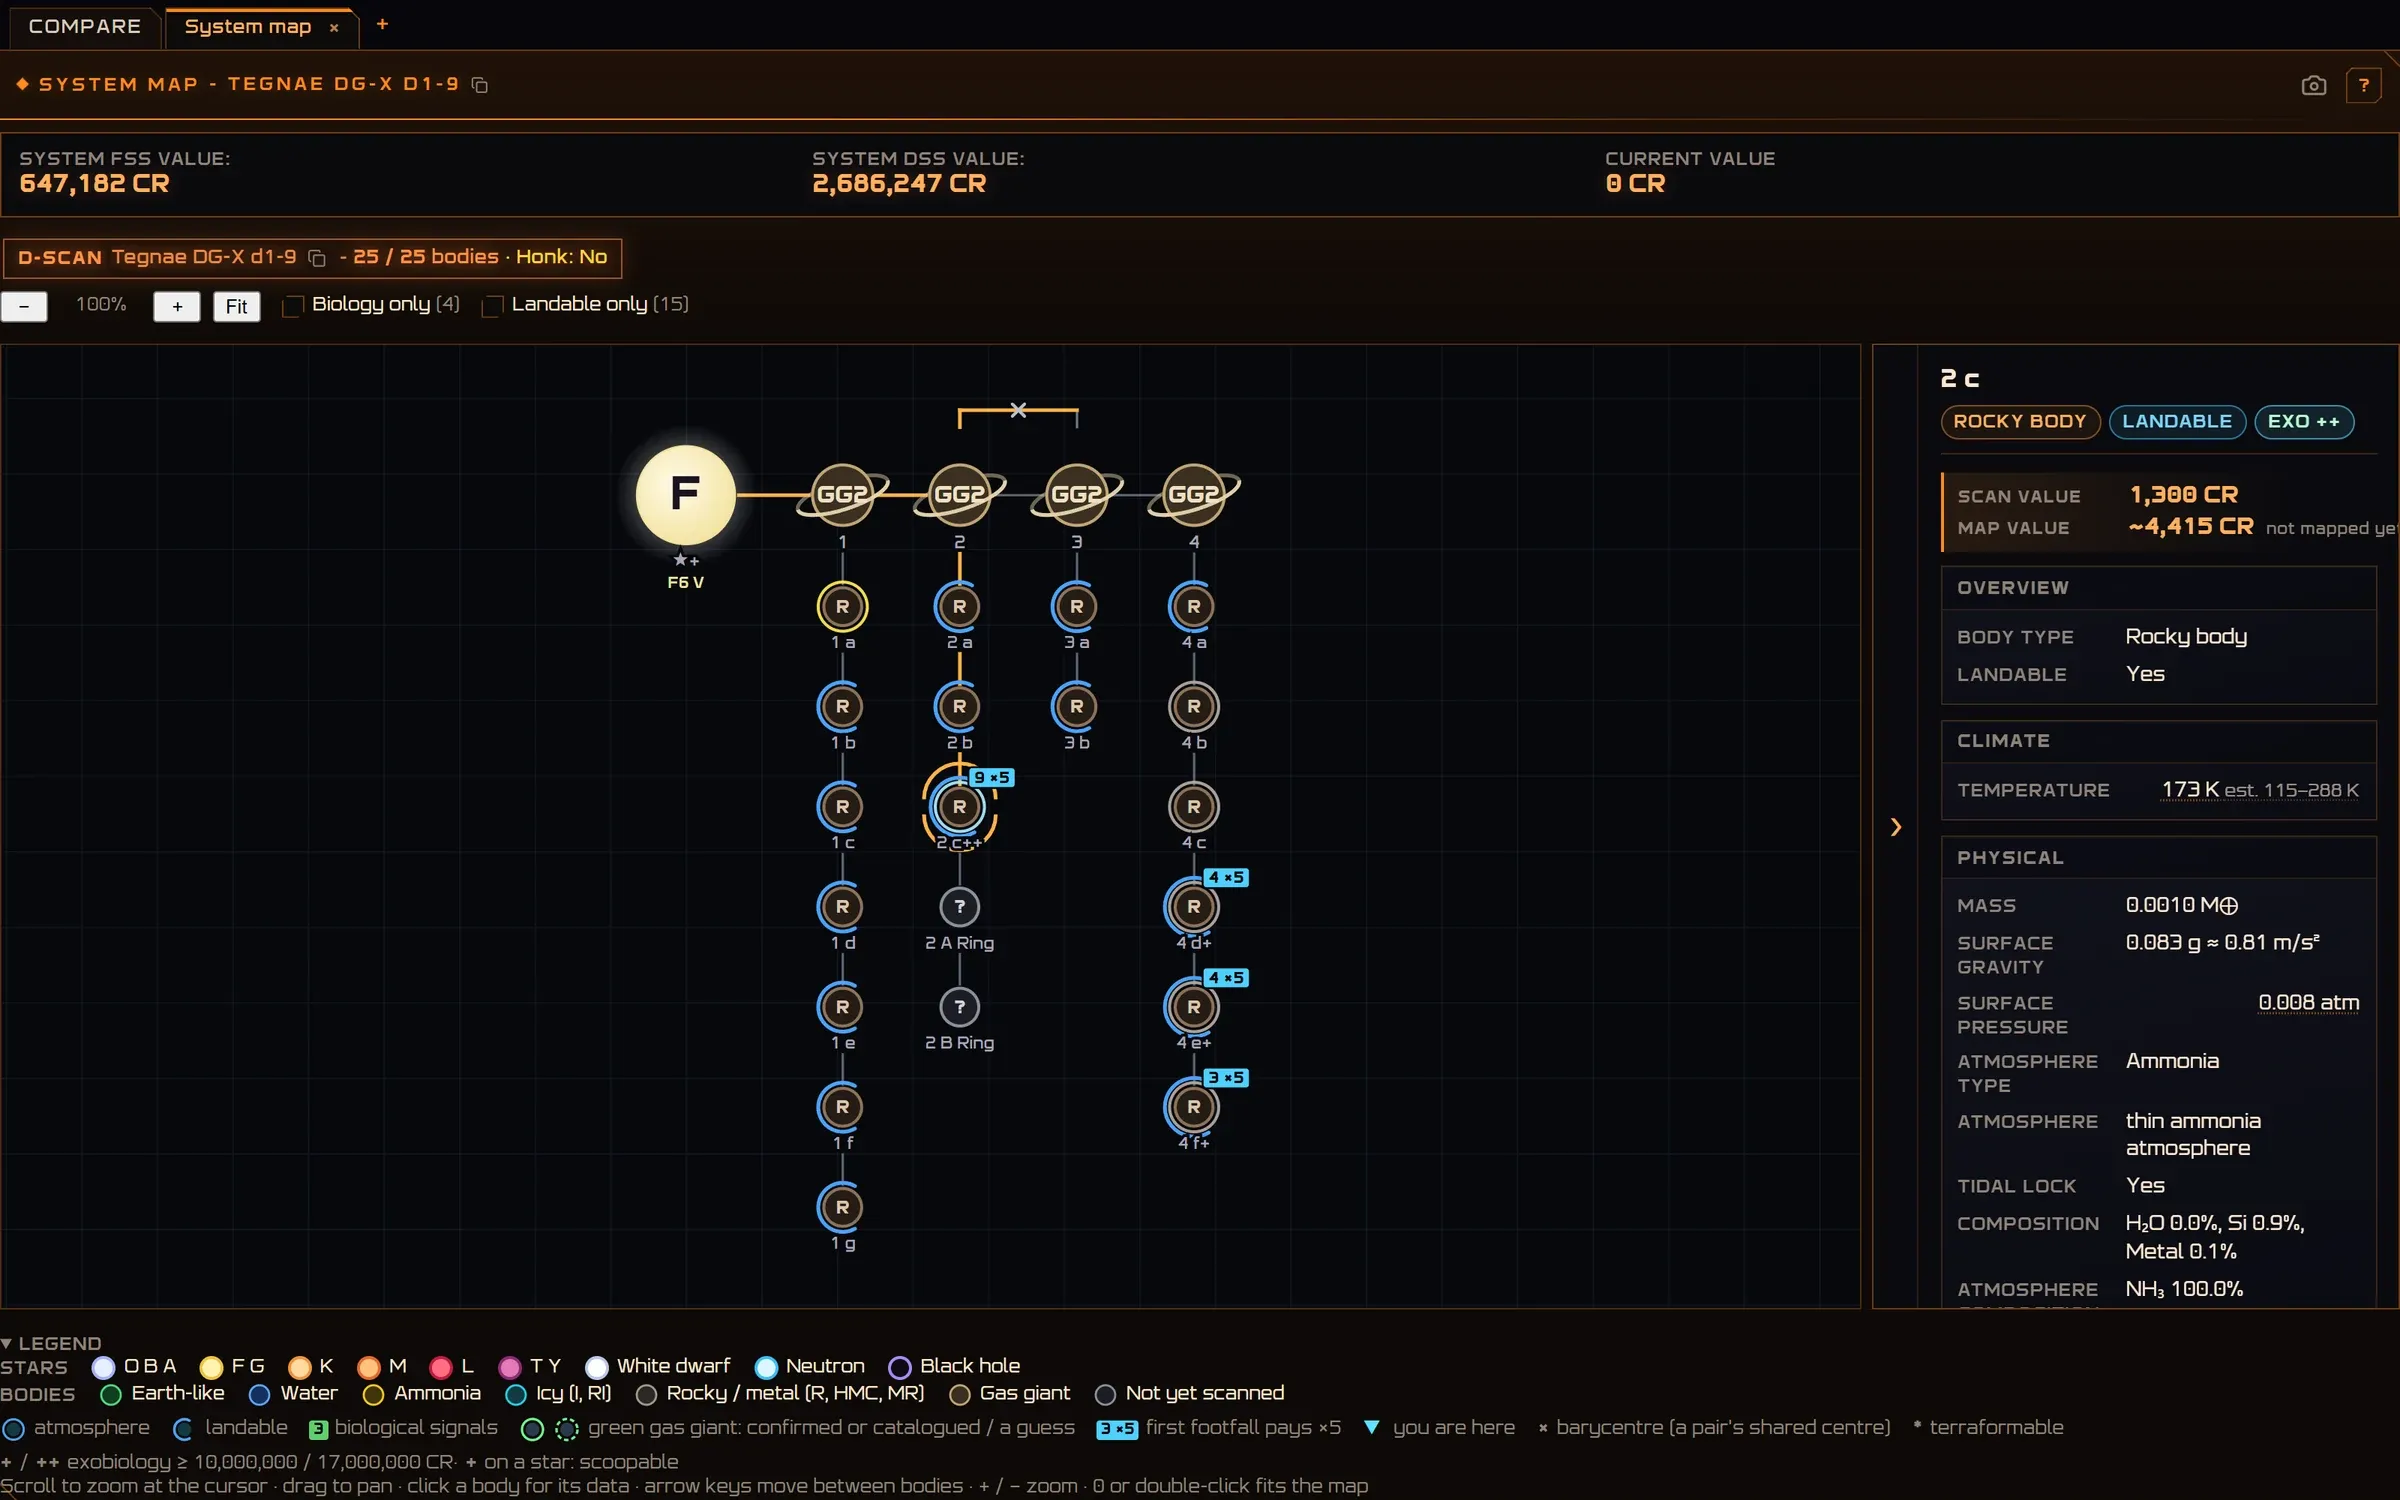
- System values. What the system pays for its discovery scans, for mapping, and what you hold of it now.
- Trim it. Zoom, fit, and show only bodies with biology or only landable ones.
- Stars and bodies. Coloured by class, moons hang under their planet, a bar joins a pair that orbit each other.
- Biology badges. Signal count and ×5 where first footfall still pays; ++ marks bodies worth 17 million or more.
- The picked body. Its scan and map value, climate and physical facts.
- Legend. Every colour and mark on the map, folded away when you know it.
Scan route
The system you are in, or any on your route, from above at true scale: the shortest way from the arrival star over the planets worth mapping and the biology worth sampling, and what the system pays. From the + tab menu or the menu.
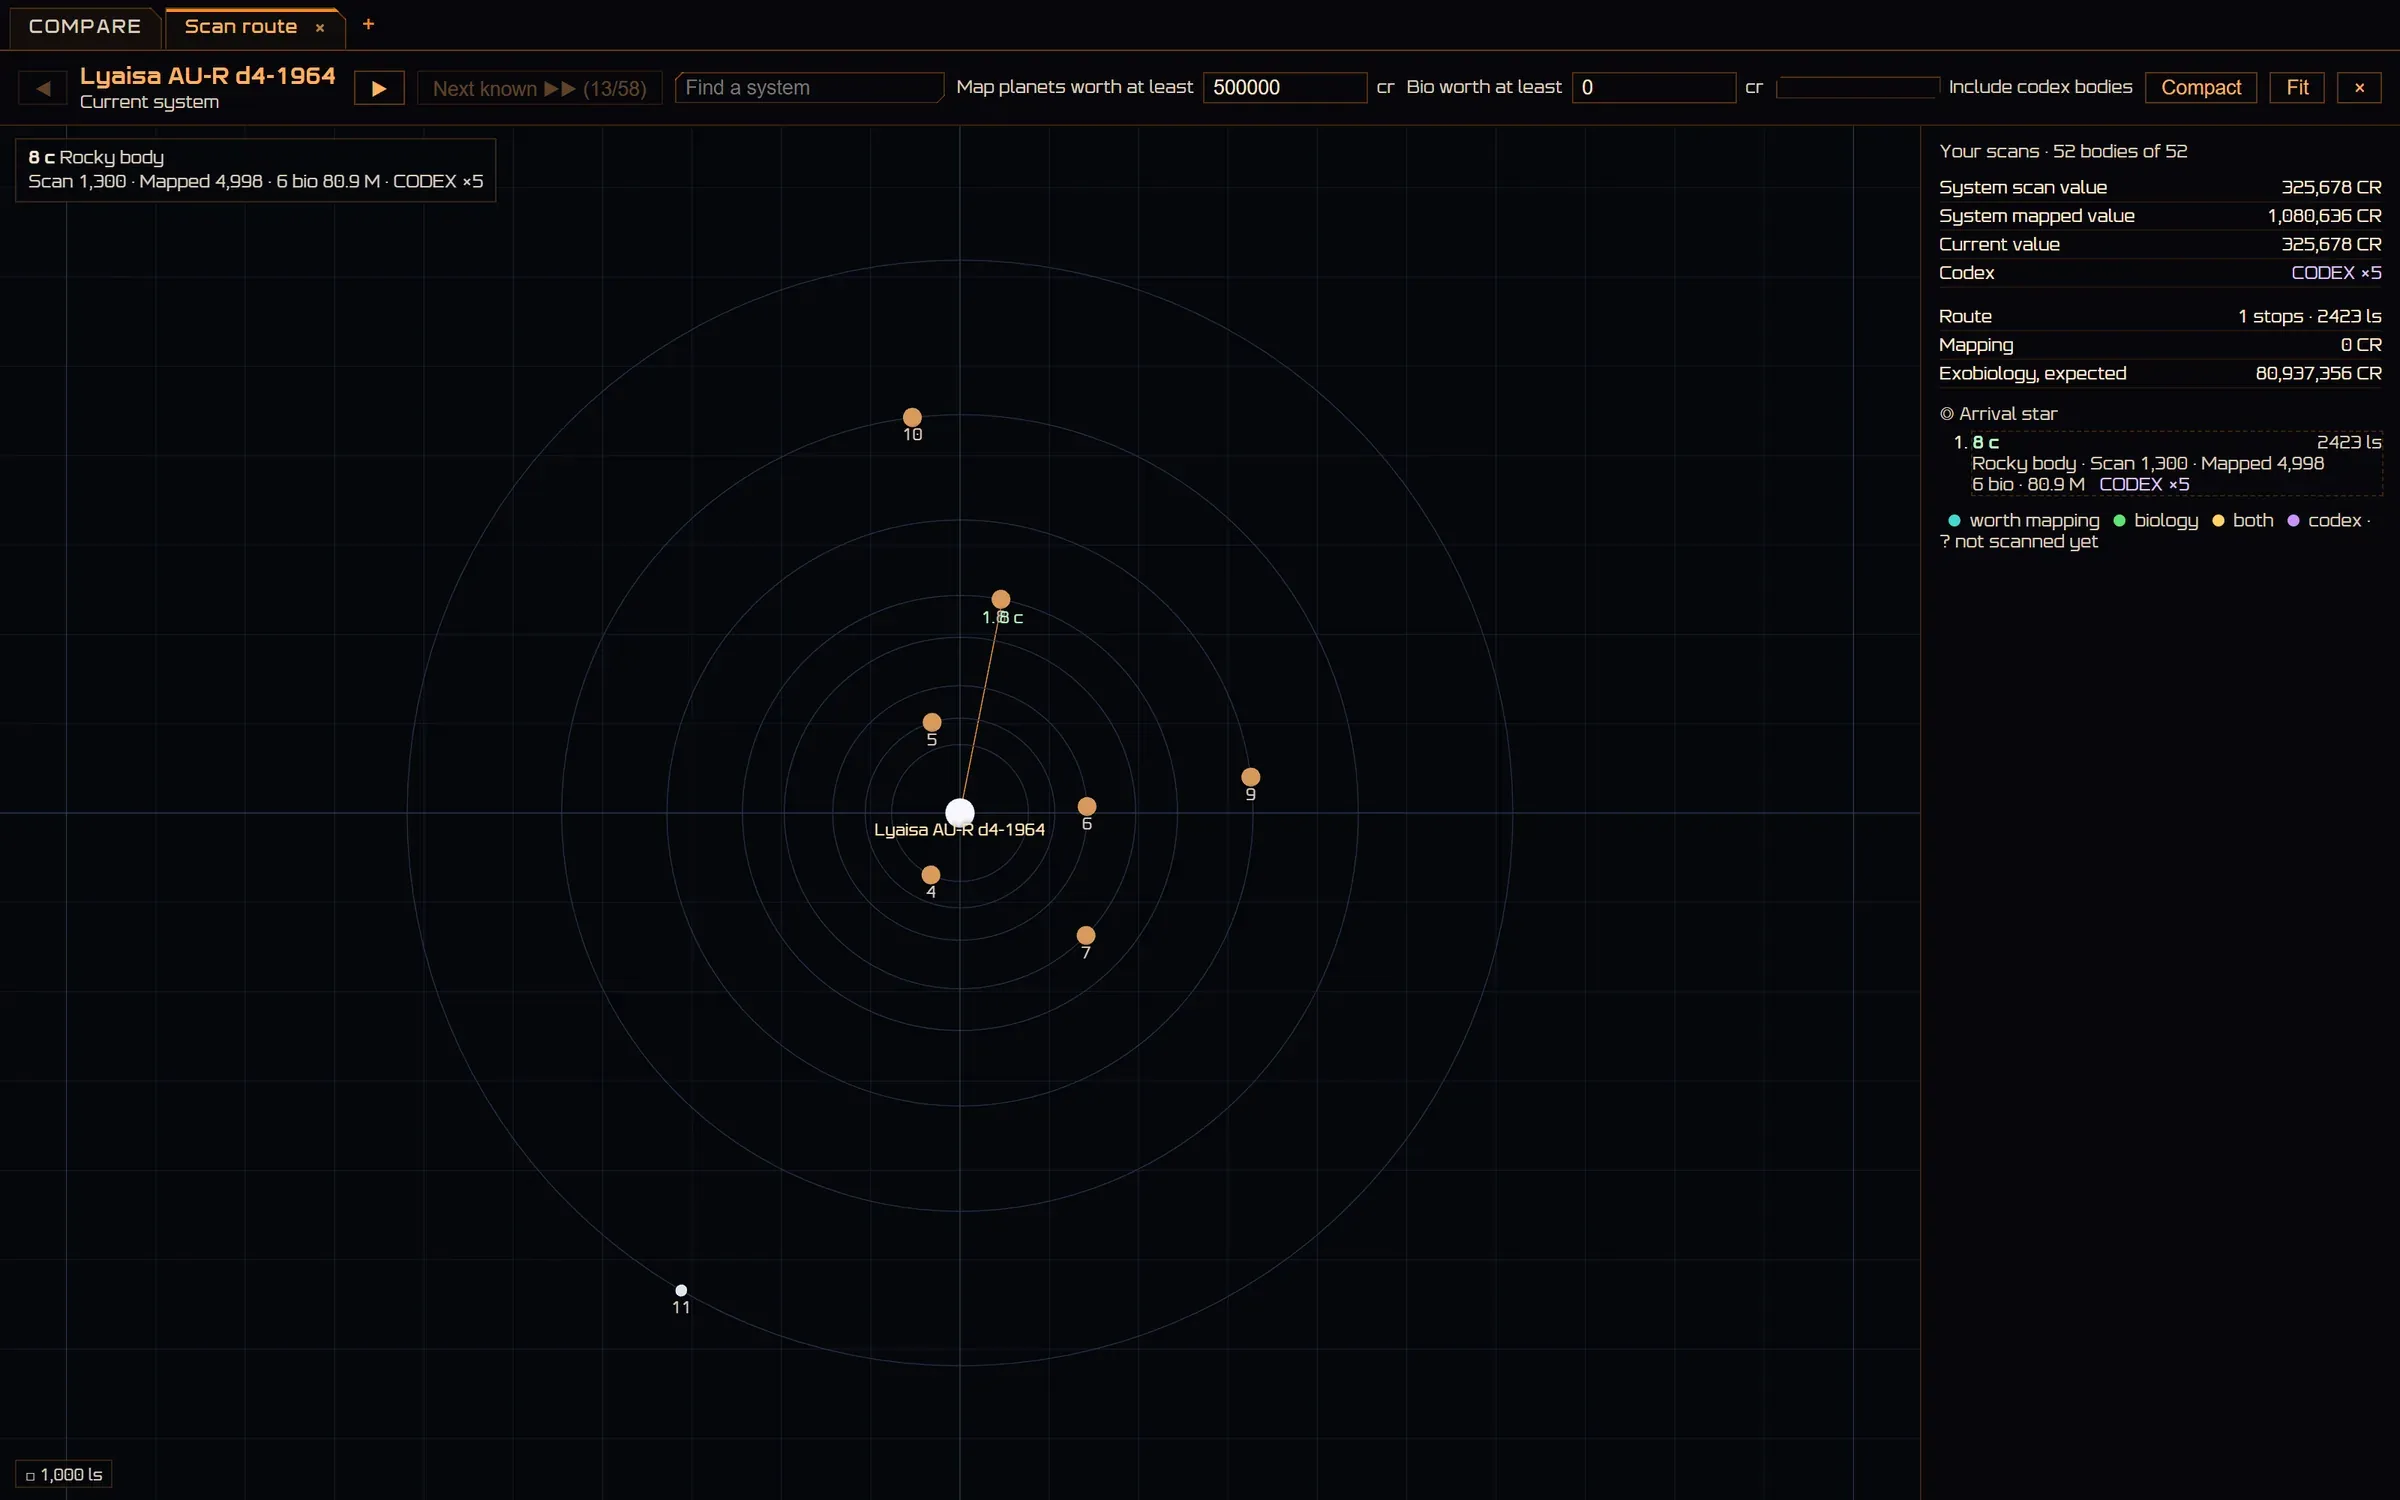
- The system. The current system, or step through your plotted route with the arrows.
- Next known. Skips to the next system on the route whose bodies are on record.
- Any system. Search one by name.
- Worth mapping. The value a planet must reach to be a stop.
- Biology. The expected exobiology a body needs to be a stop; 0 keeps every bio body.
- Codex bodies. A body with species missing from your codex for the region is a stop whatever it pays.
- Compact and Fit. Every orbit on a log scale, or the whole system framed.
- Hovered body. Its class, Scan and Mapped value, biology and codex count while you hover it; a click keeps it until another system is shown.
- The route. From the arrival star to each stop in the shortest order, numbered.
- What it pays. Every body scanned, every planet worth mapping mapped, and what your own scans sell for now.
- CODEX ×N. The likeliest species on each body that your codex for this region lacks.
- The route in numbers. Stops, distance, mapping value and the expected exobiology.
- Each stop. Leg distance, class, Scan and Mapped value, biology and codex. Hover for the card, click to keep it and turn the view to it.
- Colours and ?. Worth mapping, biology, both, codex; bodies the honk counted that nobody has scanned wait on an outer ring as ?. Bodies others discovered are filled in from EDSM and Spansh.
- Grid. The size of one square, from 1 ls up as you zoom out.
Galaxy map
A 3D map of the Milky Way with all 5.4 million systems where biology has been recorded, your own travels on top. The icons at the top left open its menus; each has its own help.
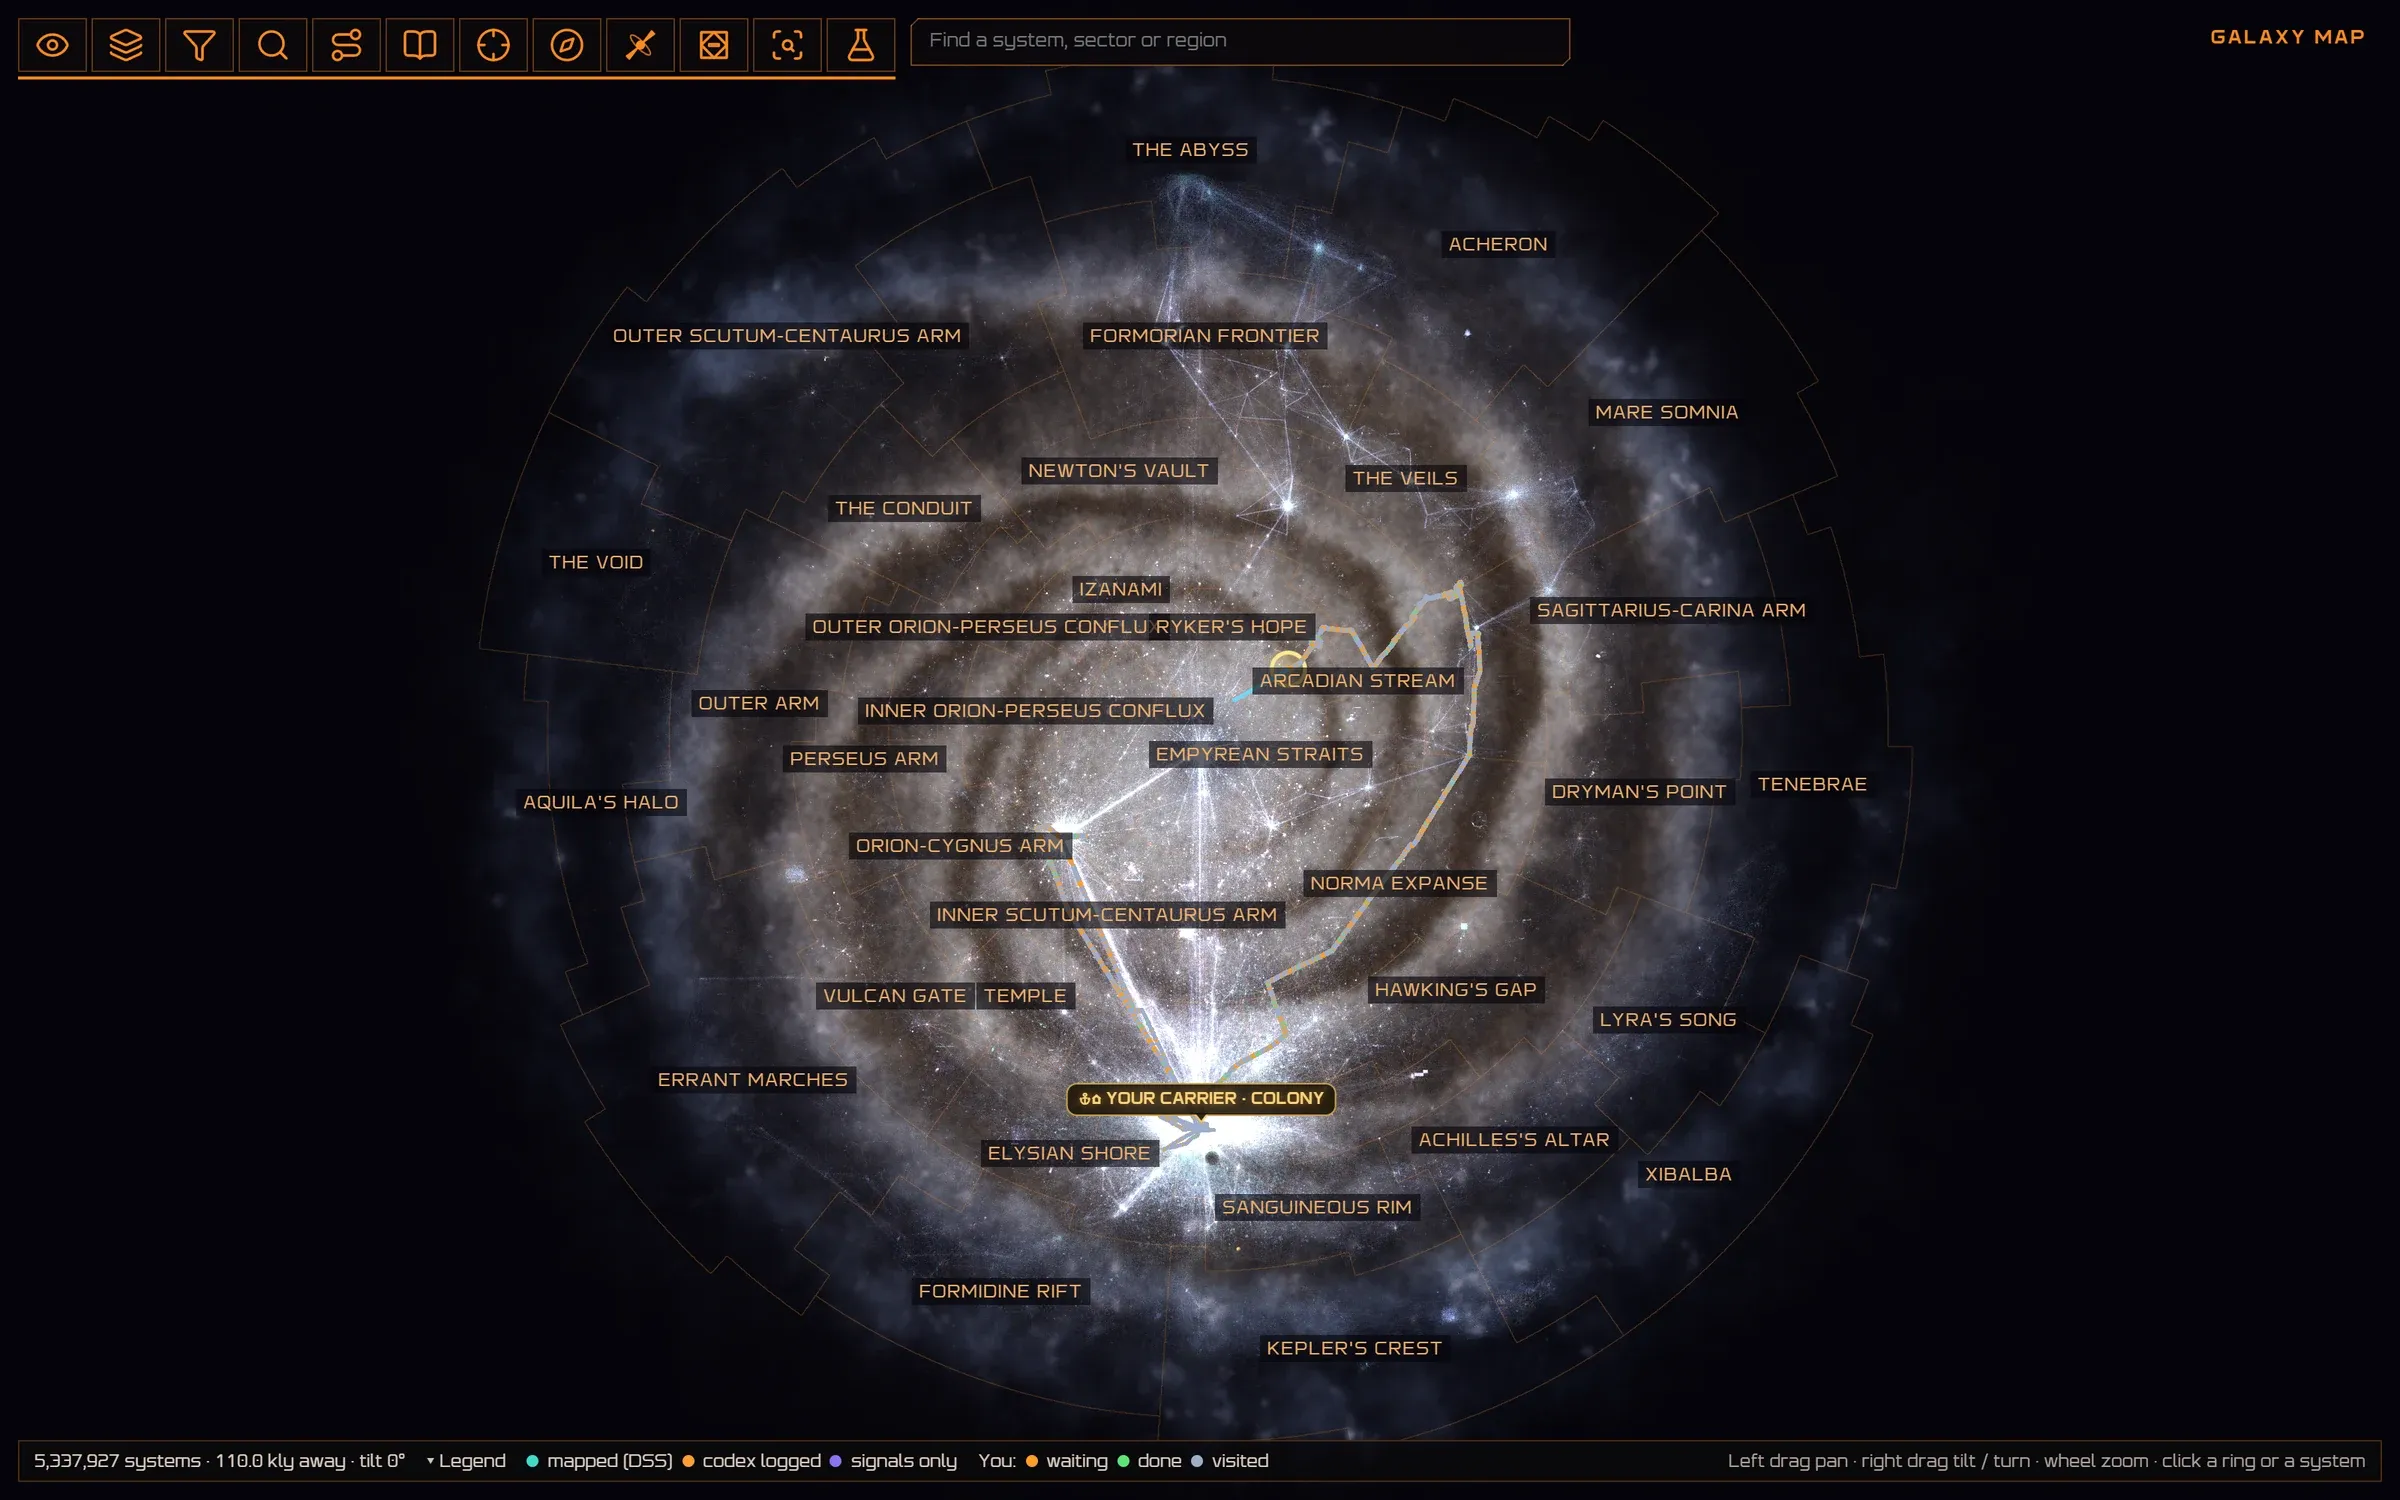
- Menus. View, Layers, Filter, Search, NavRoute, Codex, Targets, Expedition, Neutron, Carriers & Stations, Colonisation candidate search, Laboratory.
- Find. A system, a sector or a region by name; the map flies to it.
- Regions. The game’s regions with their borders. Click a ring to zoom into a group of systems, a system for its card.
- Your travels. Systems you have visited, coloured by what is still waiting there.
- Your assets. Your fleet carrier and colonies, marked where they are.
- Status bar. Systems loaded, distance, tilt and the legend of the colours.
Filter
Light every system with a species, a star or a planet you tick. Here, every Stratum species.
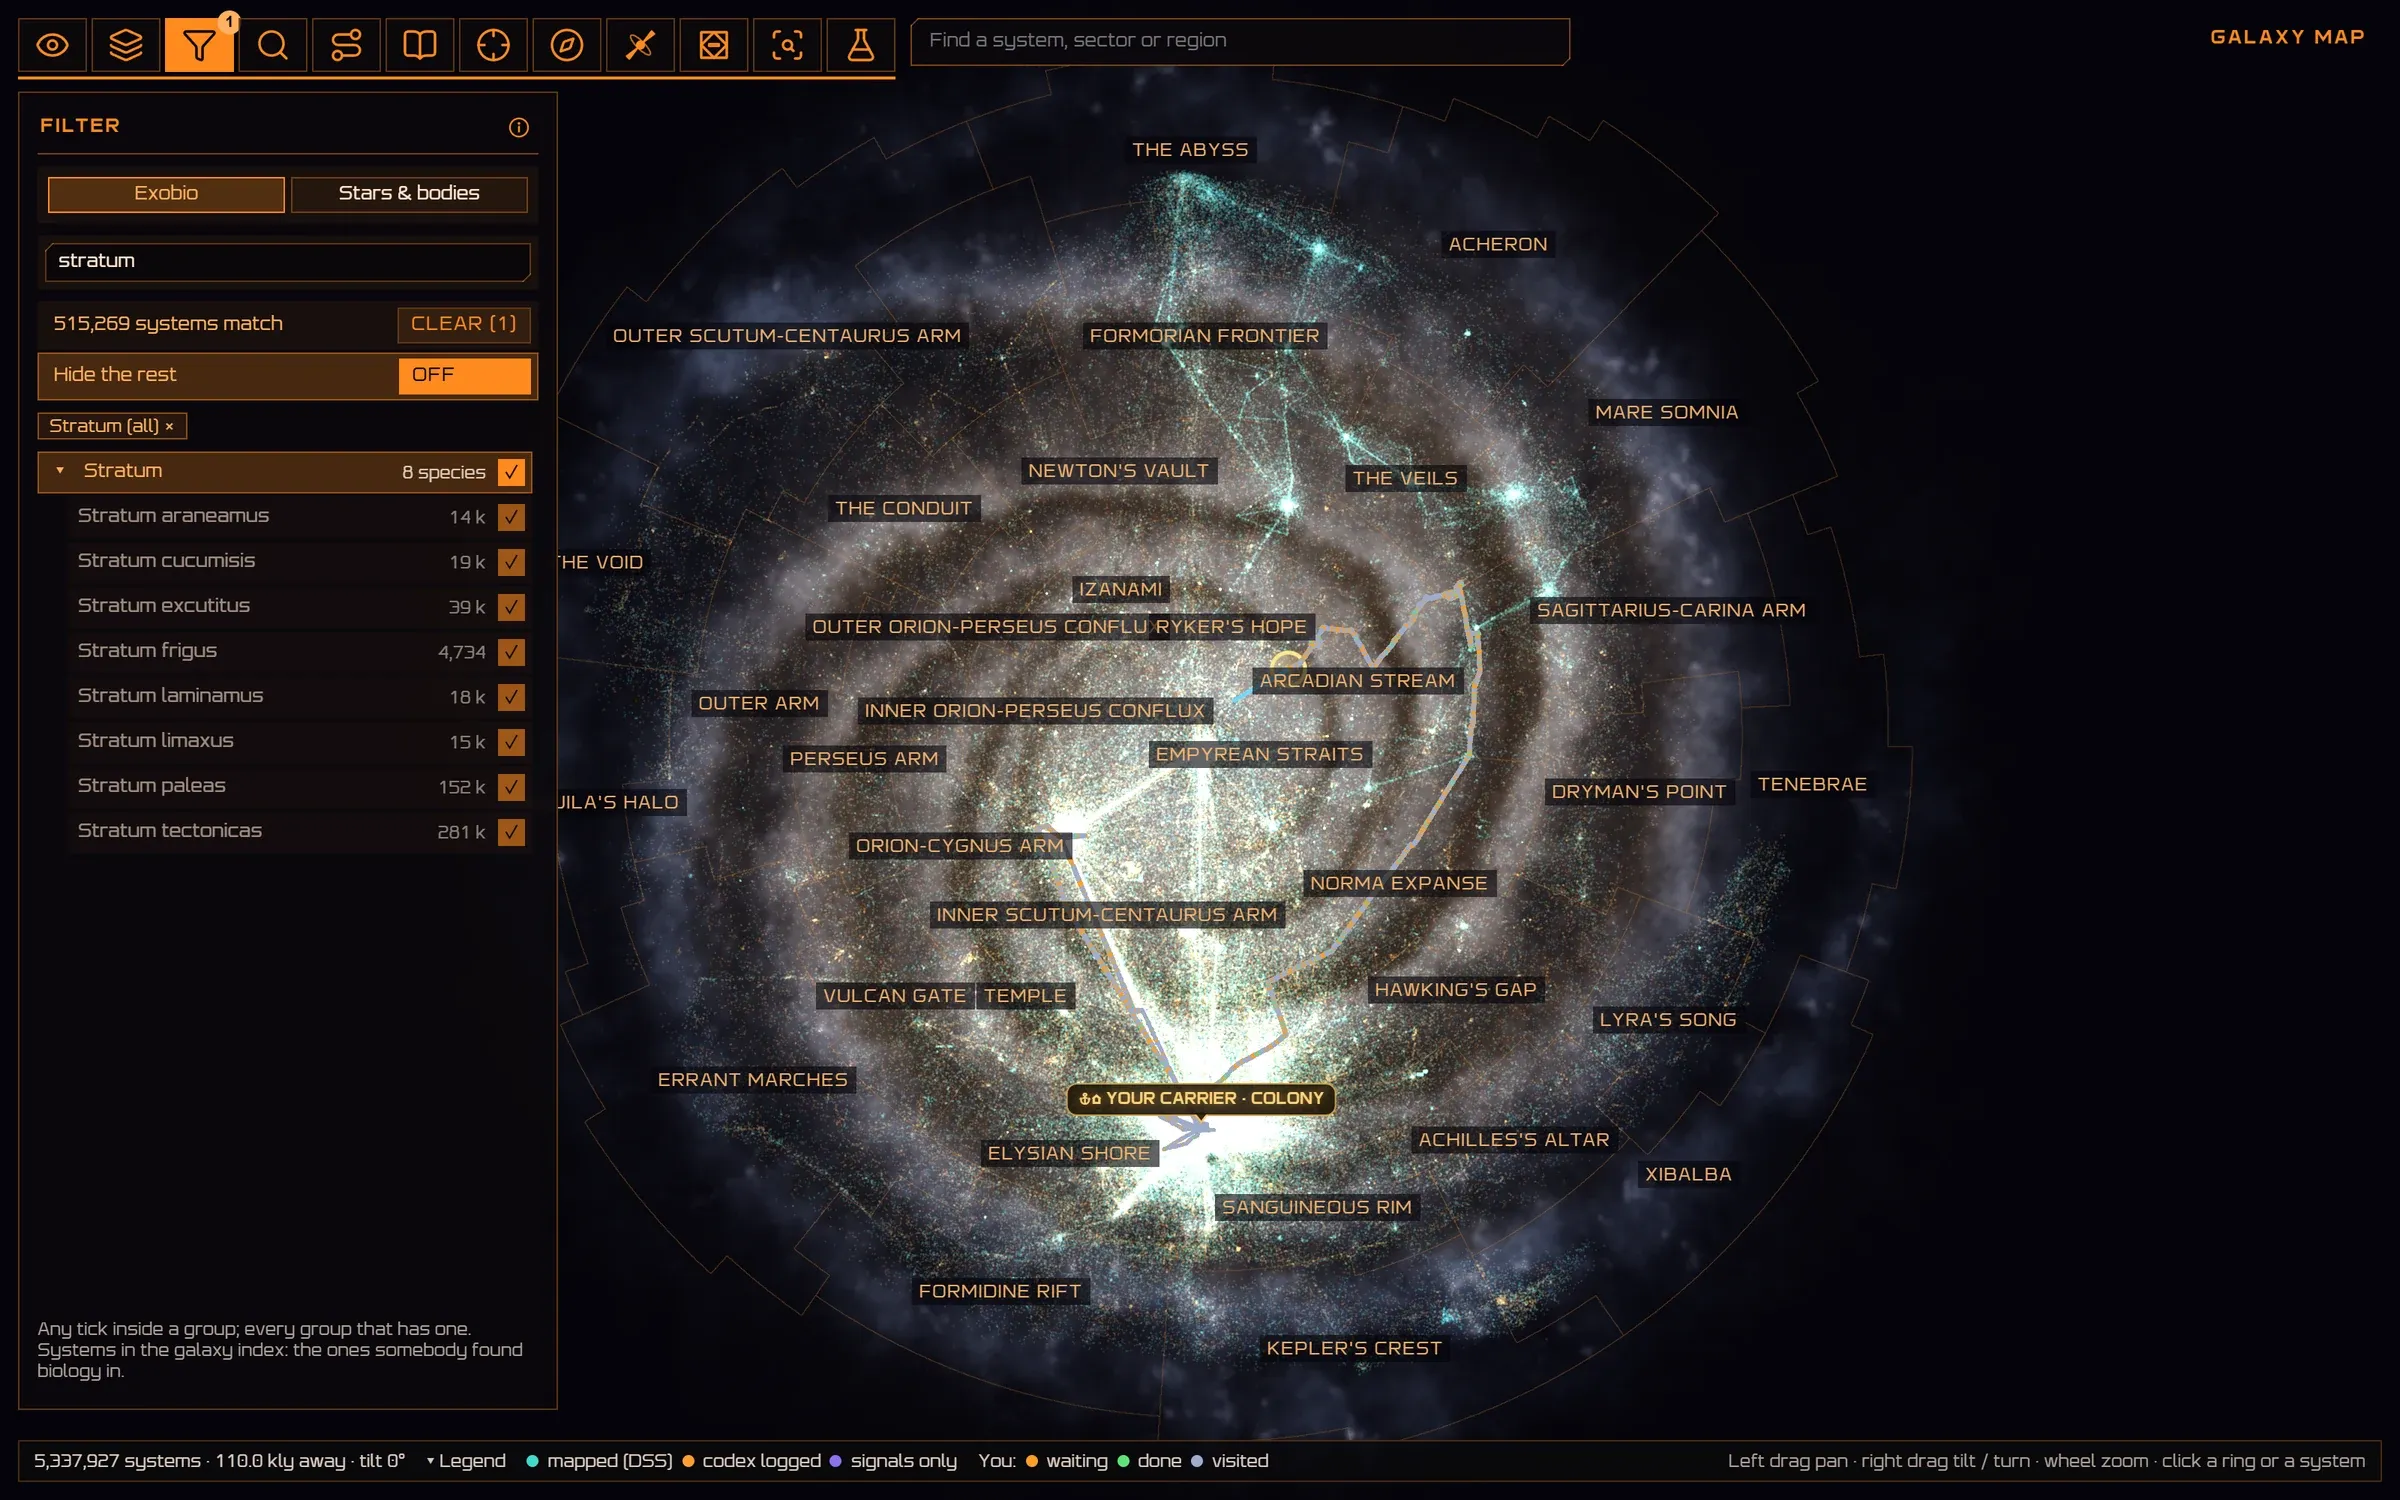
- Exobio or stars and bodies. Two lists; a search narrows both.
- Matches. 515,269 systems with any Stratum, and a switch to hide the rest.
- Ticks. A genus or single species, with how many systems each has.
- Lit. The map shows where they grow.
Codex
Your codex region by region: what you have logged of what is known there.
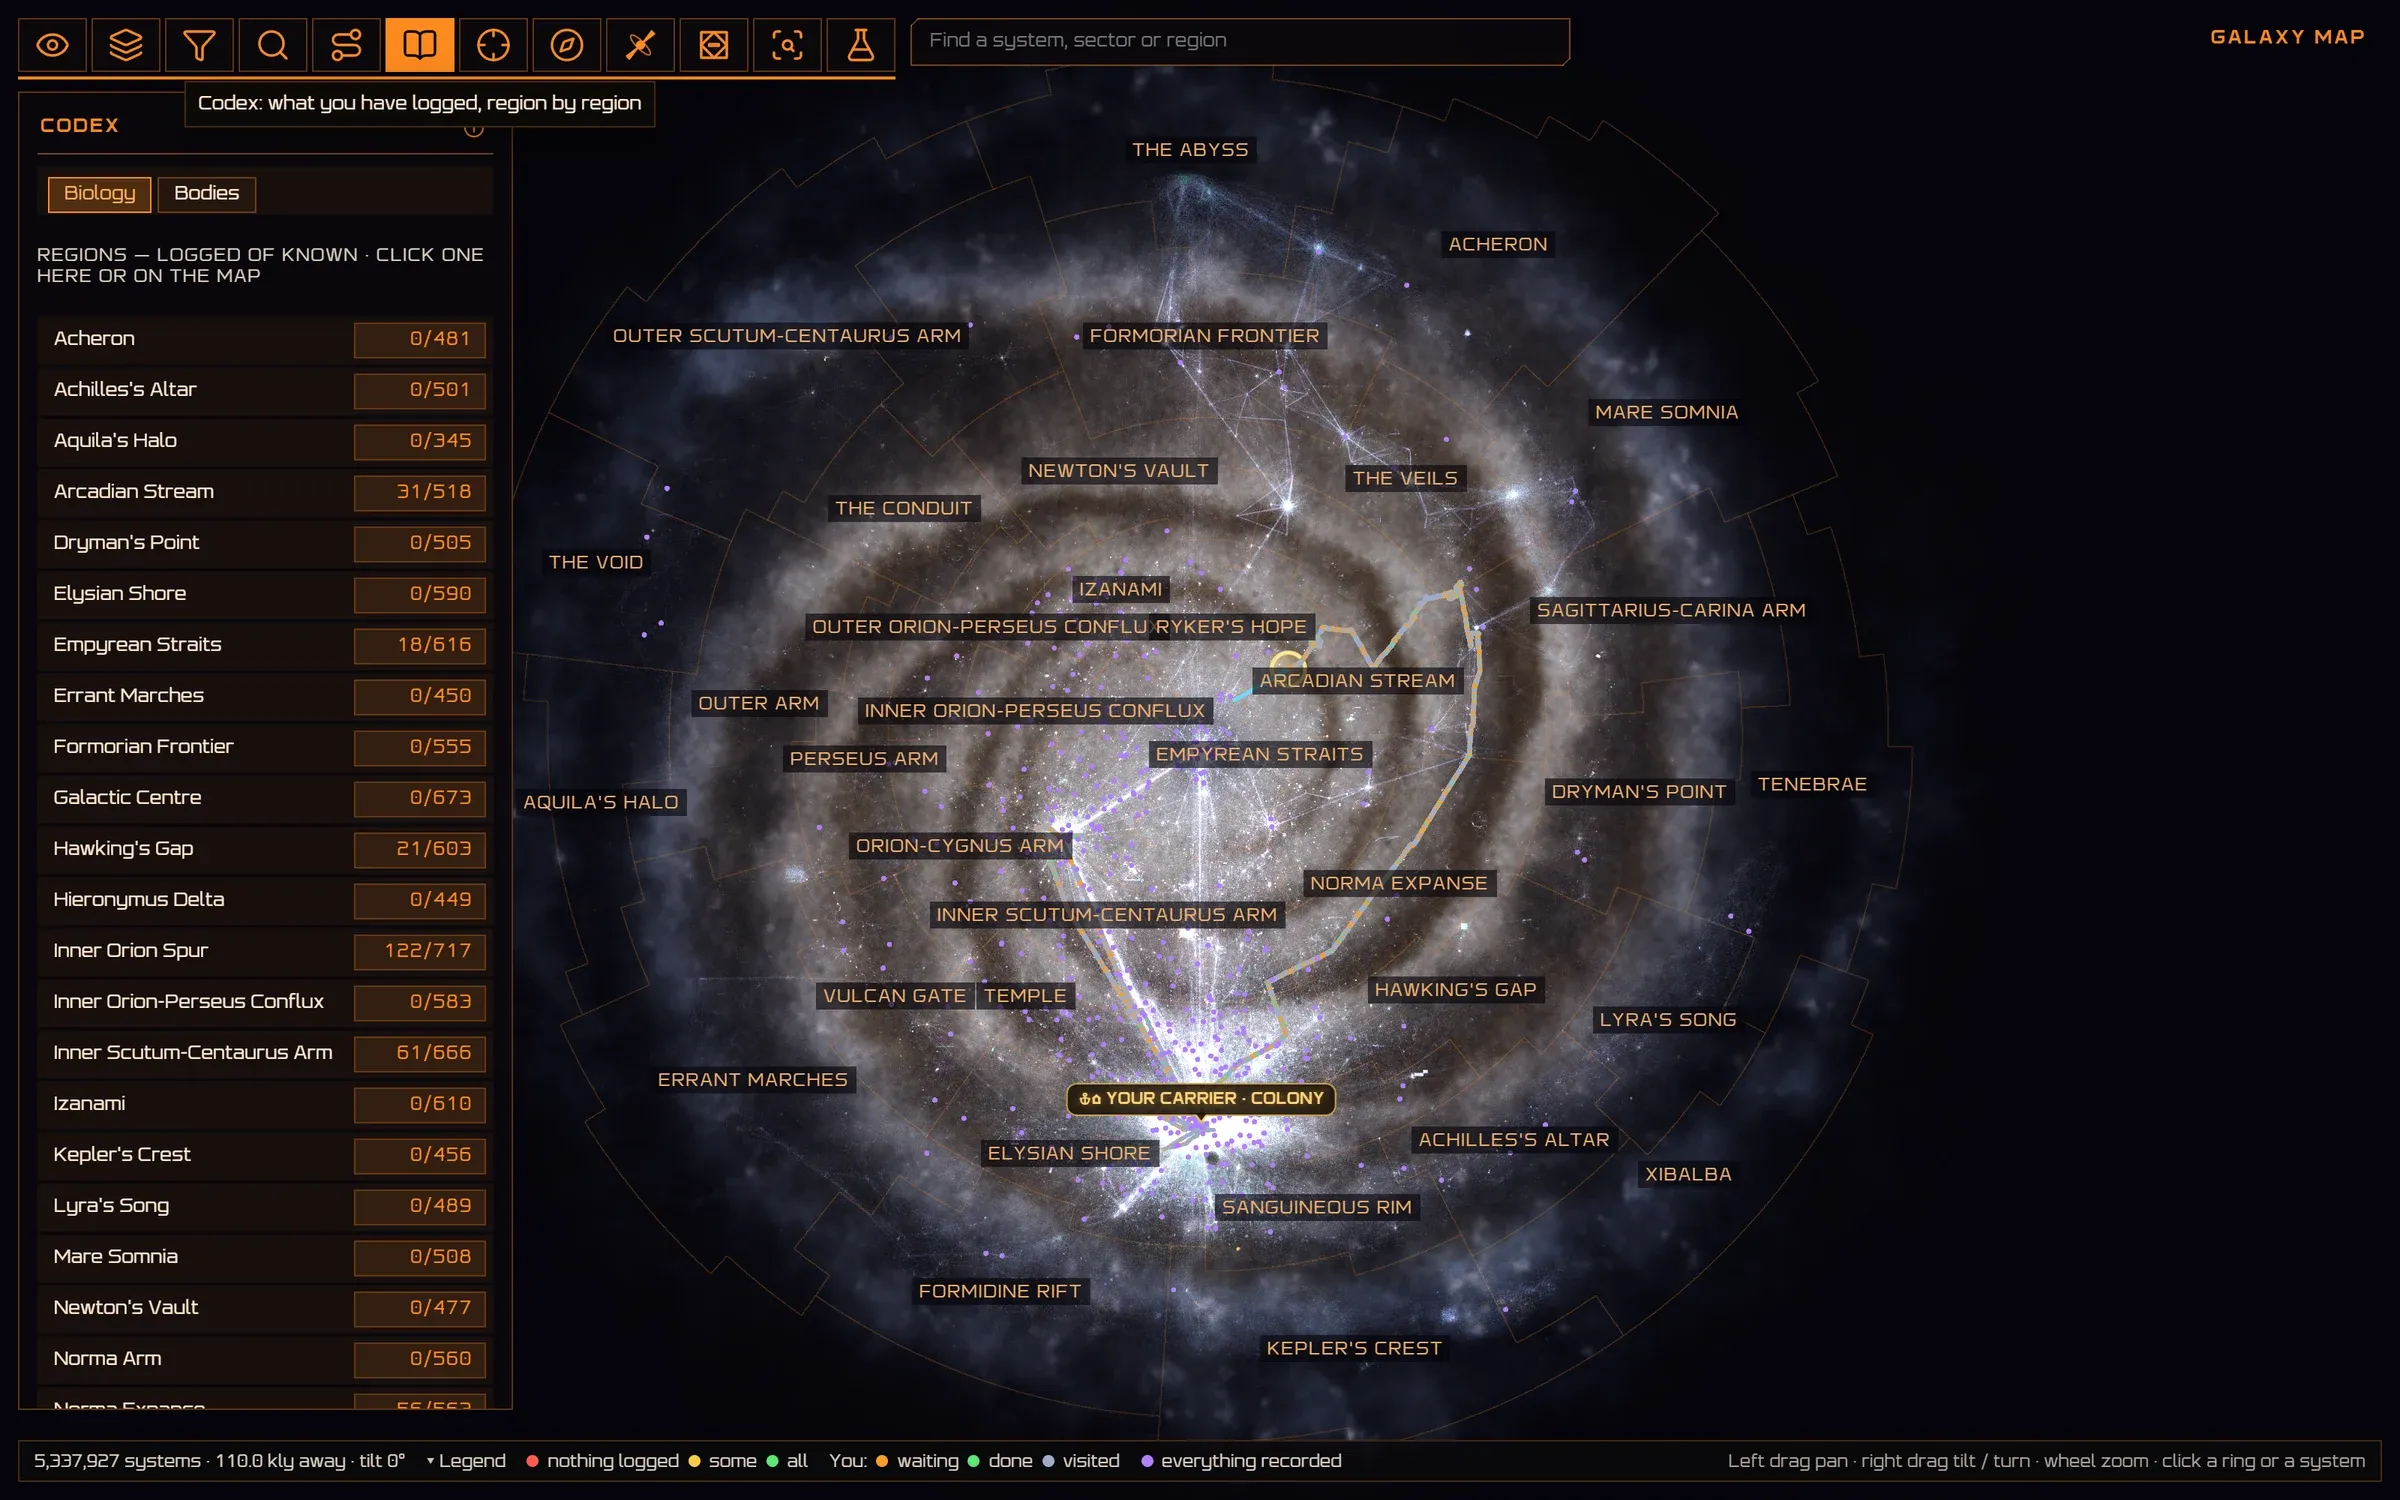
- Biology or bodies. Two codex views.
- Each region. Logged against known. Pick one for what other commanders logged there that you lack, rarest first.
- Colours. Nothing logged, some, all.
Neutron route
A route through neutron stars to one or more systems, any system as a stop, planned for your ship as it is: its range and fuel from the drive’s own figures, its supercharge, the tank, and the FSD’s wear. Keep in the tank sets a share of the tank no jump arrives under. Flown, it plans again when you leave it or when the fuel aboard is a jump off the plan, a star scooped between neutron jumps for one.
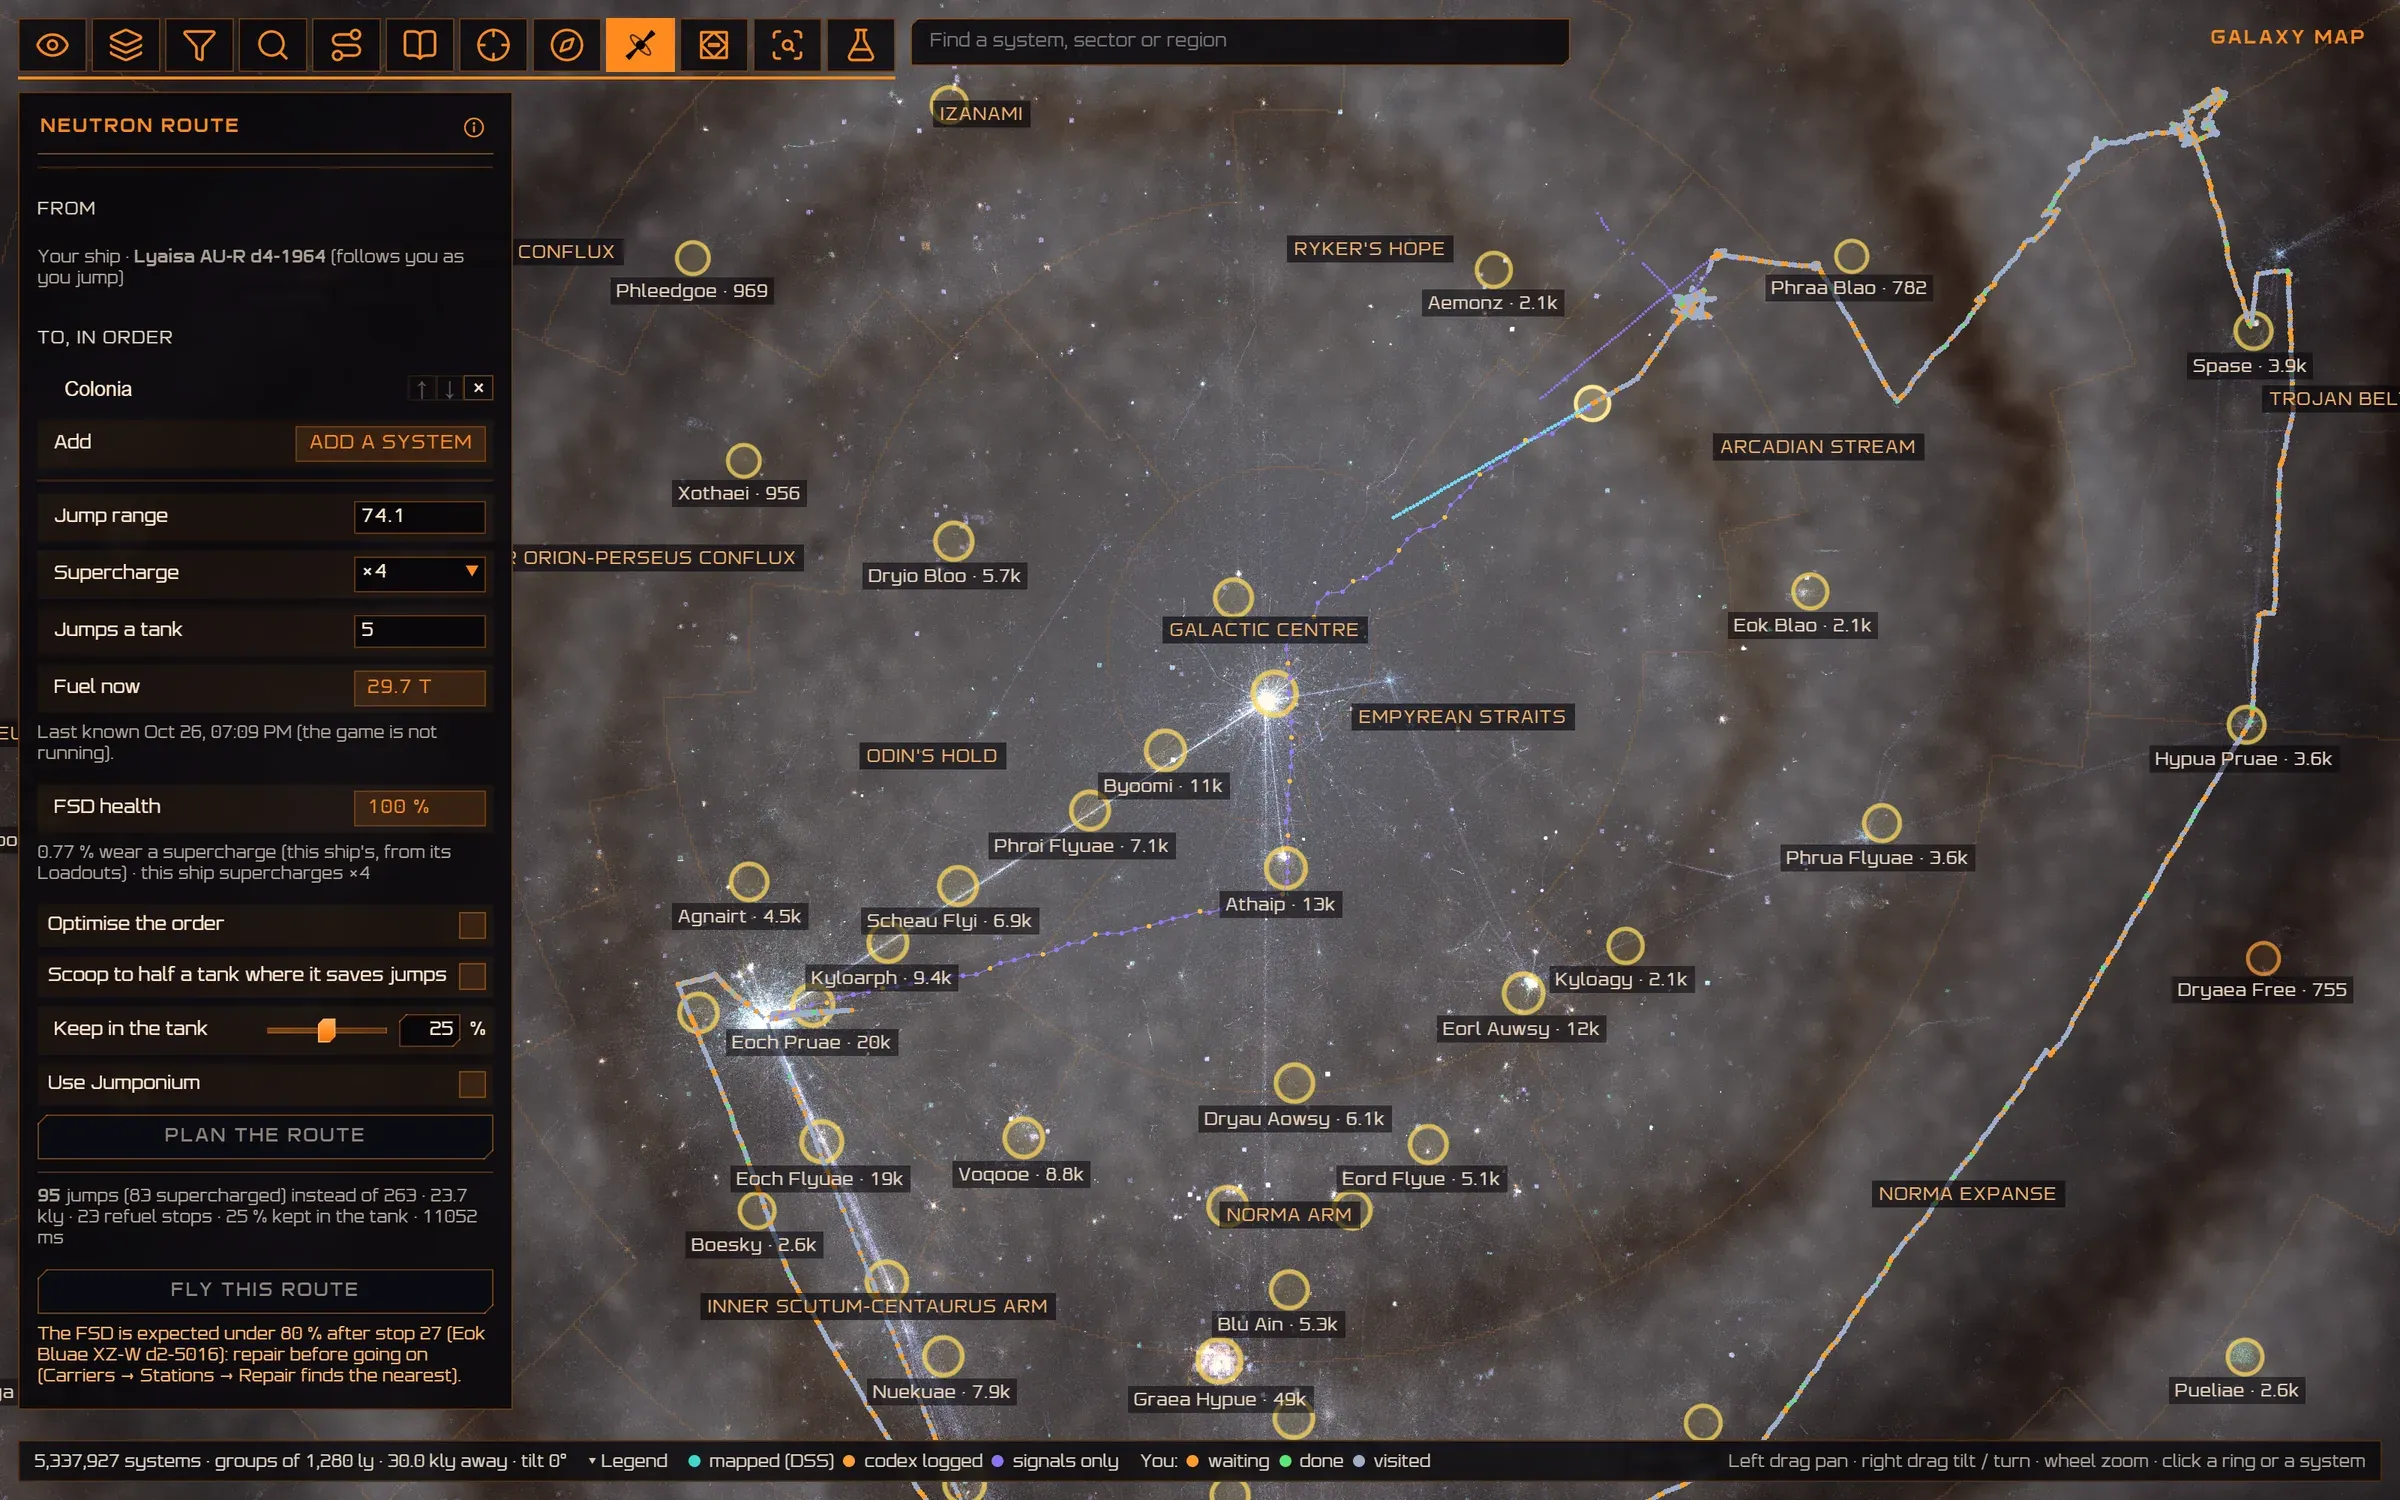
- From. Your ship, and it follows you as you jump.
- Stops. Any system, one or more, in order.
- Your ship. Jump range, supercharge ×4 or ×6, jumps a tank and FSD health, read from the journal; type over any.
- Fuel now. The tank the plan starts from: live while the game runs, else the last your journals recorded, and when.
- Options. Optimise the order, scoop to half a tank where a lighter ship saves jumps, and jumponium. Each shows a tick when on.
- Keep in the tank. The share of the tank no jump may arrive under, 0 to 50 %: 0 is the fastest, more is calmer.
- The plan. 95 jumps instead of 263 to Colonia, refuel stops, and the reserve kept.
- FSD wear. Where the drive is expected under 80 %, and the nearest place to repair it.
- On the map. The route stays drawn whichever menu is open, a dot on every stop: violet a neutron star, amber a refuel stop, white your own stops. Hover one for what to do there.
Carriers & Stations
The nearest fleet carriers and stations from the system you picked, else your ship, and where to buy Tritium. The same lists as the screen of its own further down, on the map.
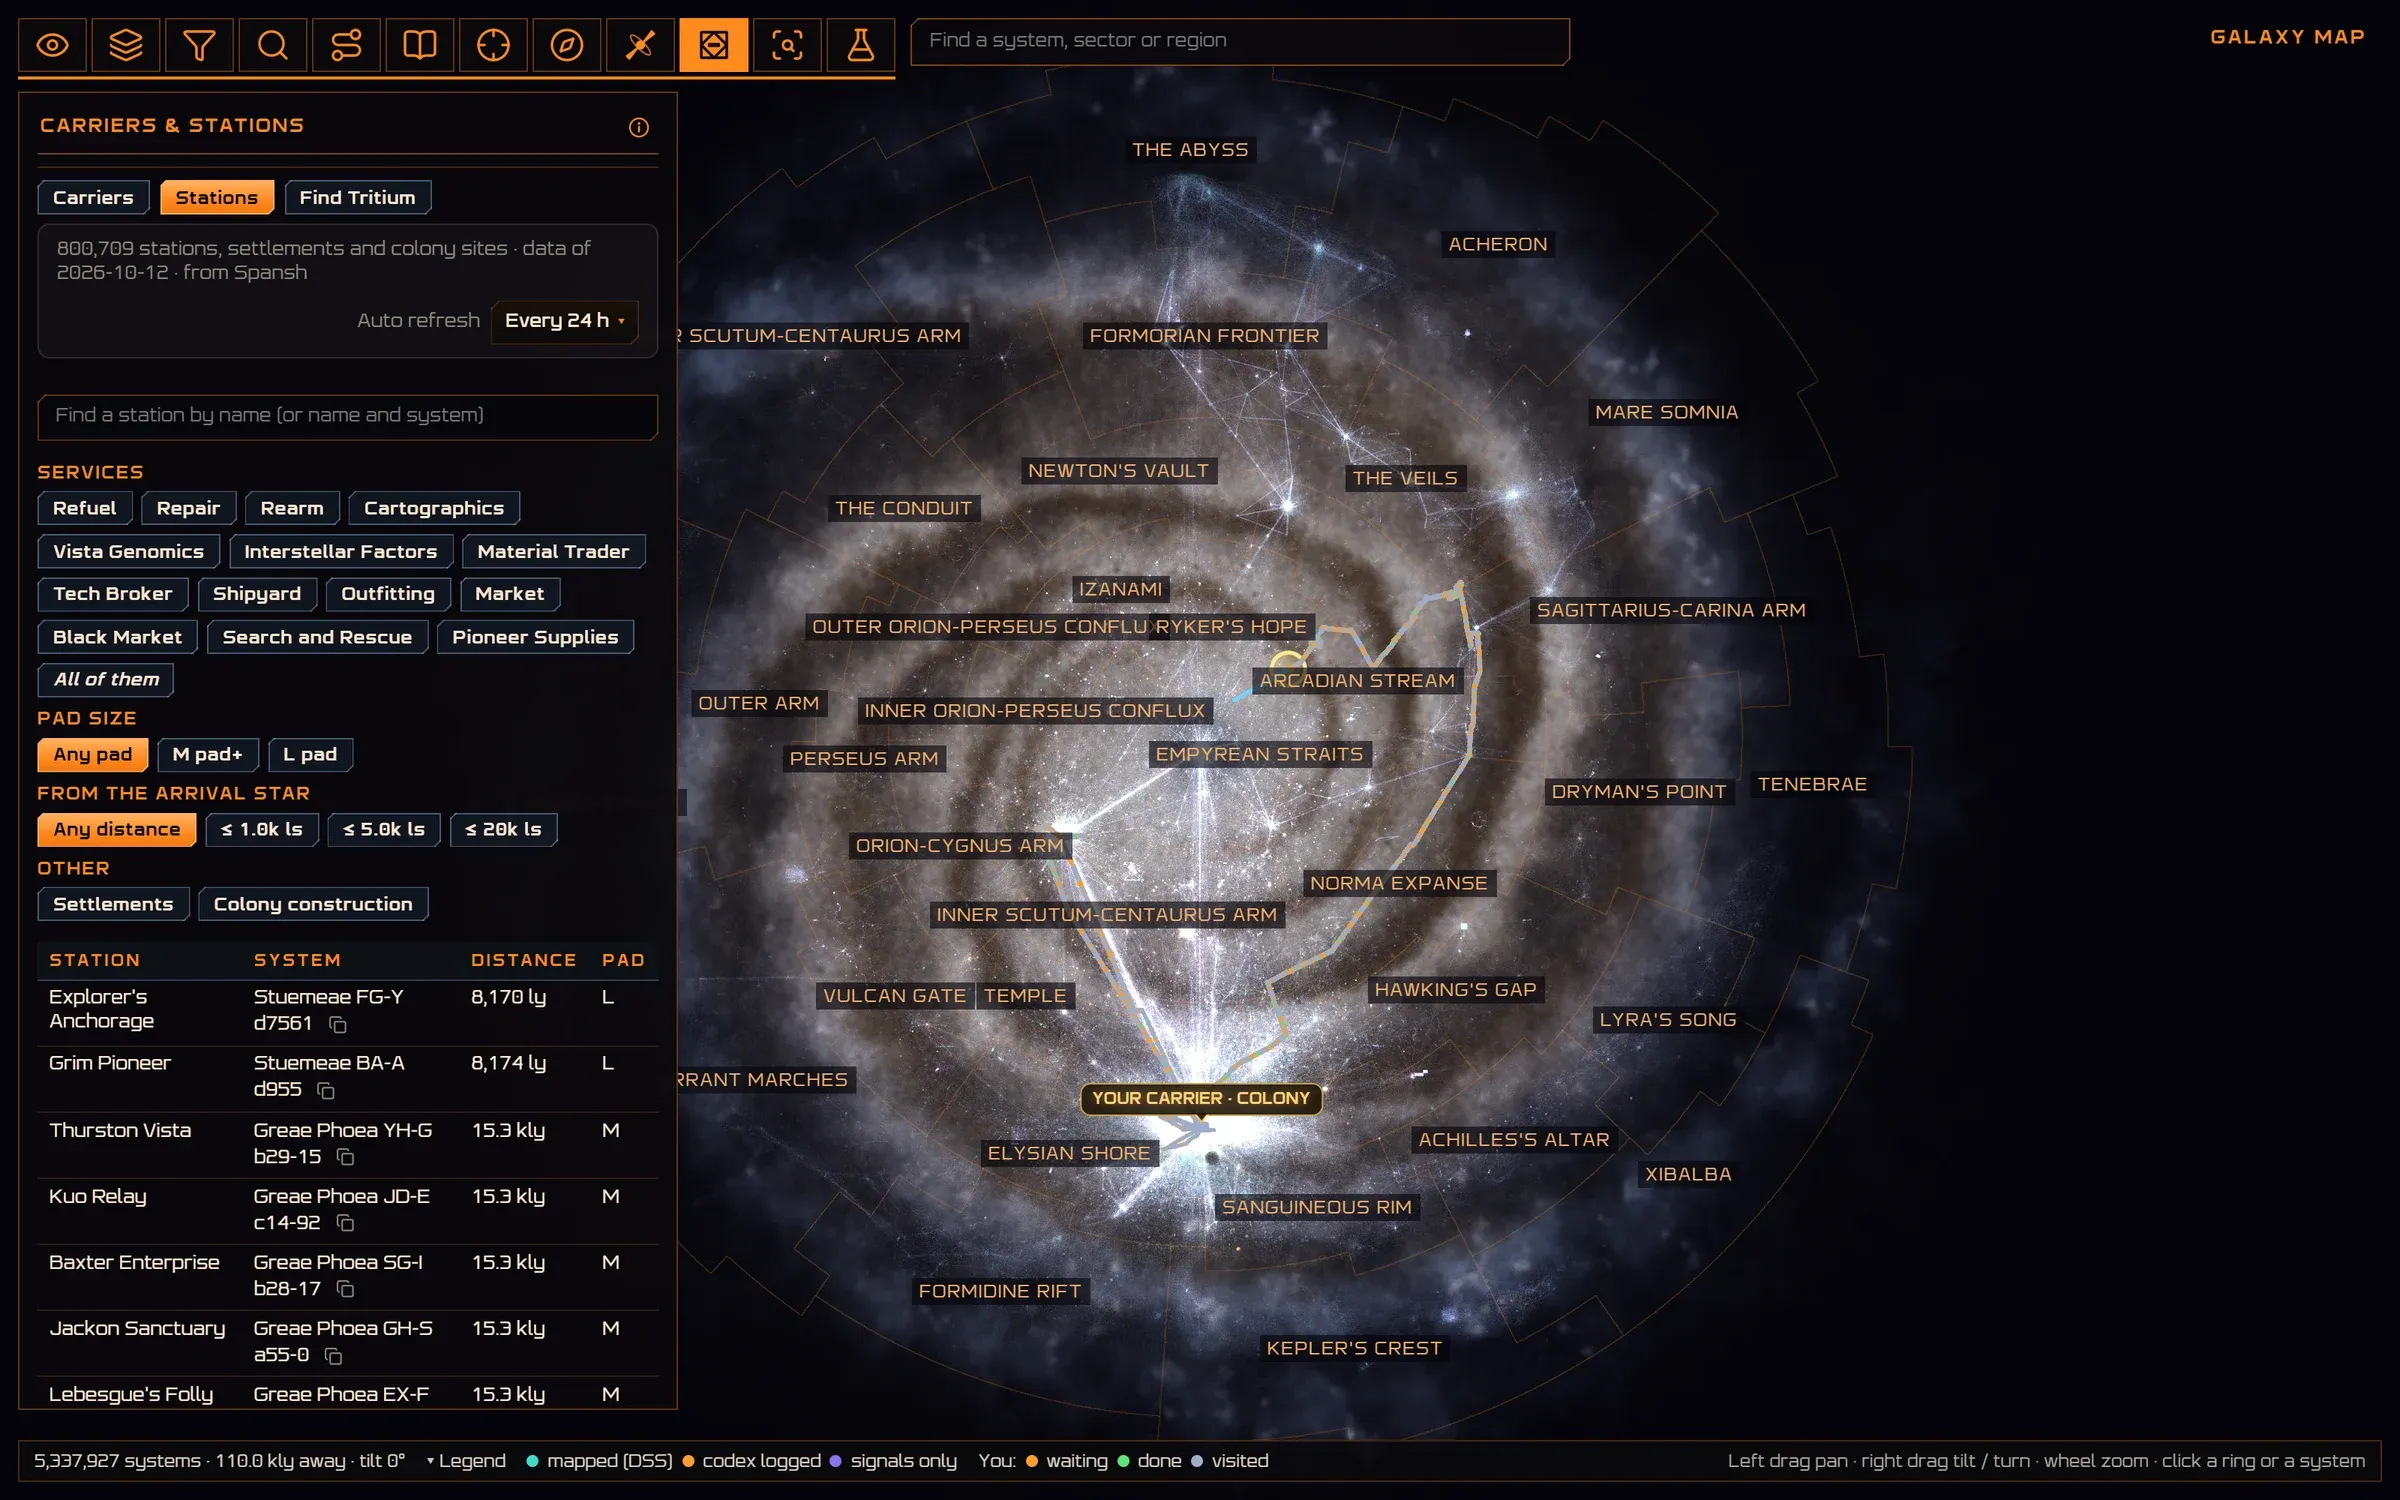
- Carriers, Stations, Find Tritium. Fleet carriers from EDAstro, stations and settlements from Spansh, each refreshed on its own schedule.
- Find. A station by name, or name and system.
- Services. Pick what you need: refuel, repair, Vista Genomics, a shipyard…
- Pad and distance. The pad your ship needs and how far from the arrival star, settlements and colony sites in or out.
- Nearest first. Each with its system, distance and pad; a row flies the map there and marks it.
Expedition
Where nobody has been yet: boxels round your ship ranked by the first-footfall credits they are likely to hold per jump.
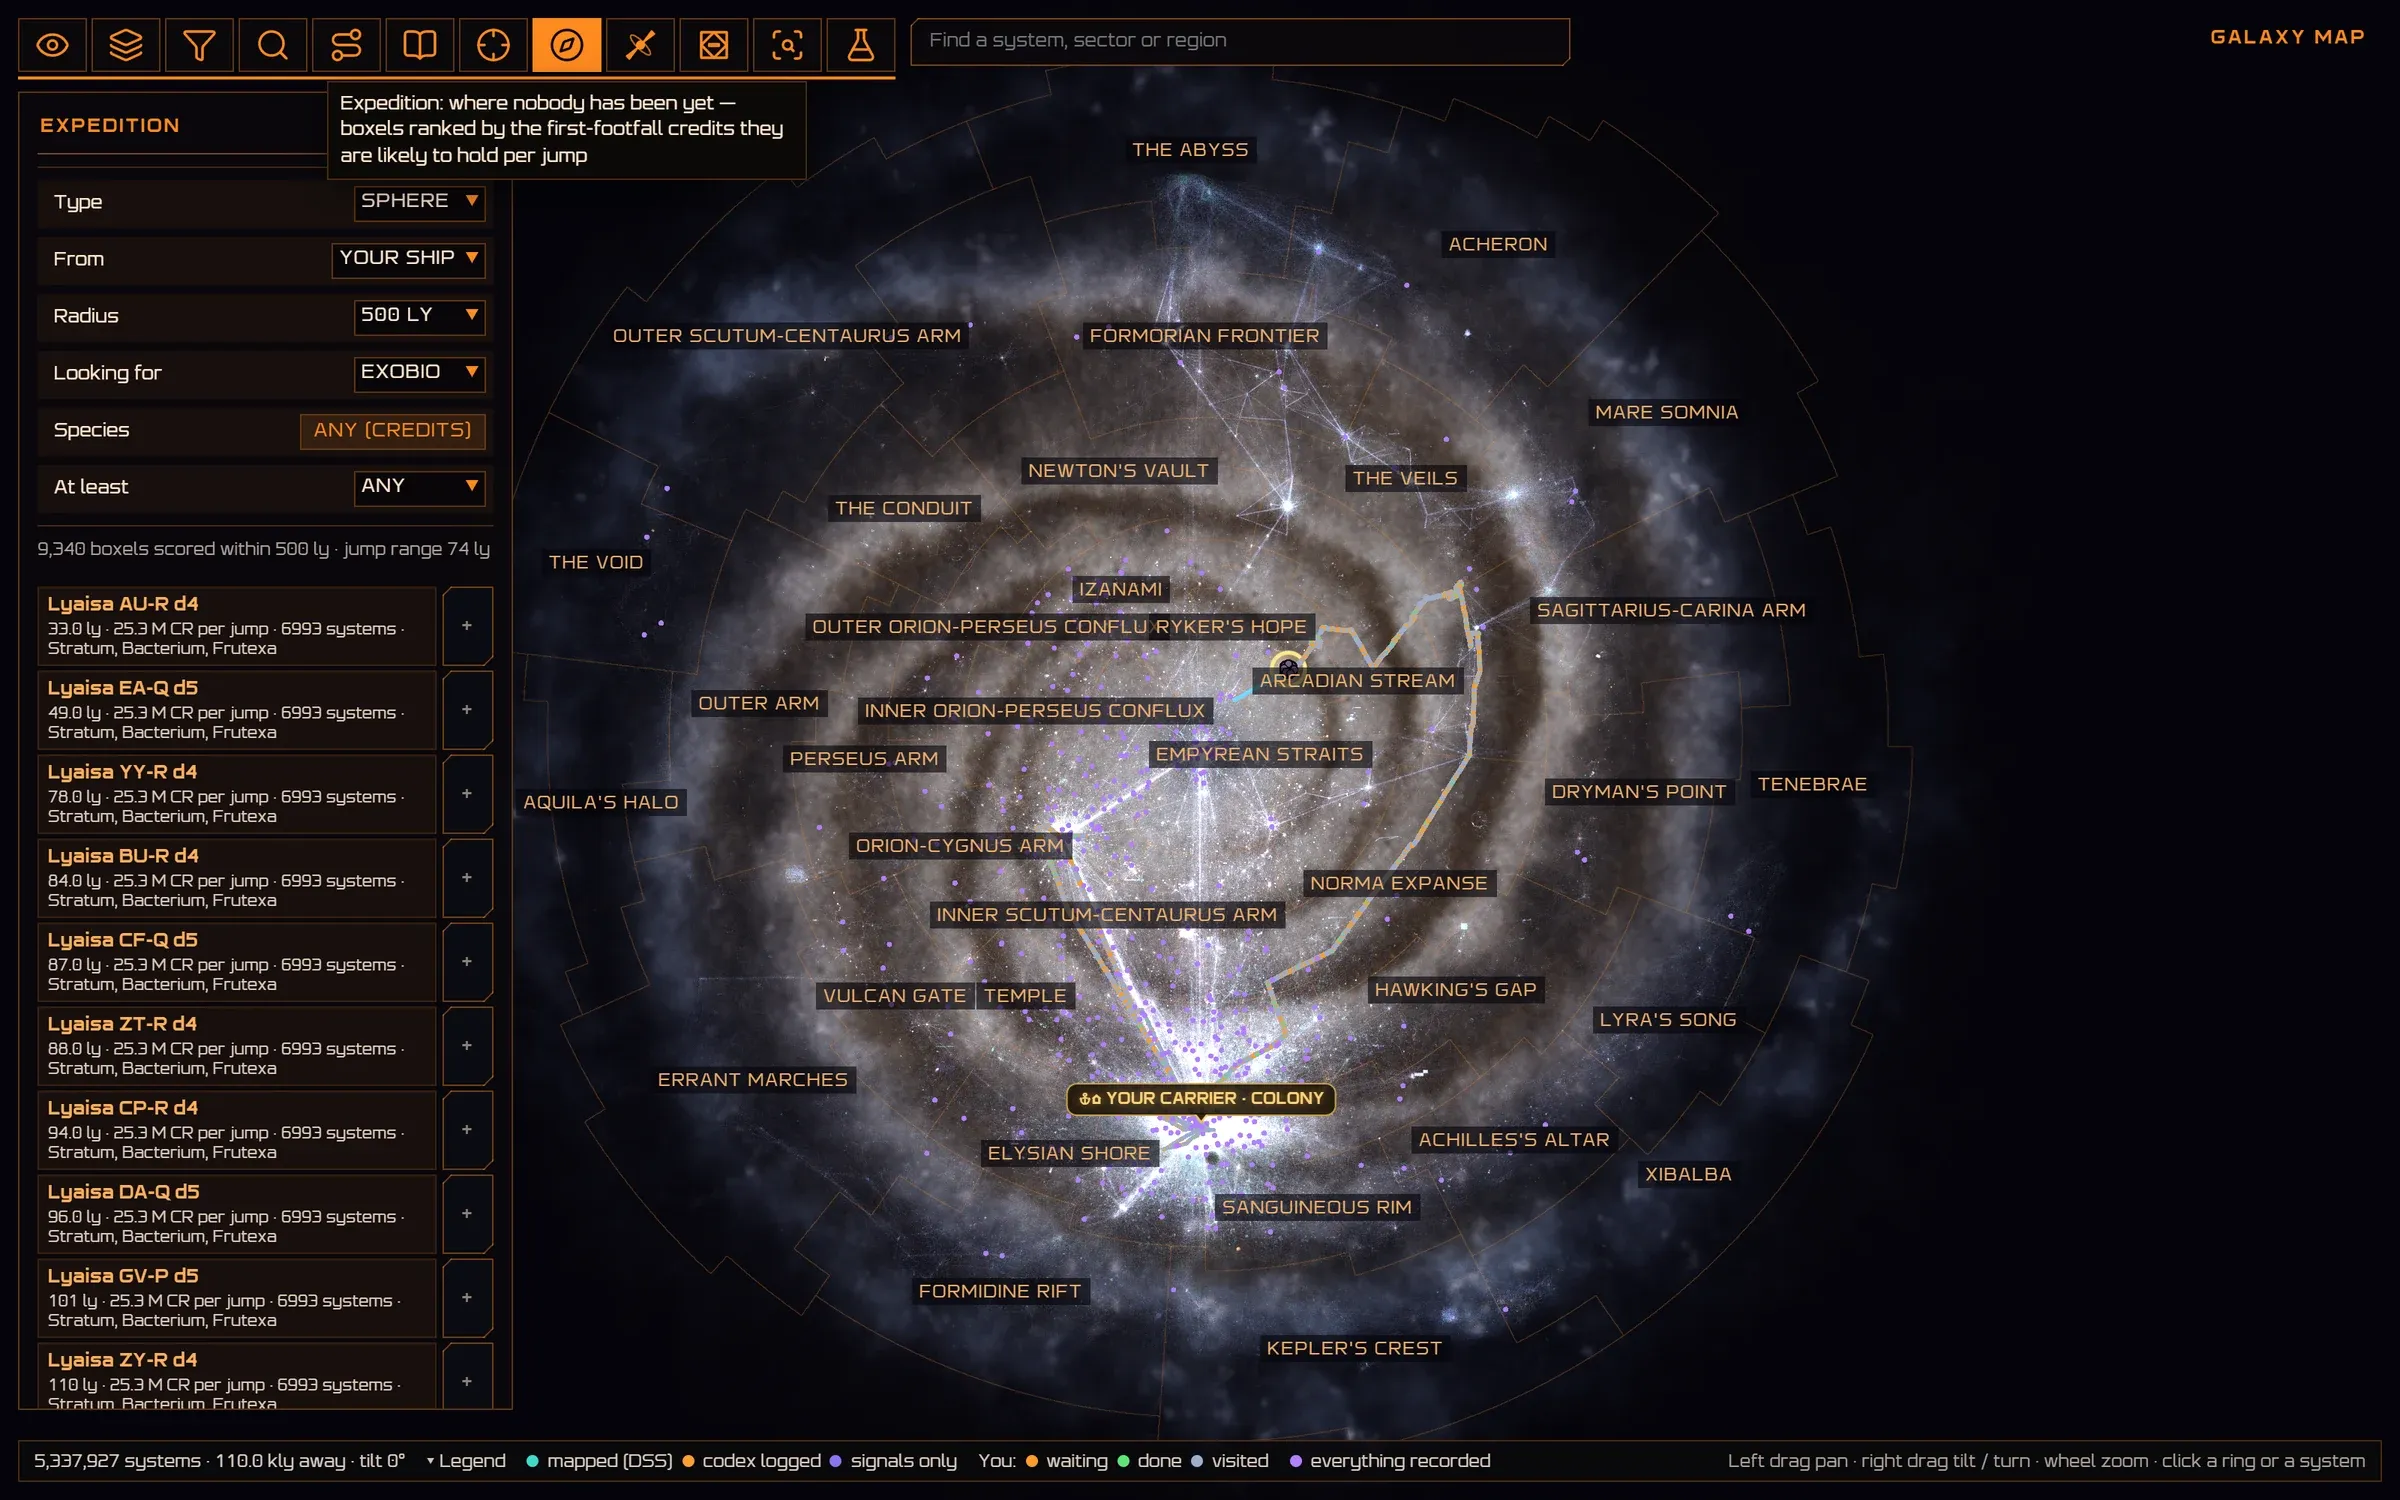
- The search. A sphere or a route, from your ship or a system, how far, and what you want.
- Boxels. Each with its distance, credits per jump, systems it holds and likely species.
Colonisation candidate search
Systems round your colonies, one you pick or any colonised one, by the bodies they have.
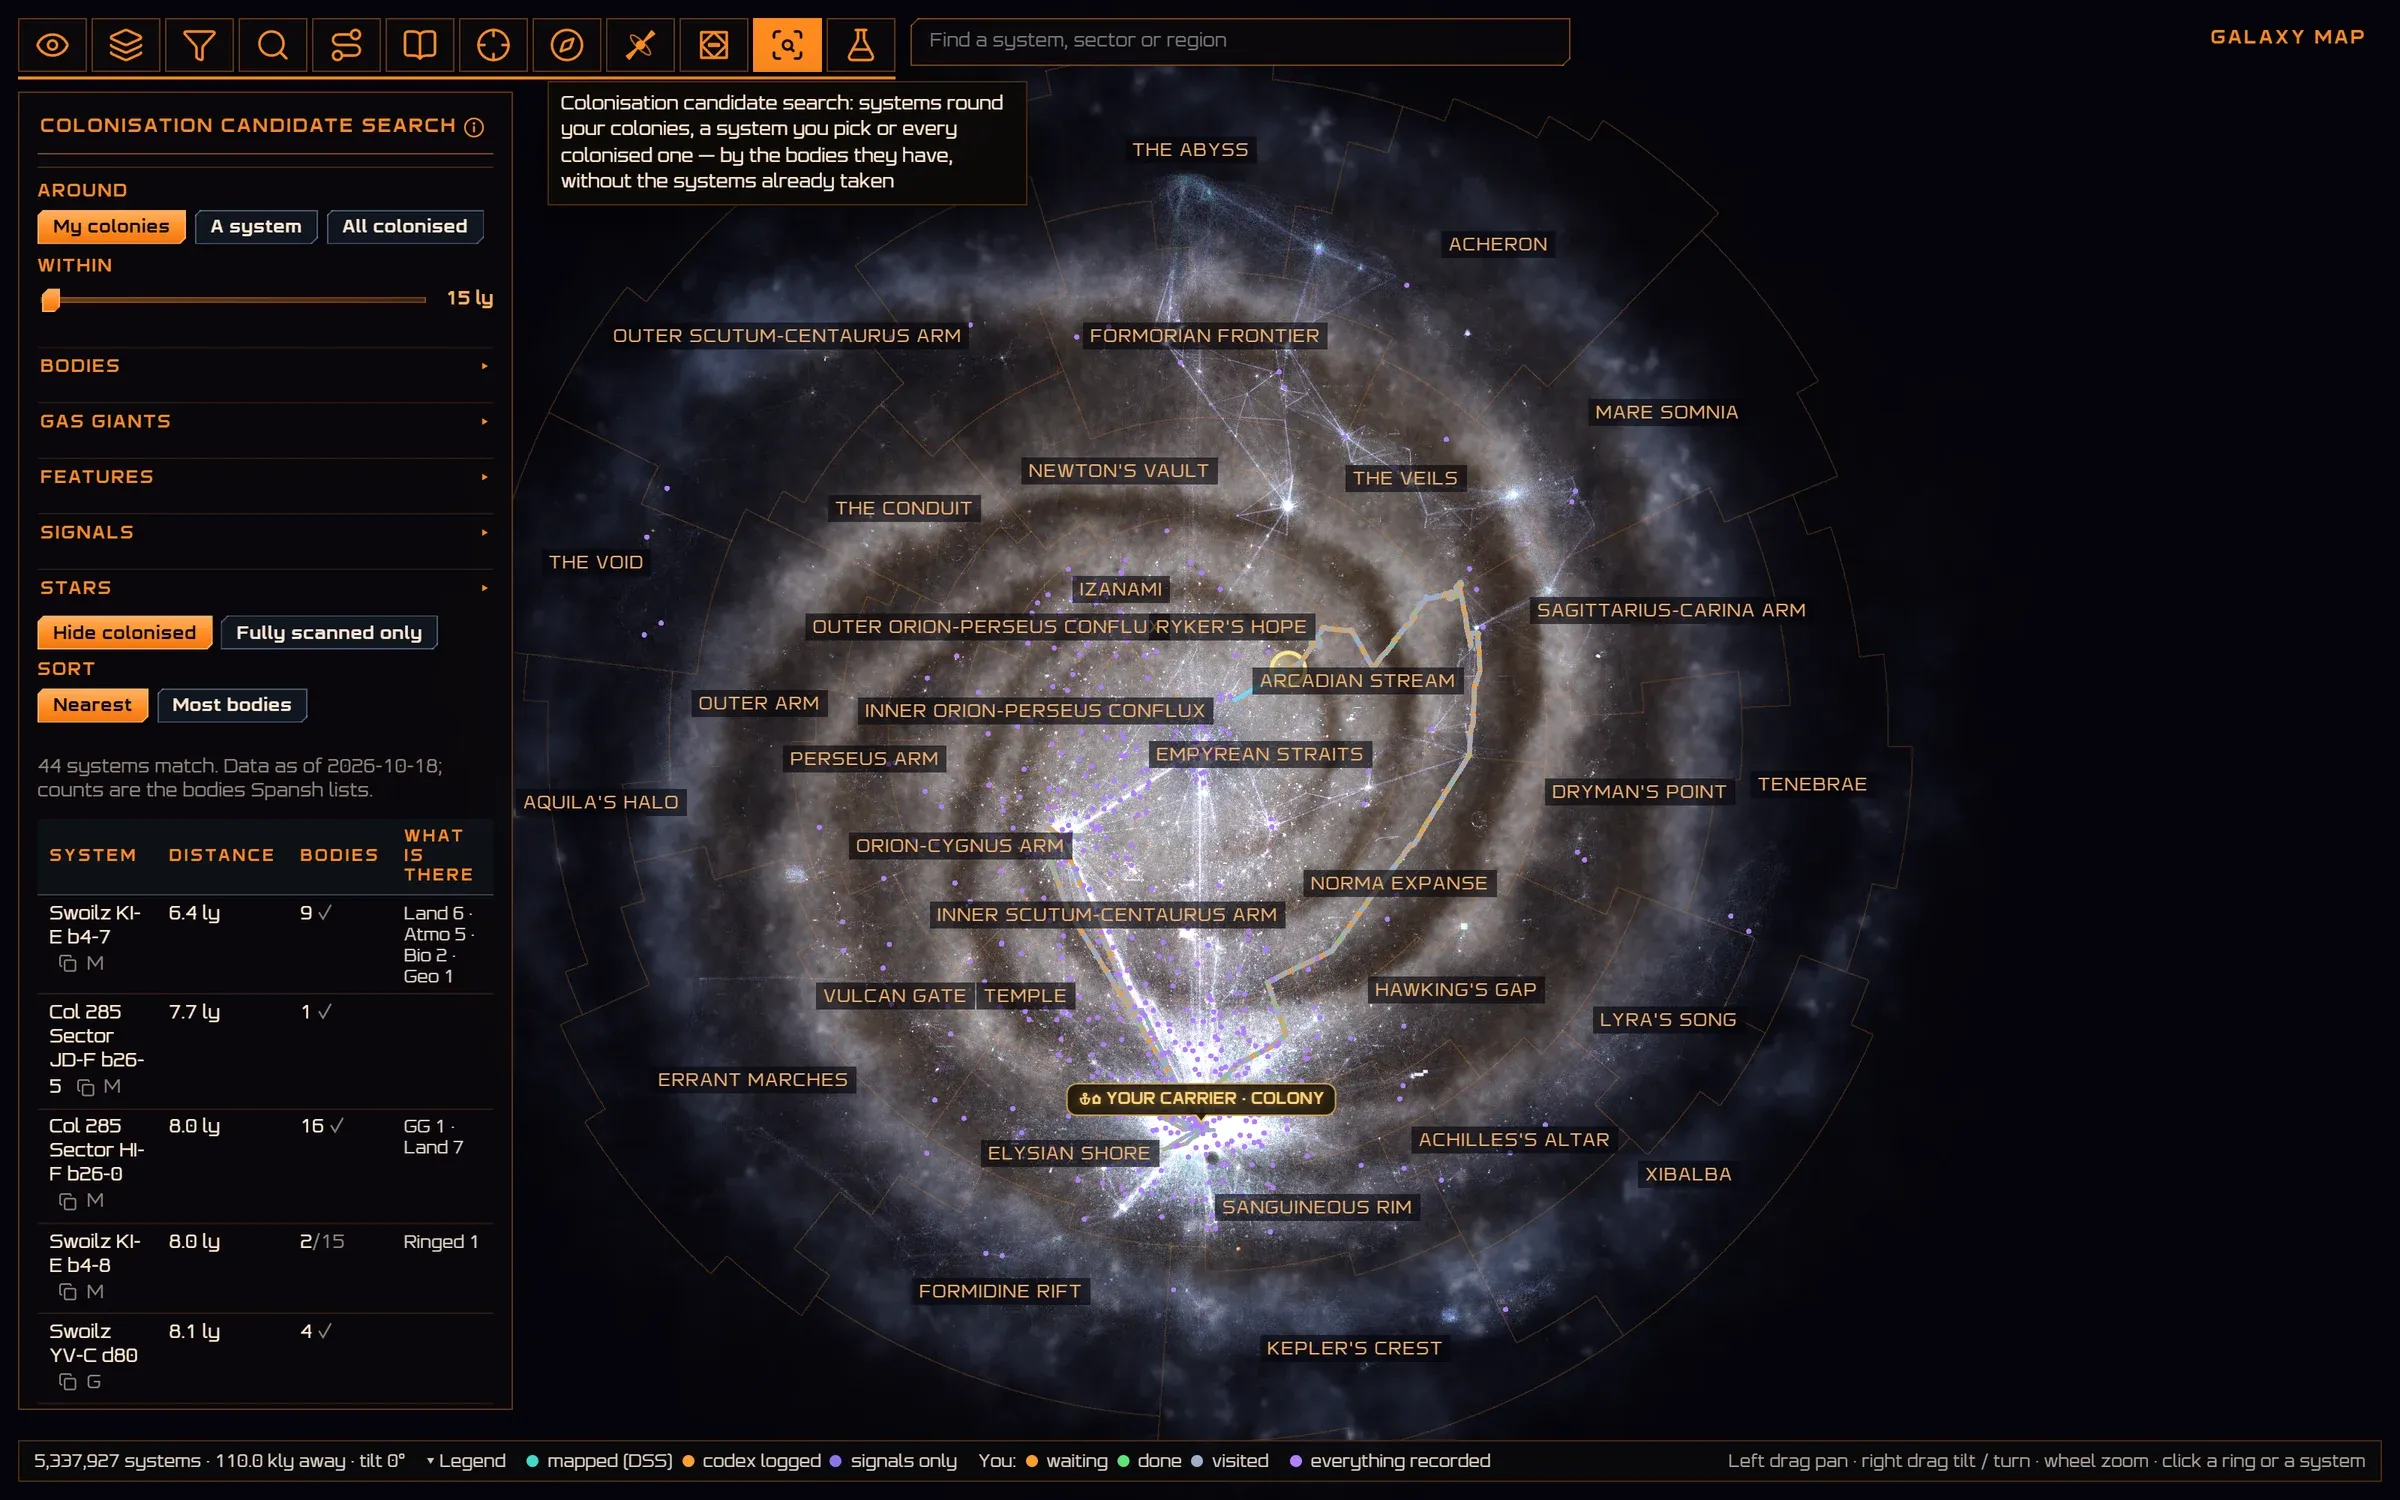
- Around and within. Your colonies, a system, or every colonised one.
- What you need. Bodies, gas giants, features, signals and stars, with taken systems hidden.
- Hits. Nearest or most bodies first; a row opens the system’s card.
Laboratory
The jumponium and AFM-refill materials you hold, what they make, and the nearest bodies rich in the ones you lack.
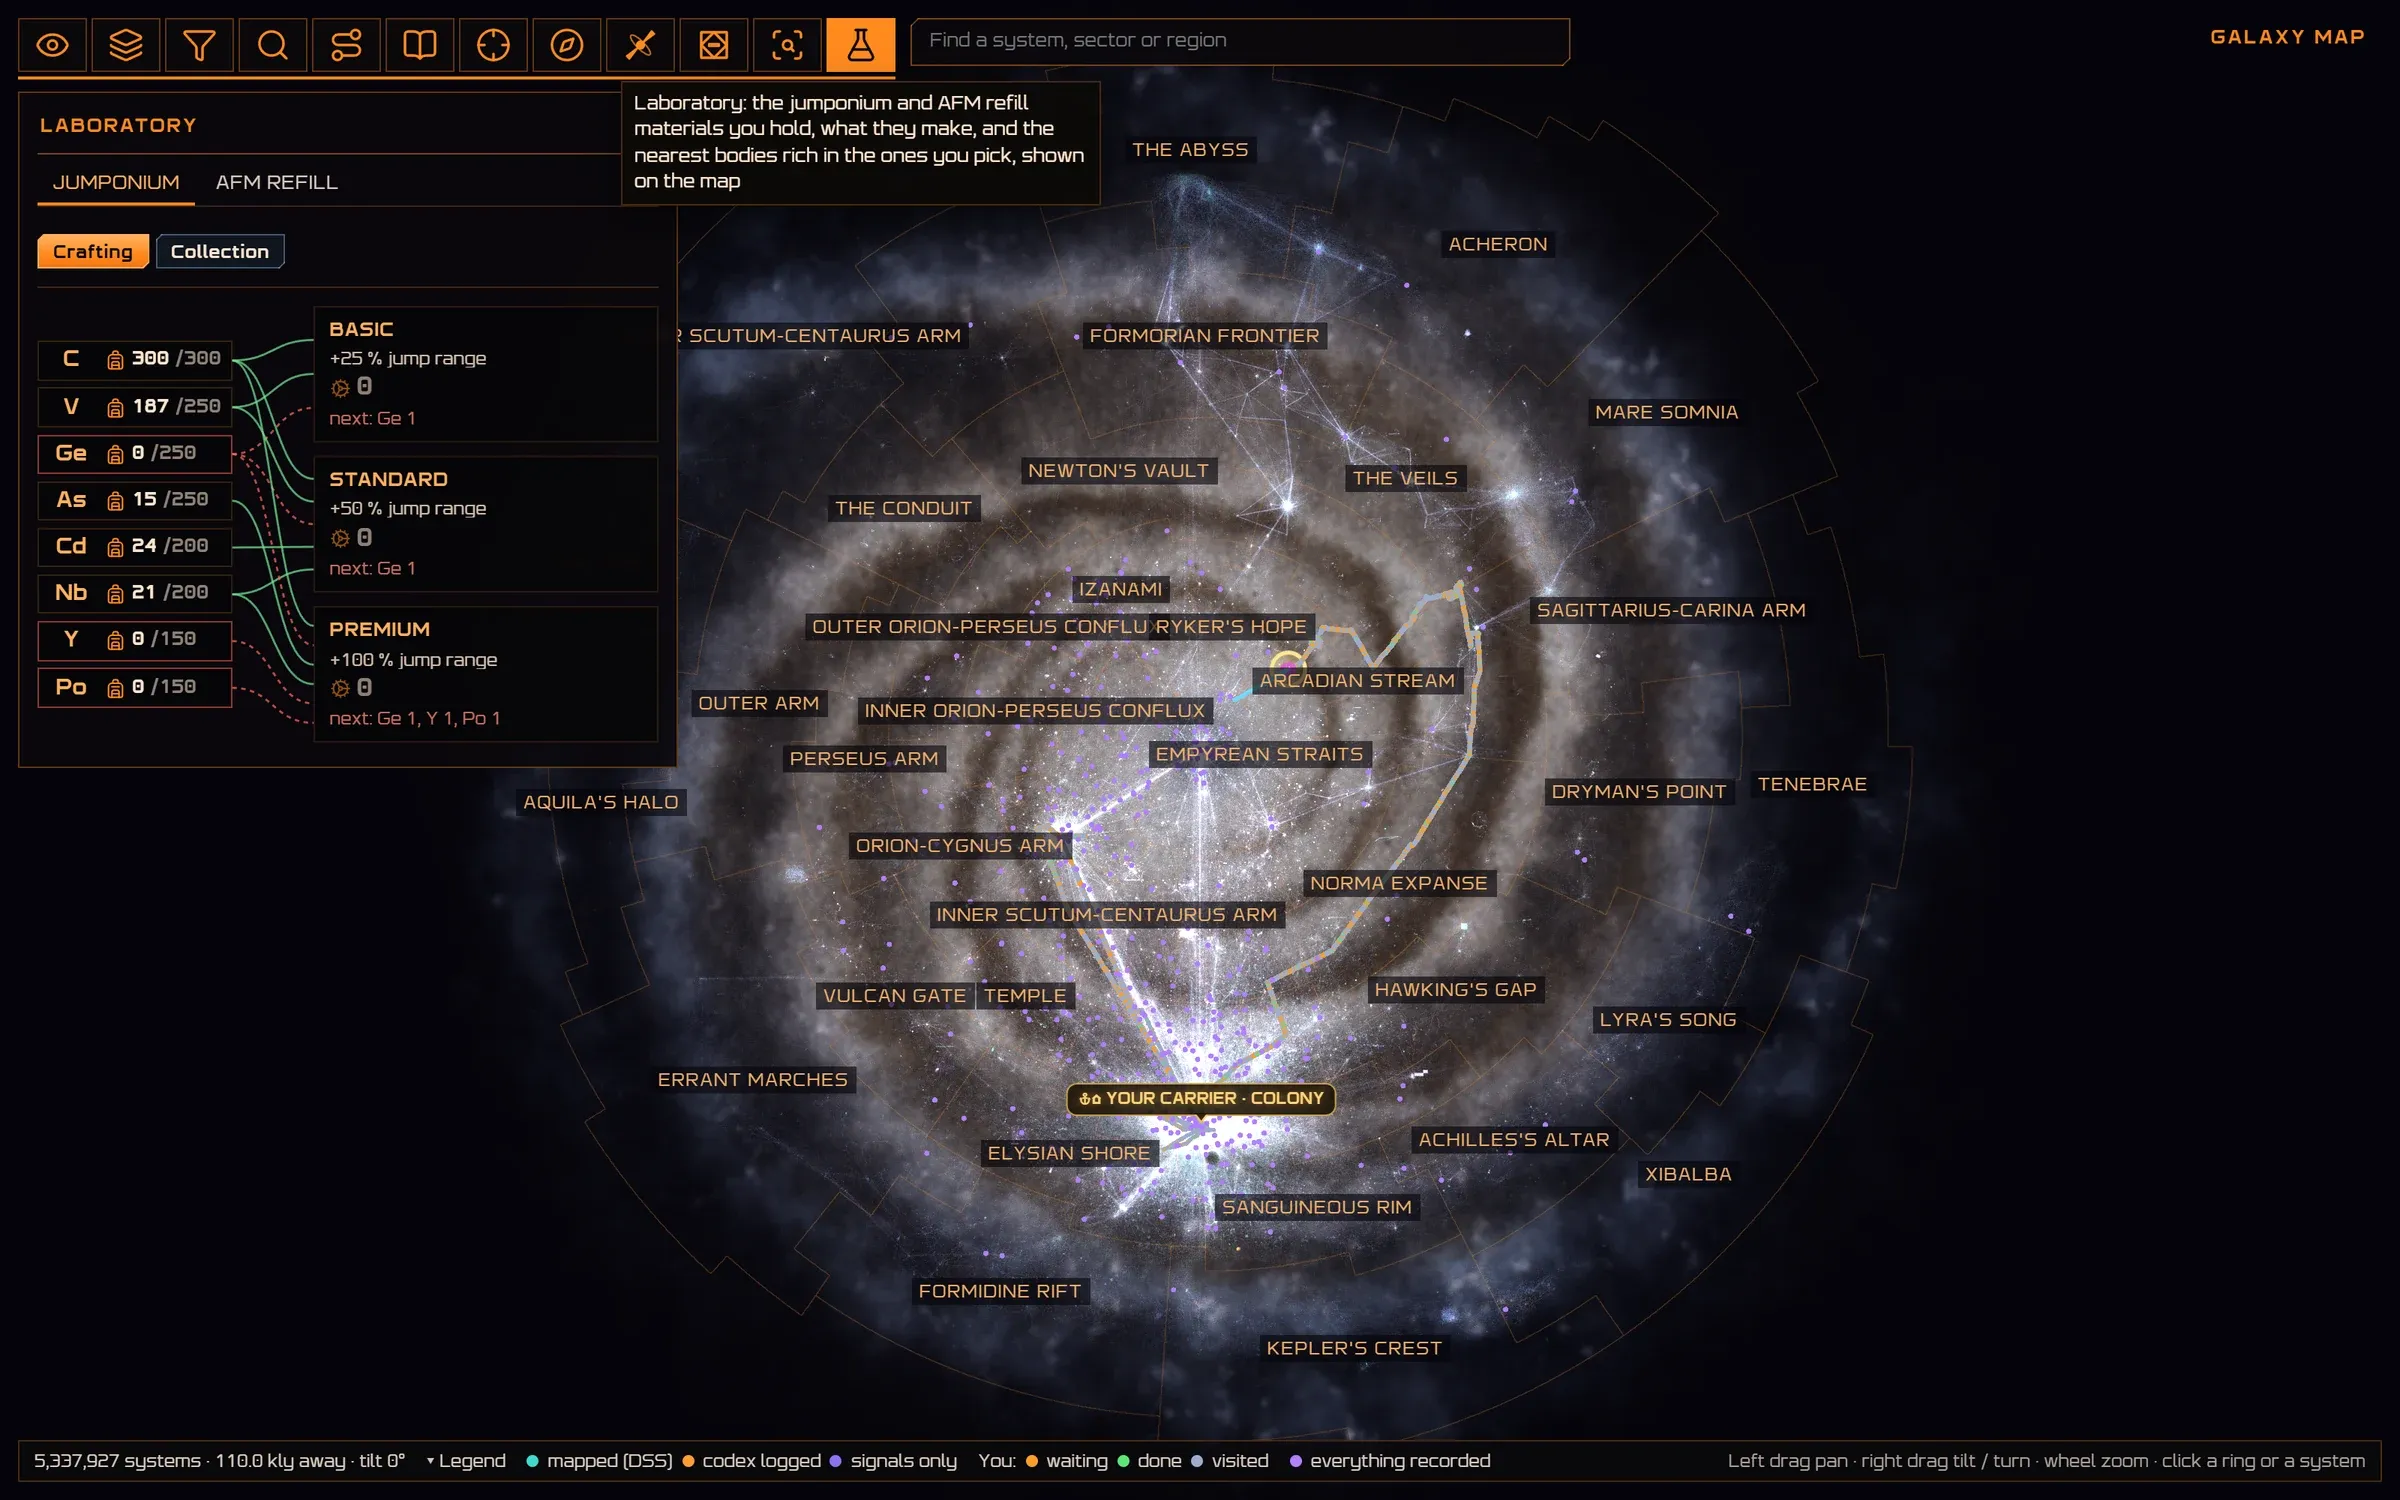
- Jumponium or AFM refill. Two recipe sets; Collection finds where to gather.
- What you hold. Each material against the most you can carry.
- What it makes. Basic, standard and premium injections, how many you can craft and what is missing for the next.
The other screens
All from the menu at the top right. They open as tabs beside Compare, so a screen stays where you left it.
Unfinished business
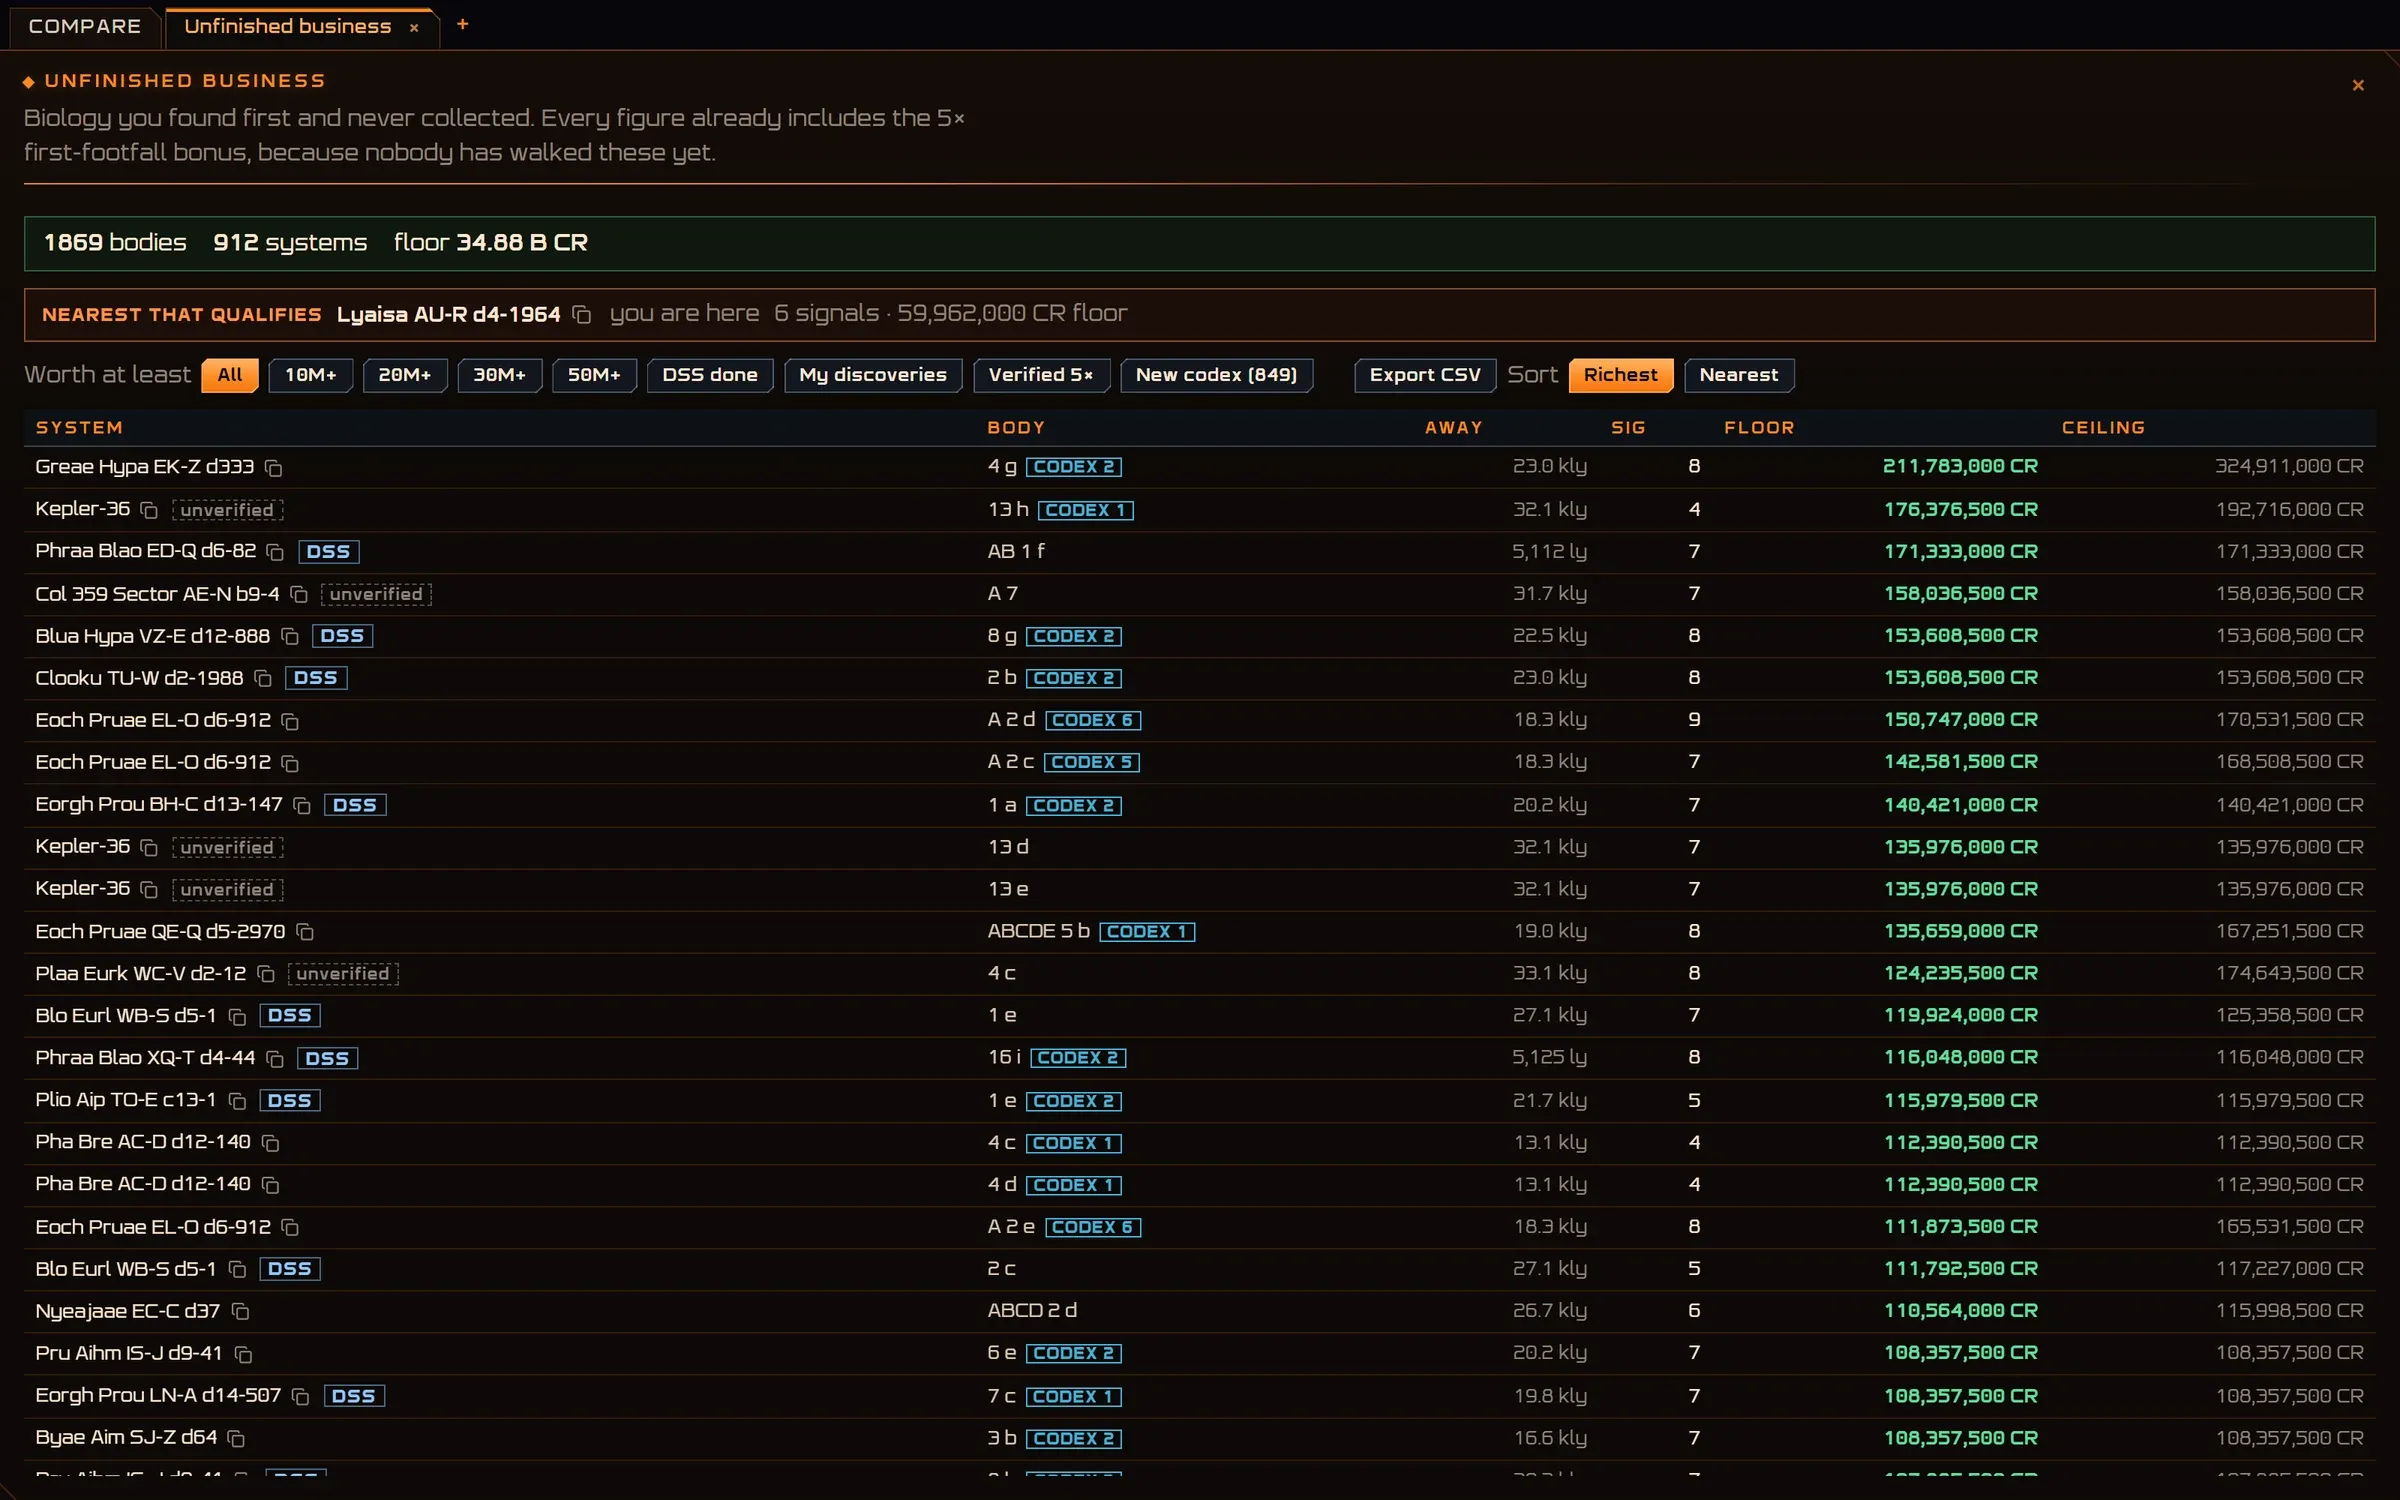
- What you left behind. Biology you found and never collected, with the ×5 bonus already in the figures.
- Nearest that qualifies. The closest one worth flying back to.
- Worth at least. Narrow by value, DSS done, your discoveries, new codex; sort by richest or nearest; export.
- Codex. How many of a body’s species would be new to your codex.
- Floor and ceiling. The least and most the body can pay.
My discoveries
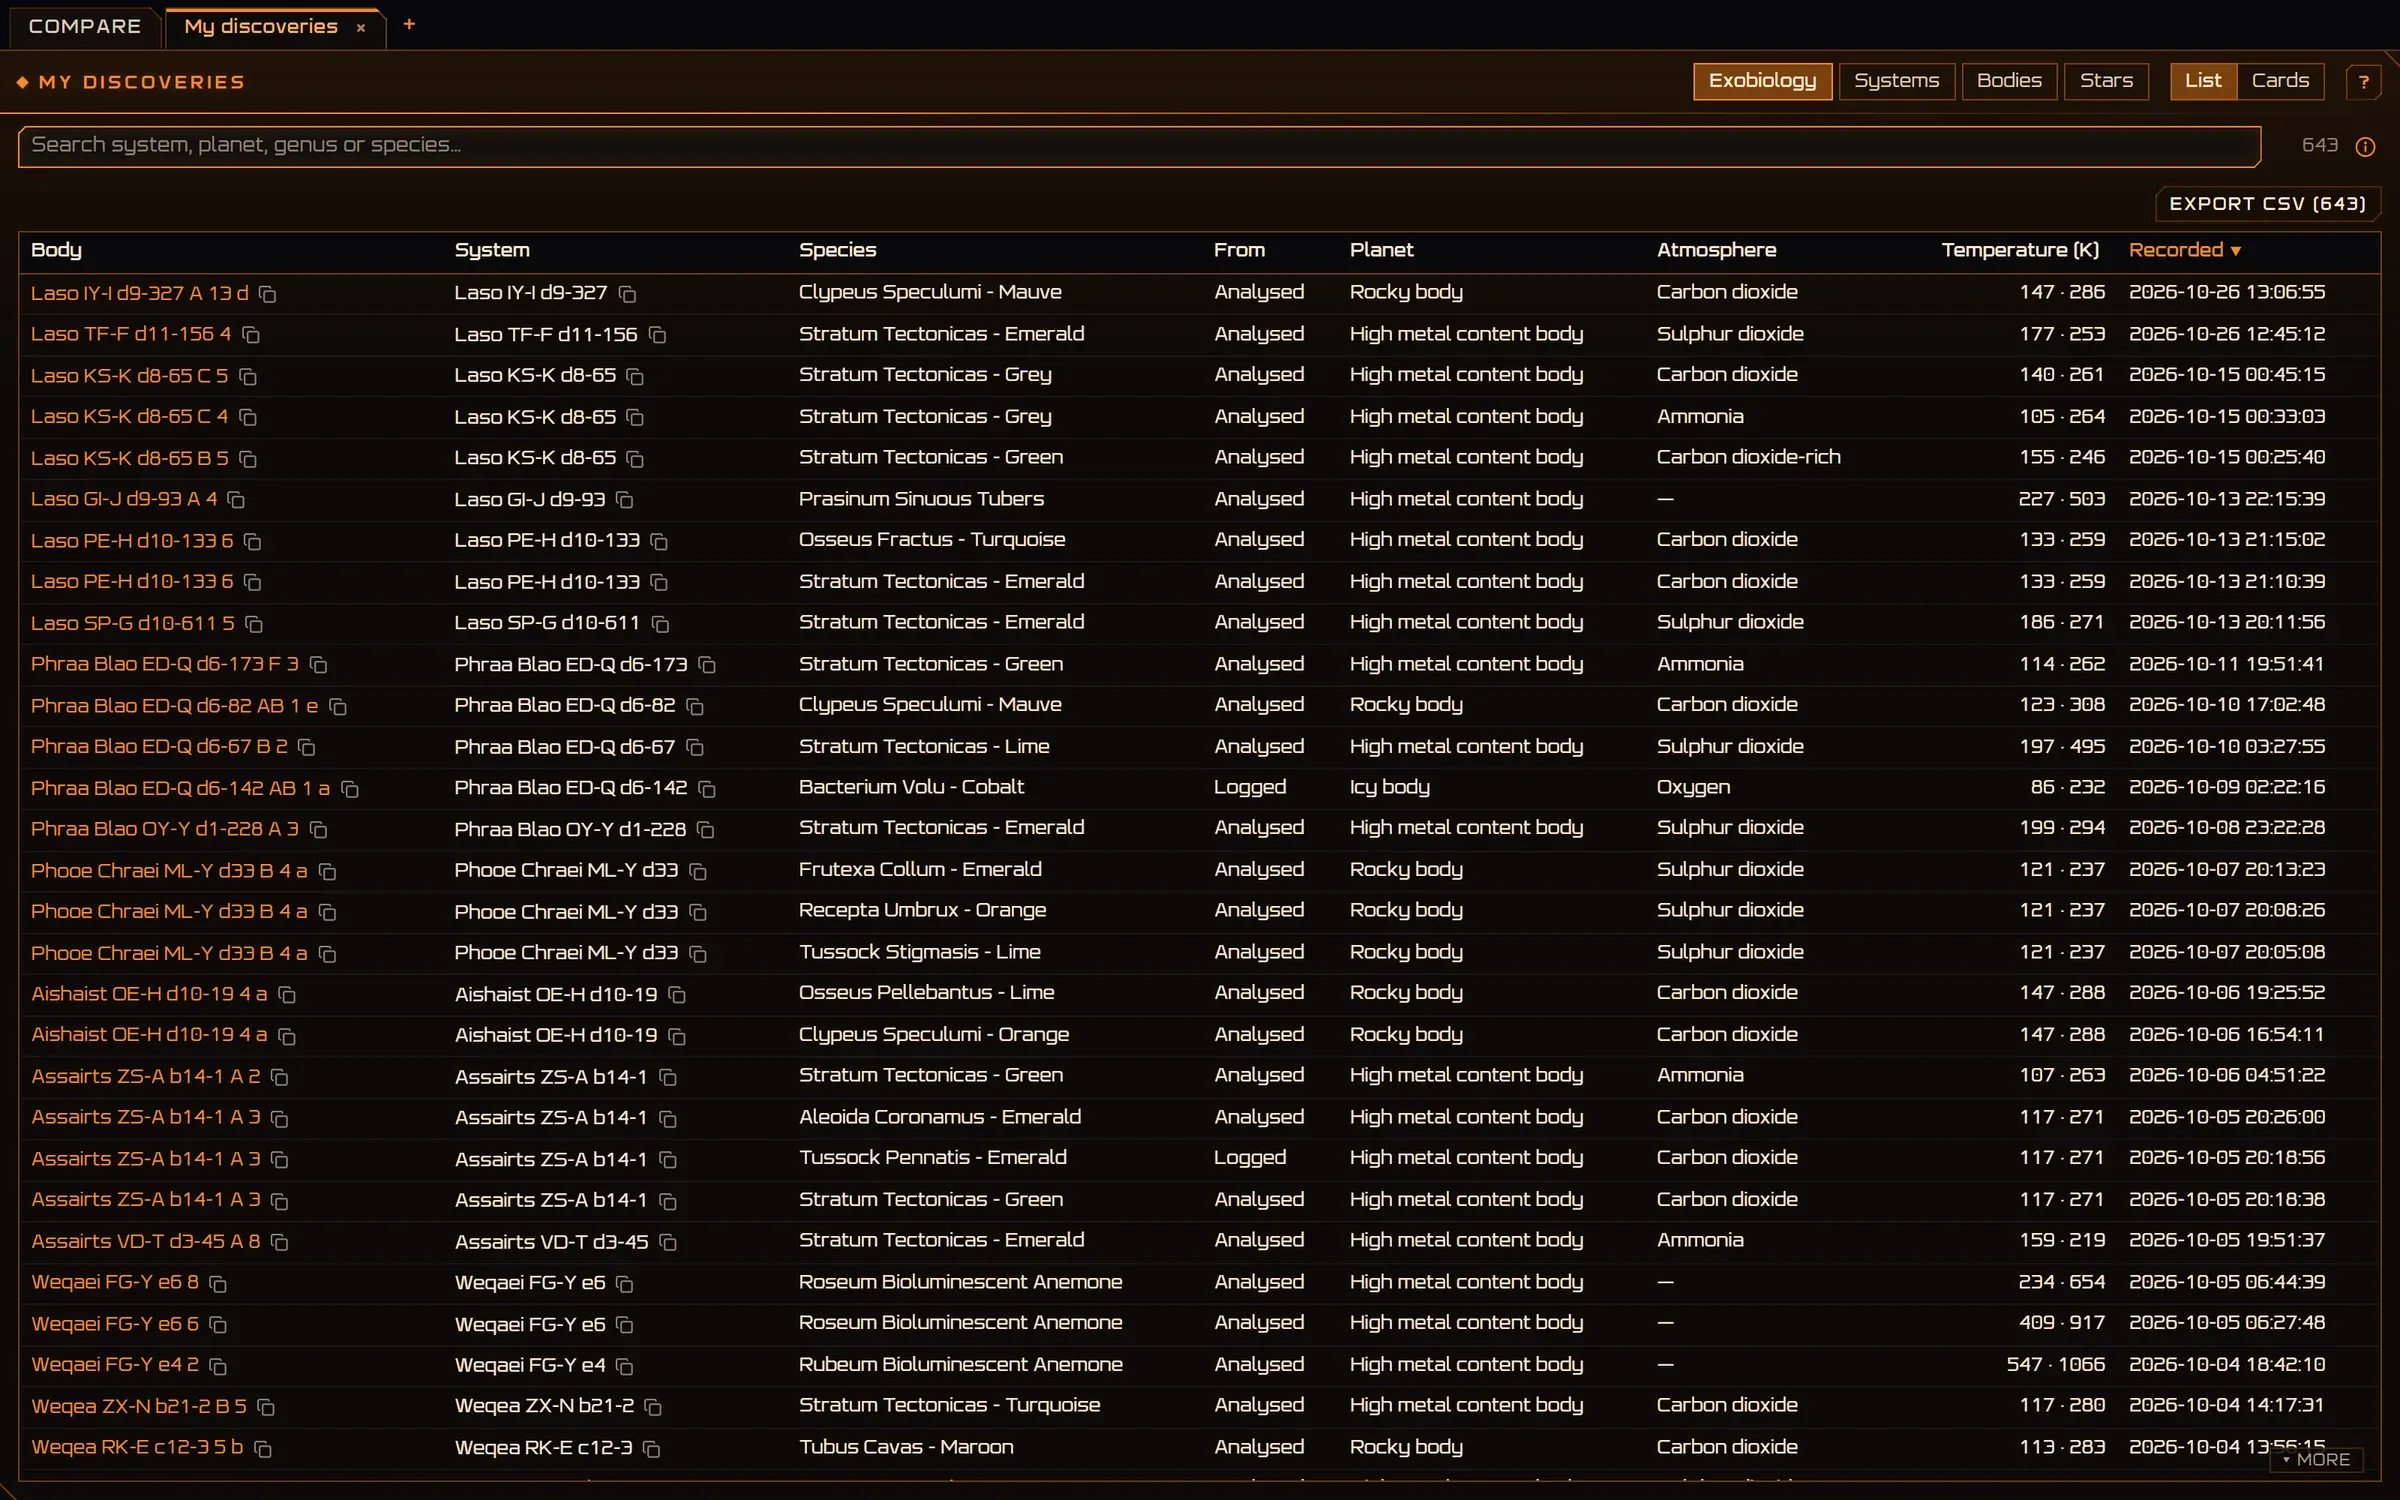
- Four lists. Exobiology, systems, bodies and stars from every journal, as a list or as cards.
- Search. Any system, planet, genus or species.
- Export. The list as CSV.
- Every column sorts. Logged or analysed, planet class, atmosphere, temperature range, date.
Encyclopedia
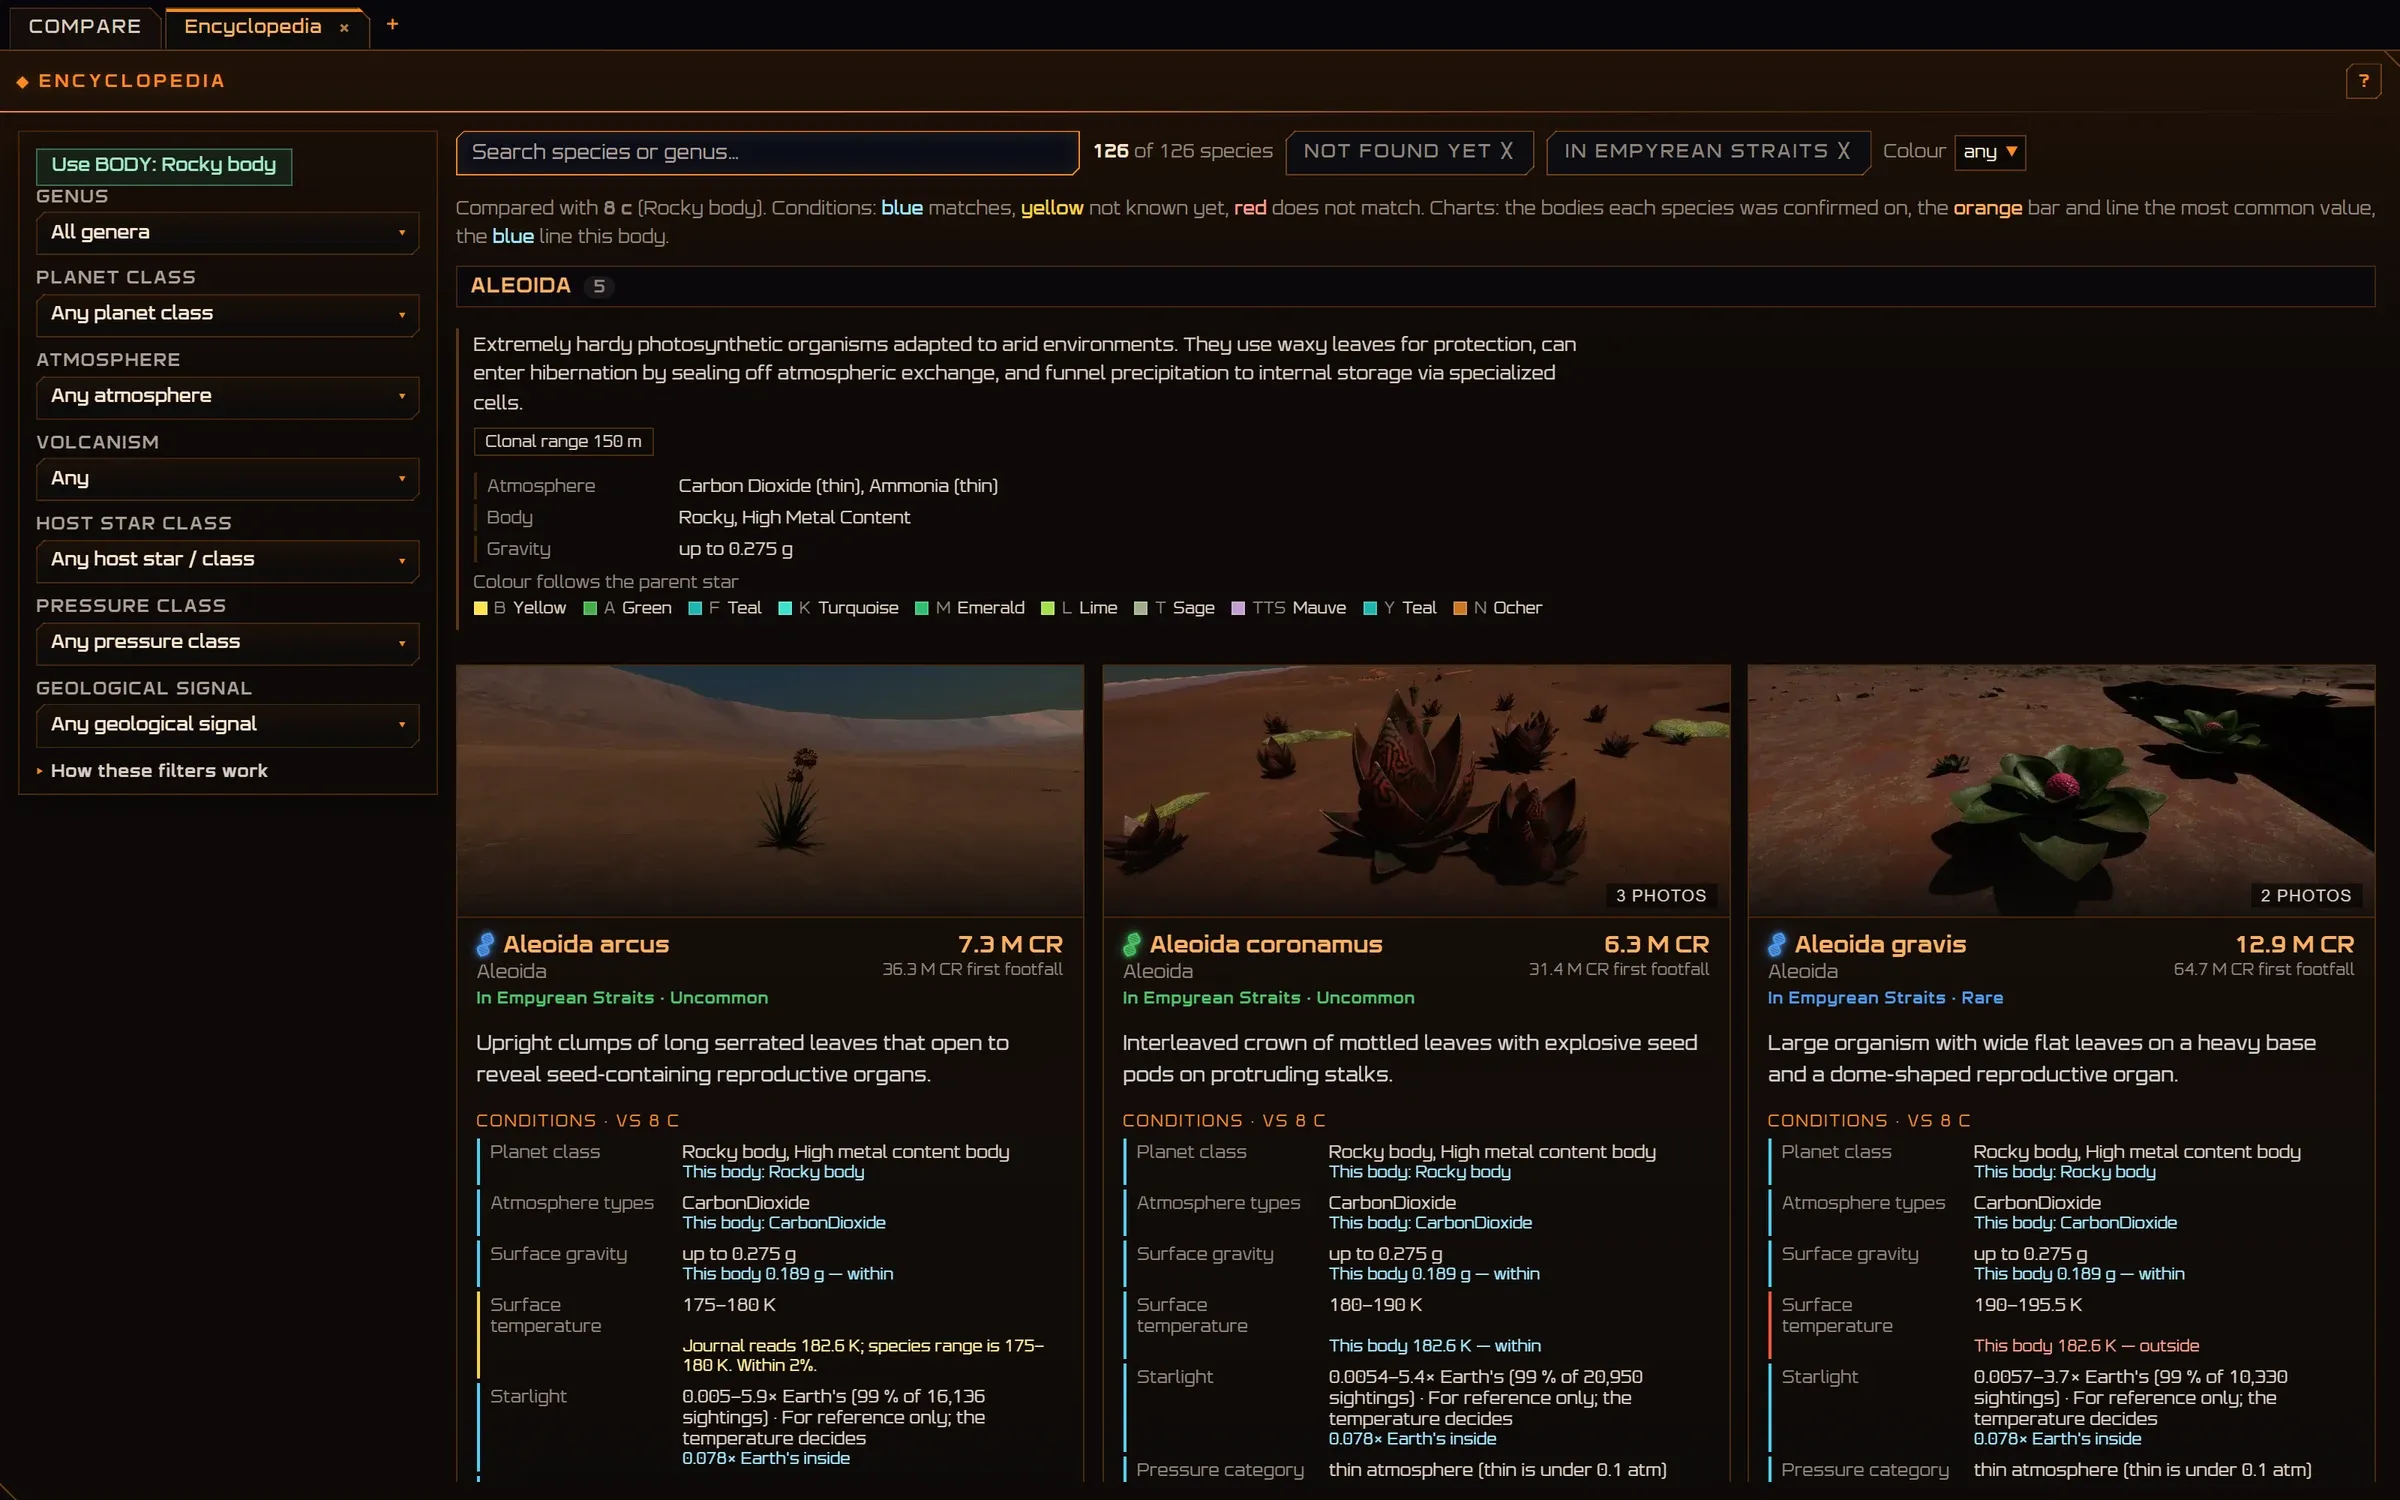
- Filters. Genus, planet class, atmosphere, volcanism, host star, pressure, geology, or Use BODY for the one you are at.
- Search. 126 species; not found yet and this region only are one click.
- Against this body. Blue matches, yellow is not known yet, red does not match.
- Conditions. Each species’ gates set against the planet, with charts of where it was confirmed.
- Photographs. Several per species where commanders sent them.
Statistics
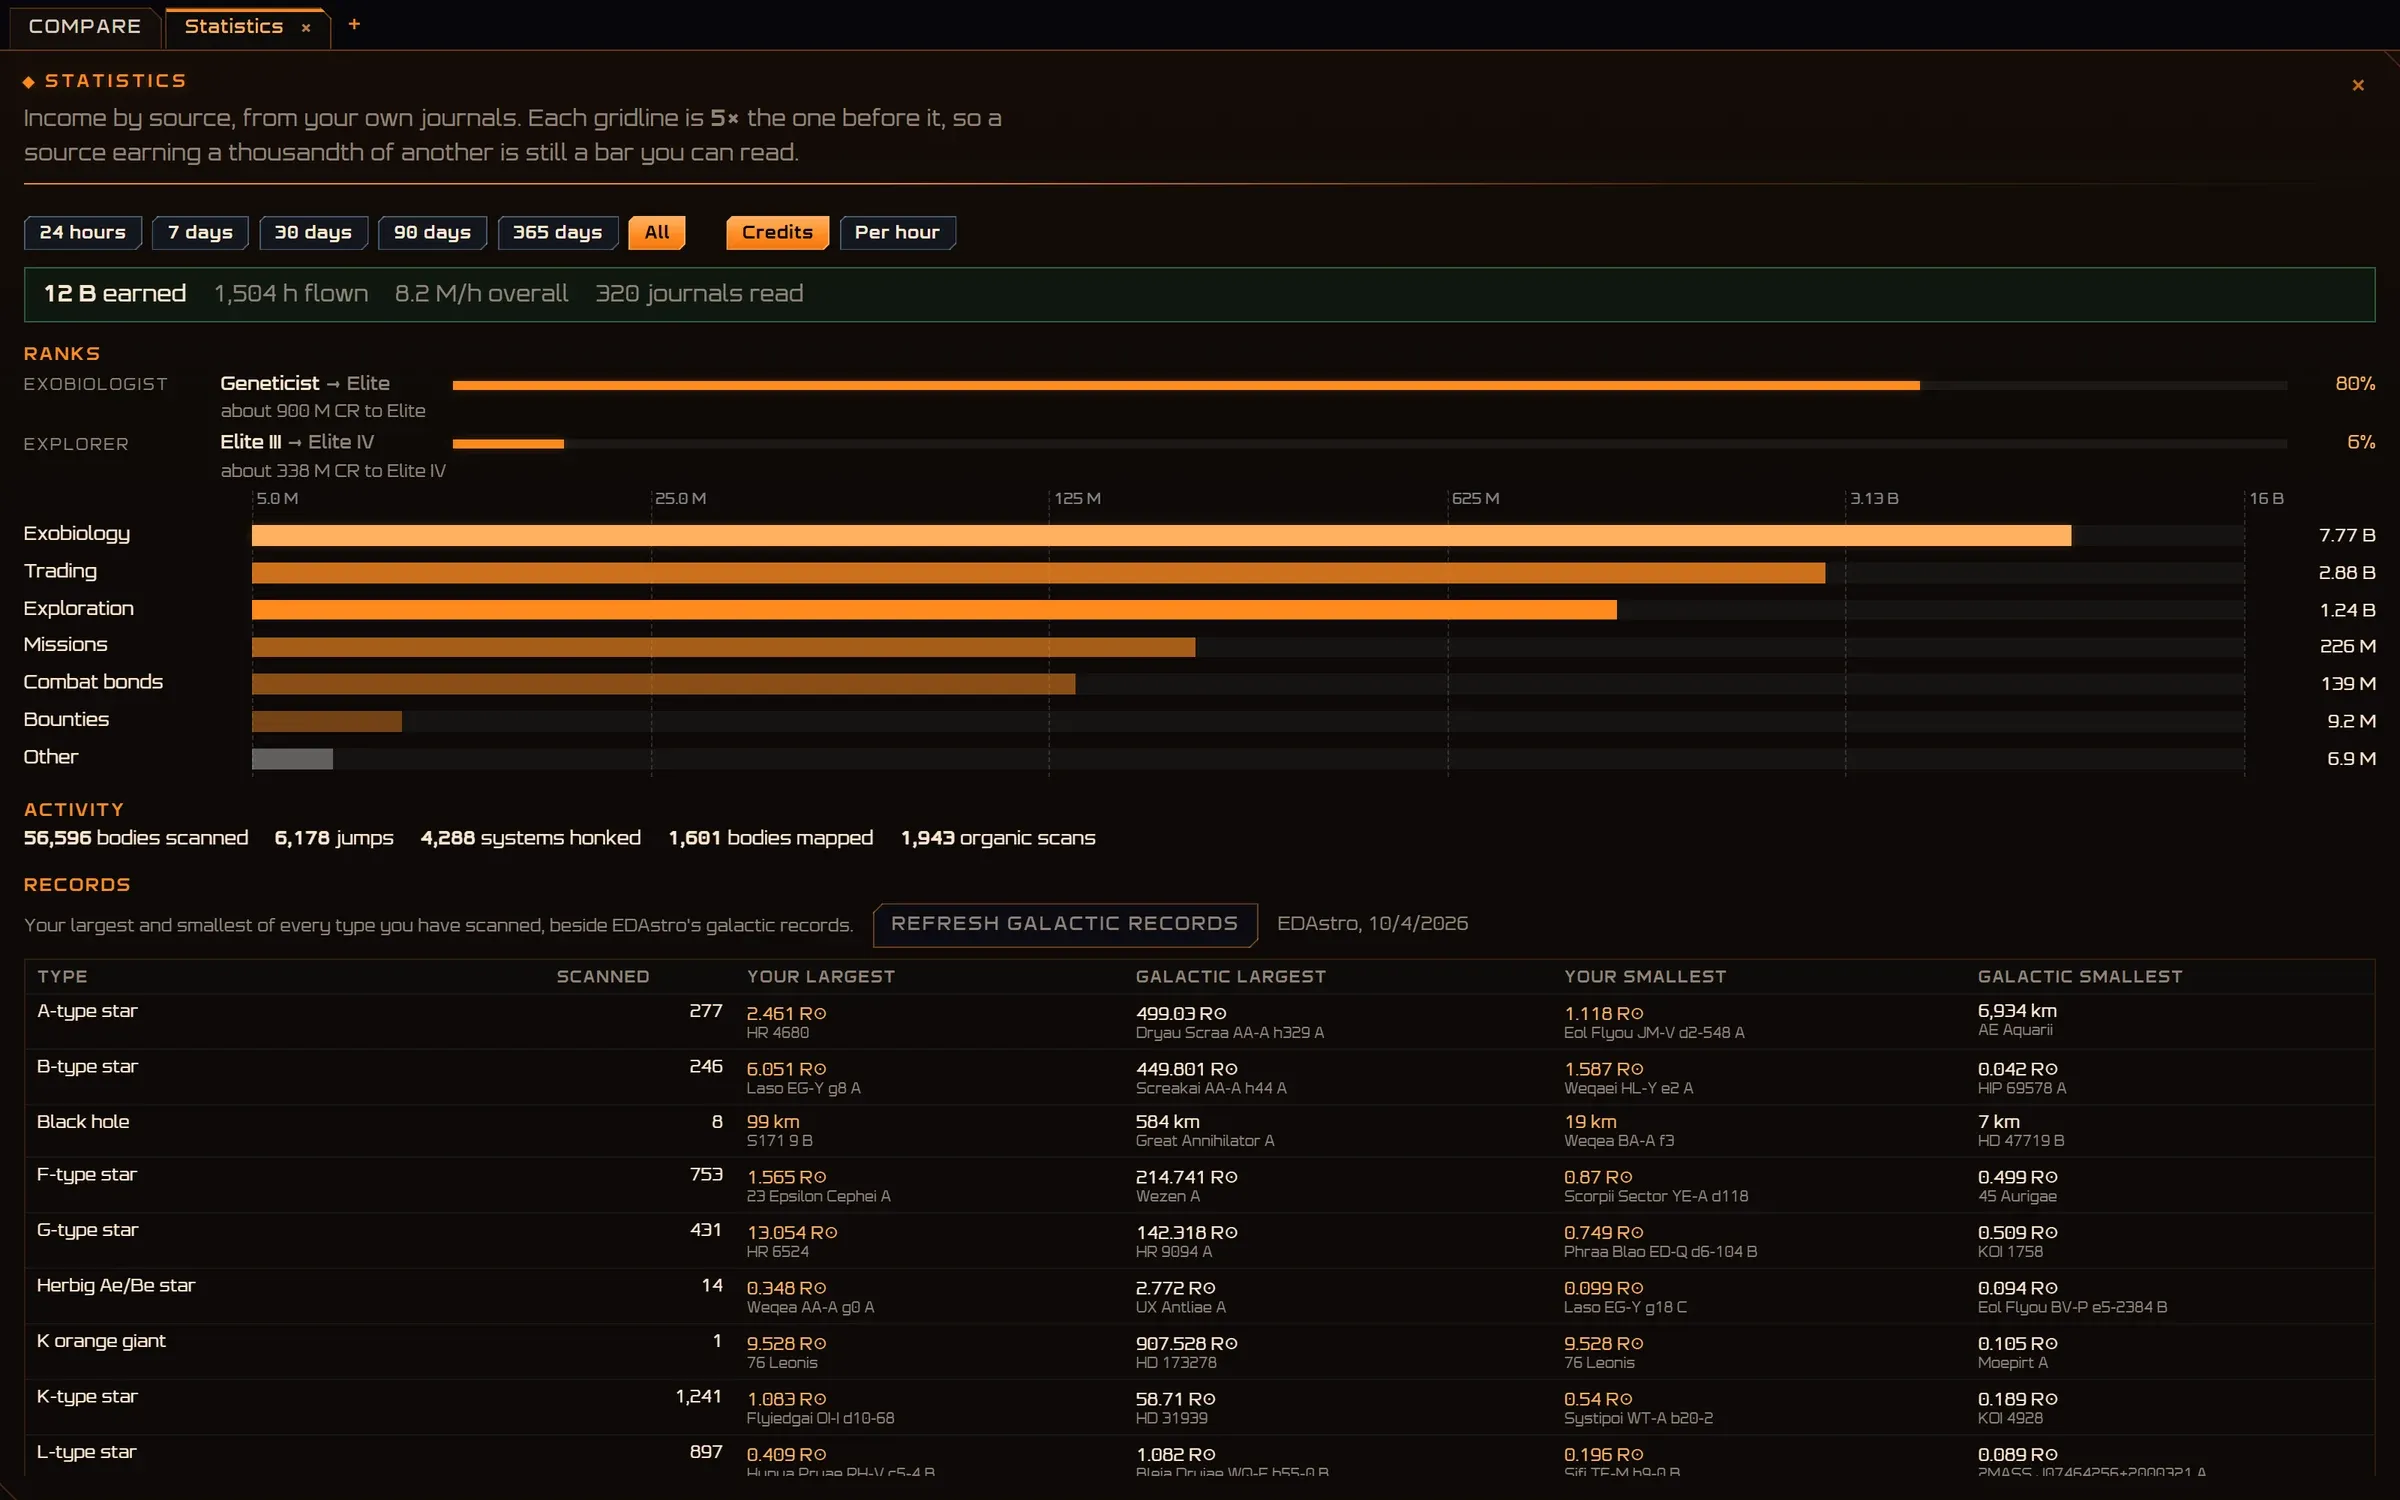
- Period. A day to all time, credits or per hour.
- Totals. Earned, hours flown, per hour, journals read.
- Ranks. How far to the next exobiologist and explorer rank.
- Income by source. Each gridline five times the one before, so a small source is still a bar you can read.
- Activity. Bodies scanned, jumps, honks, maps and organic scans.
- Records. Your largest and smallest of every star and planet type, beside EDAstro’s galactic records.
Boxels
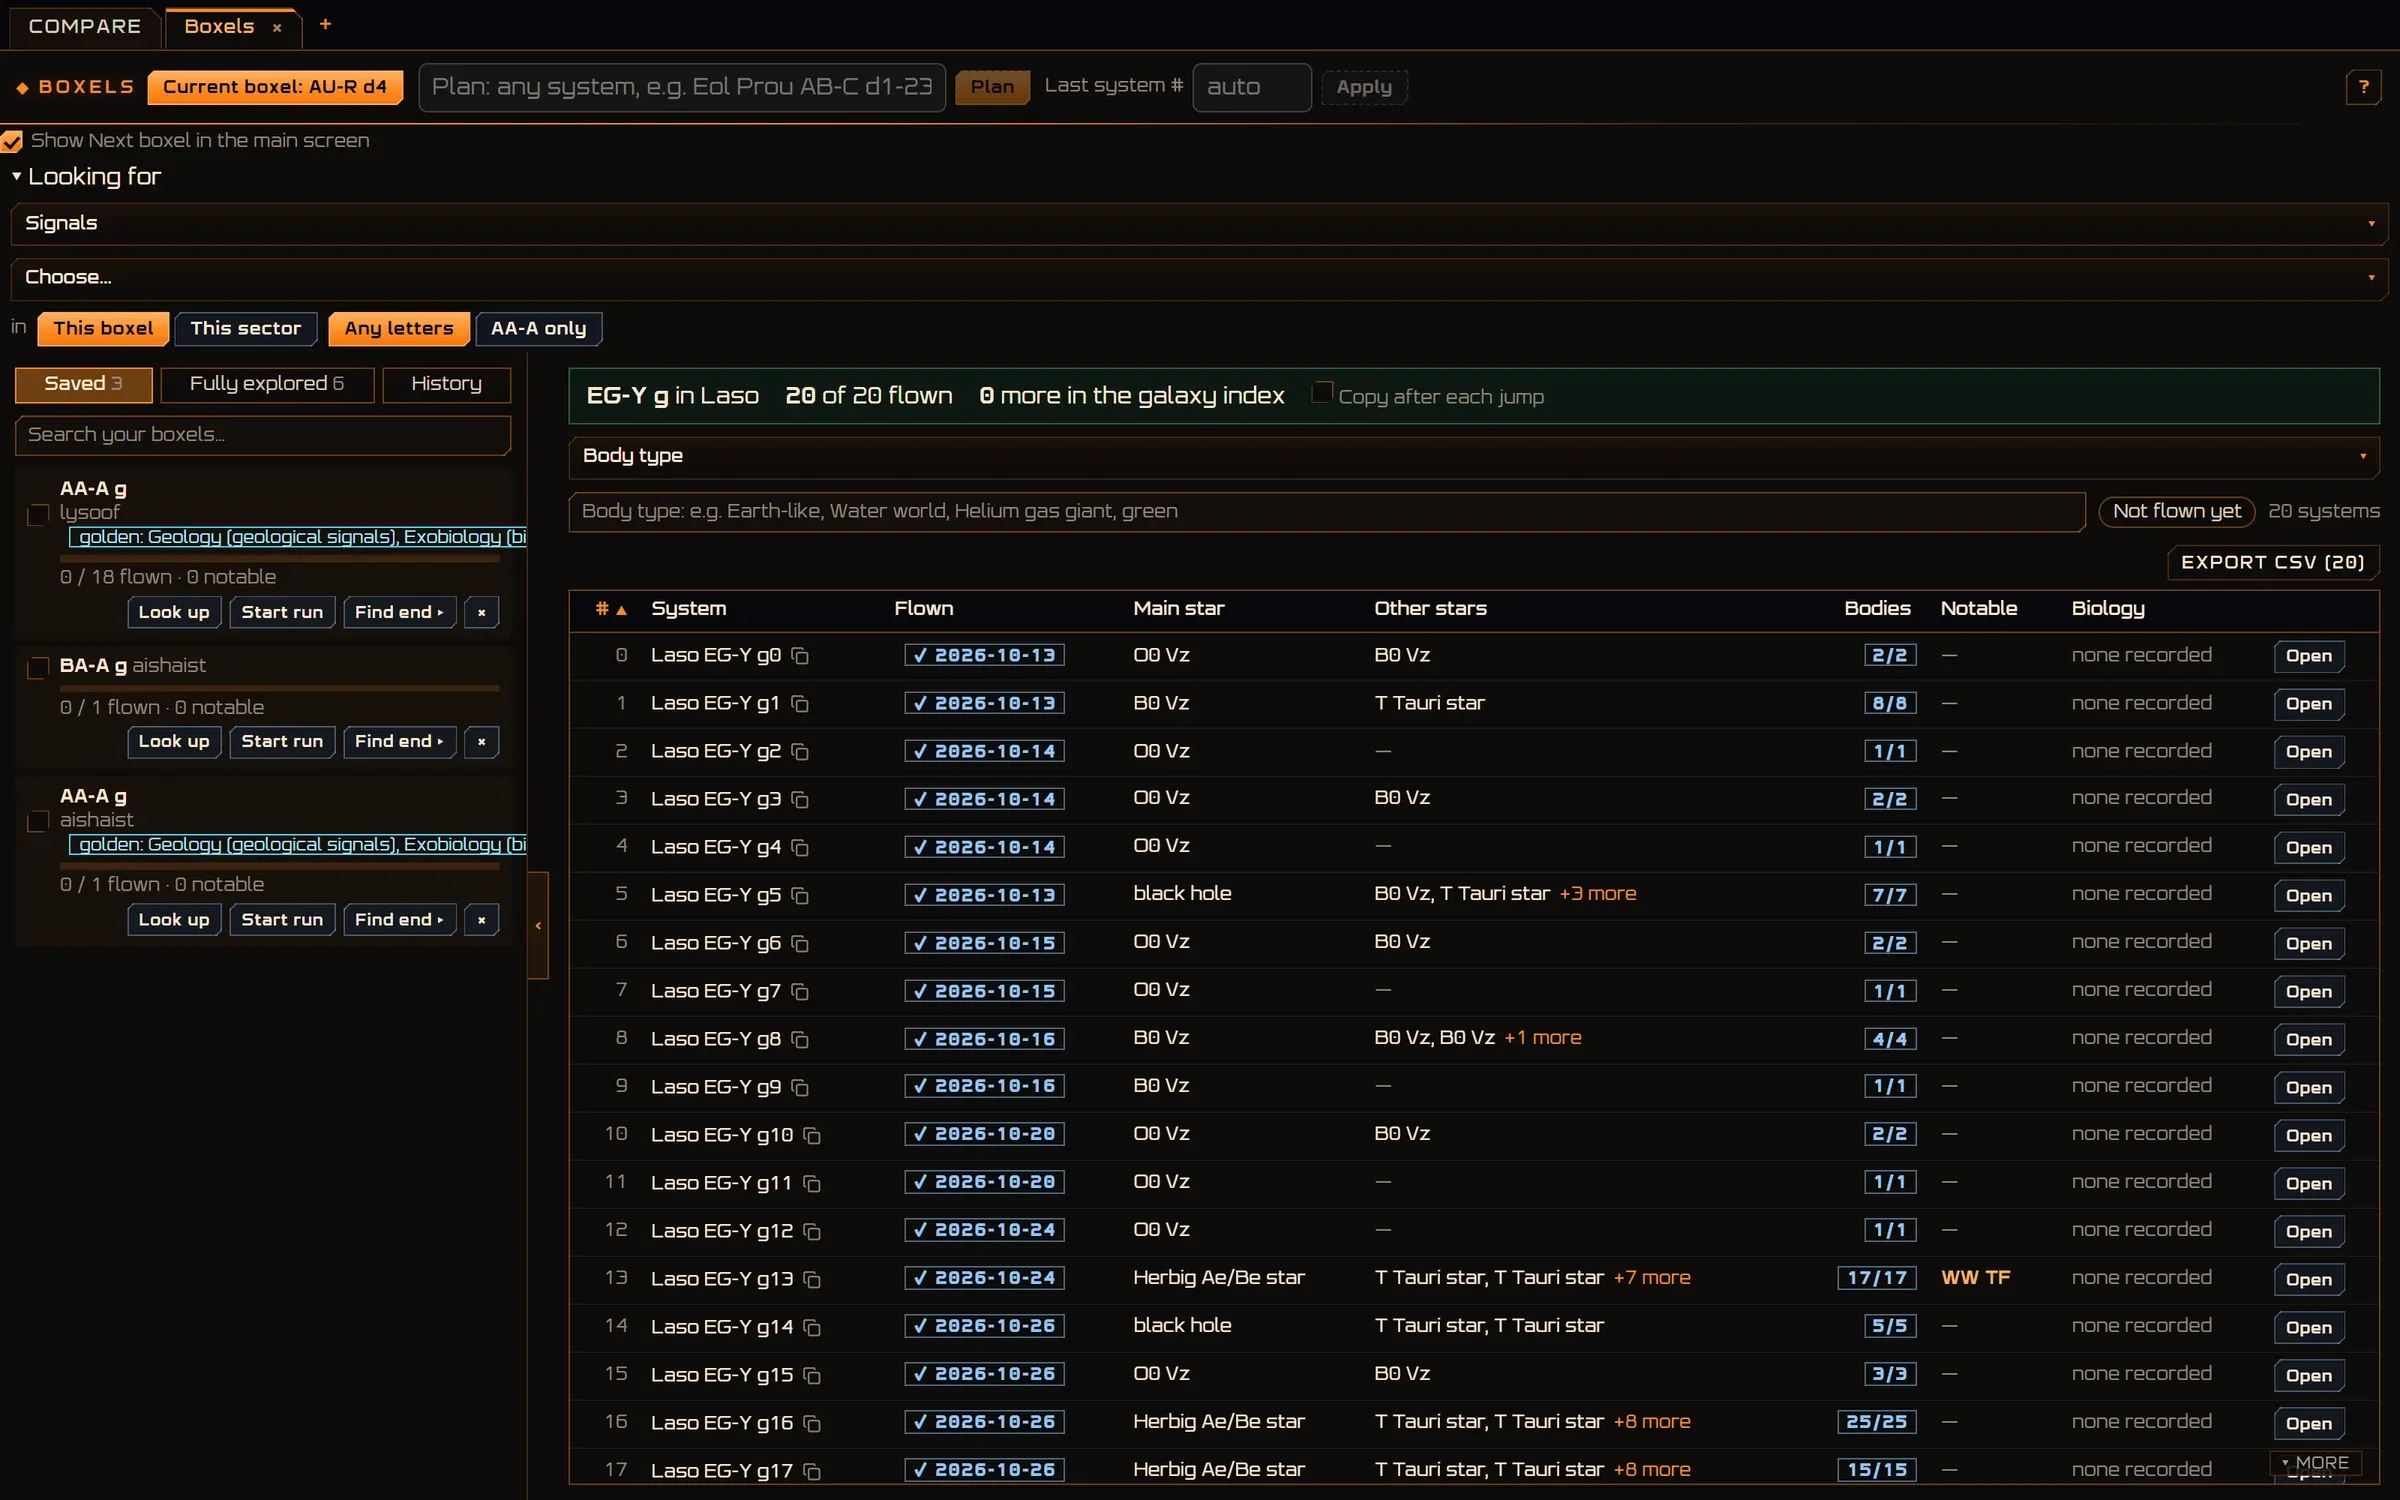
- Current boxel and plan. Where you are, and a plan through any boxel.
- Looking for. Signals, bodies or stars, in this boxel, this sector or anywhere.
- Saved boxels. With how many systems you flew, and buttons to look it up or start a run.
- Every system. Numbered, with the date you flew it, its stars, bodies and biology.
Carriers & Stations
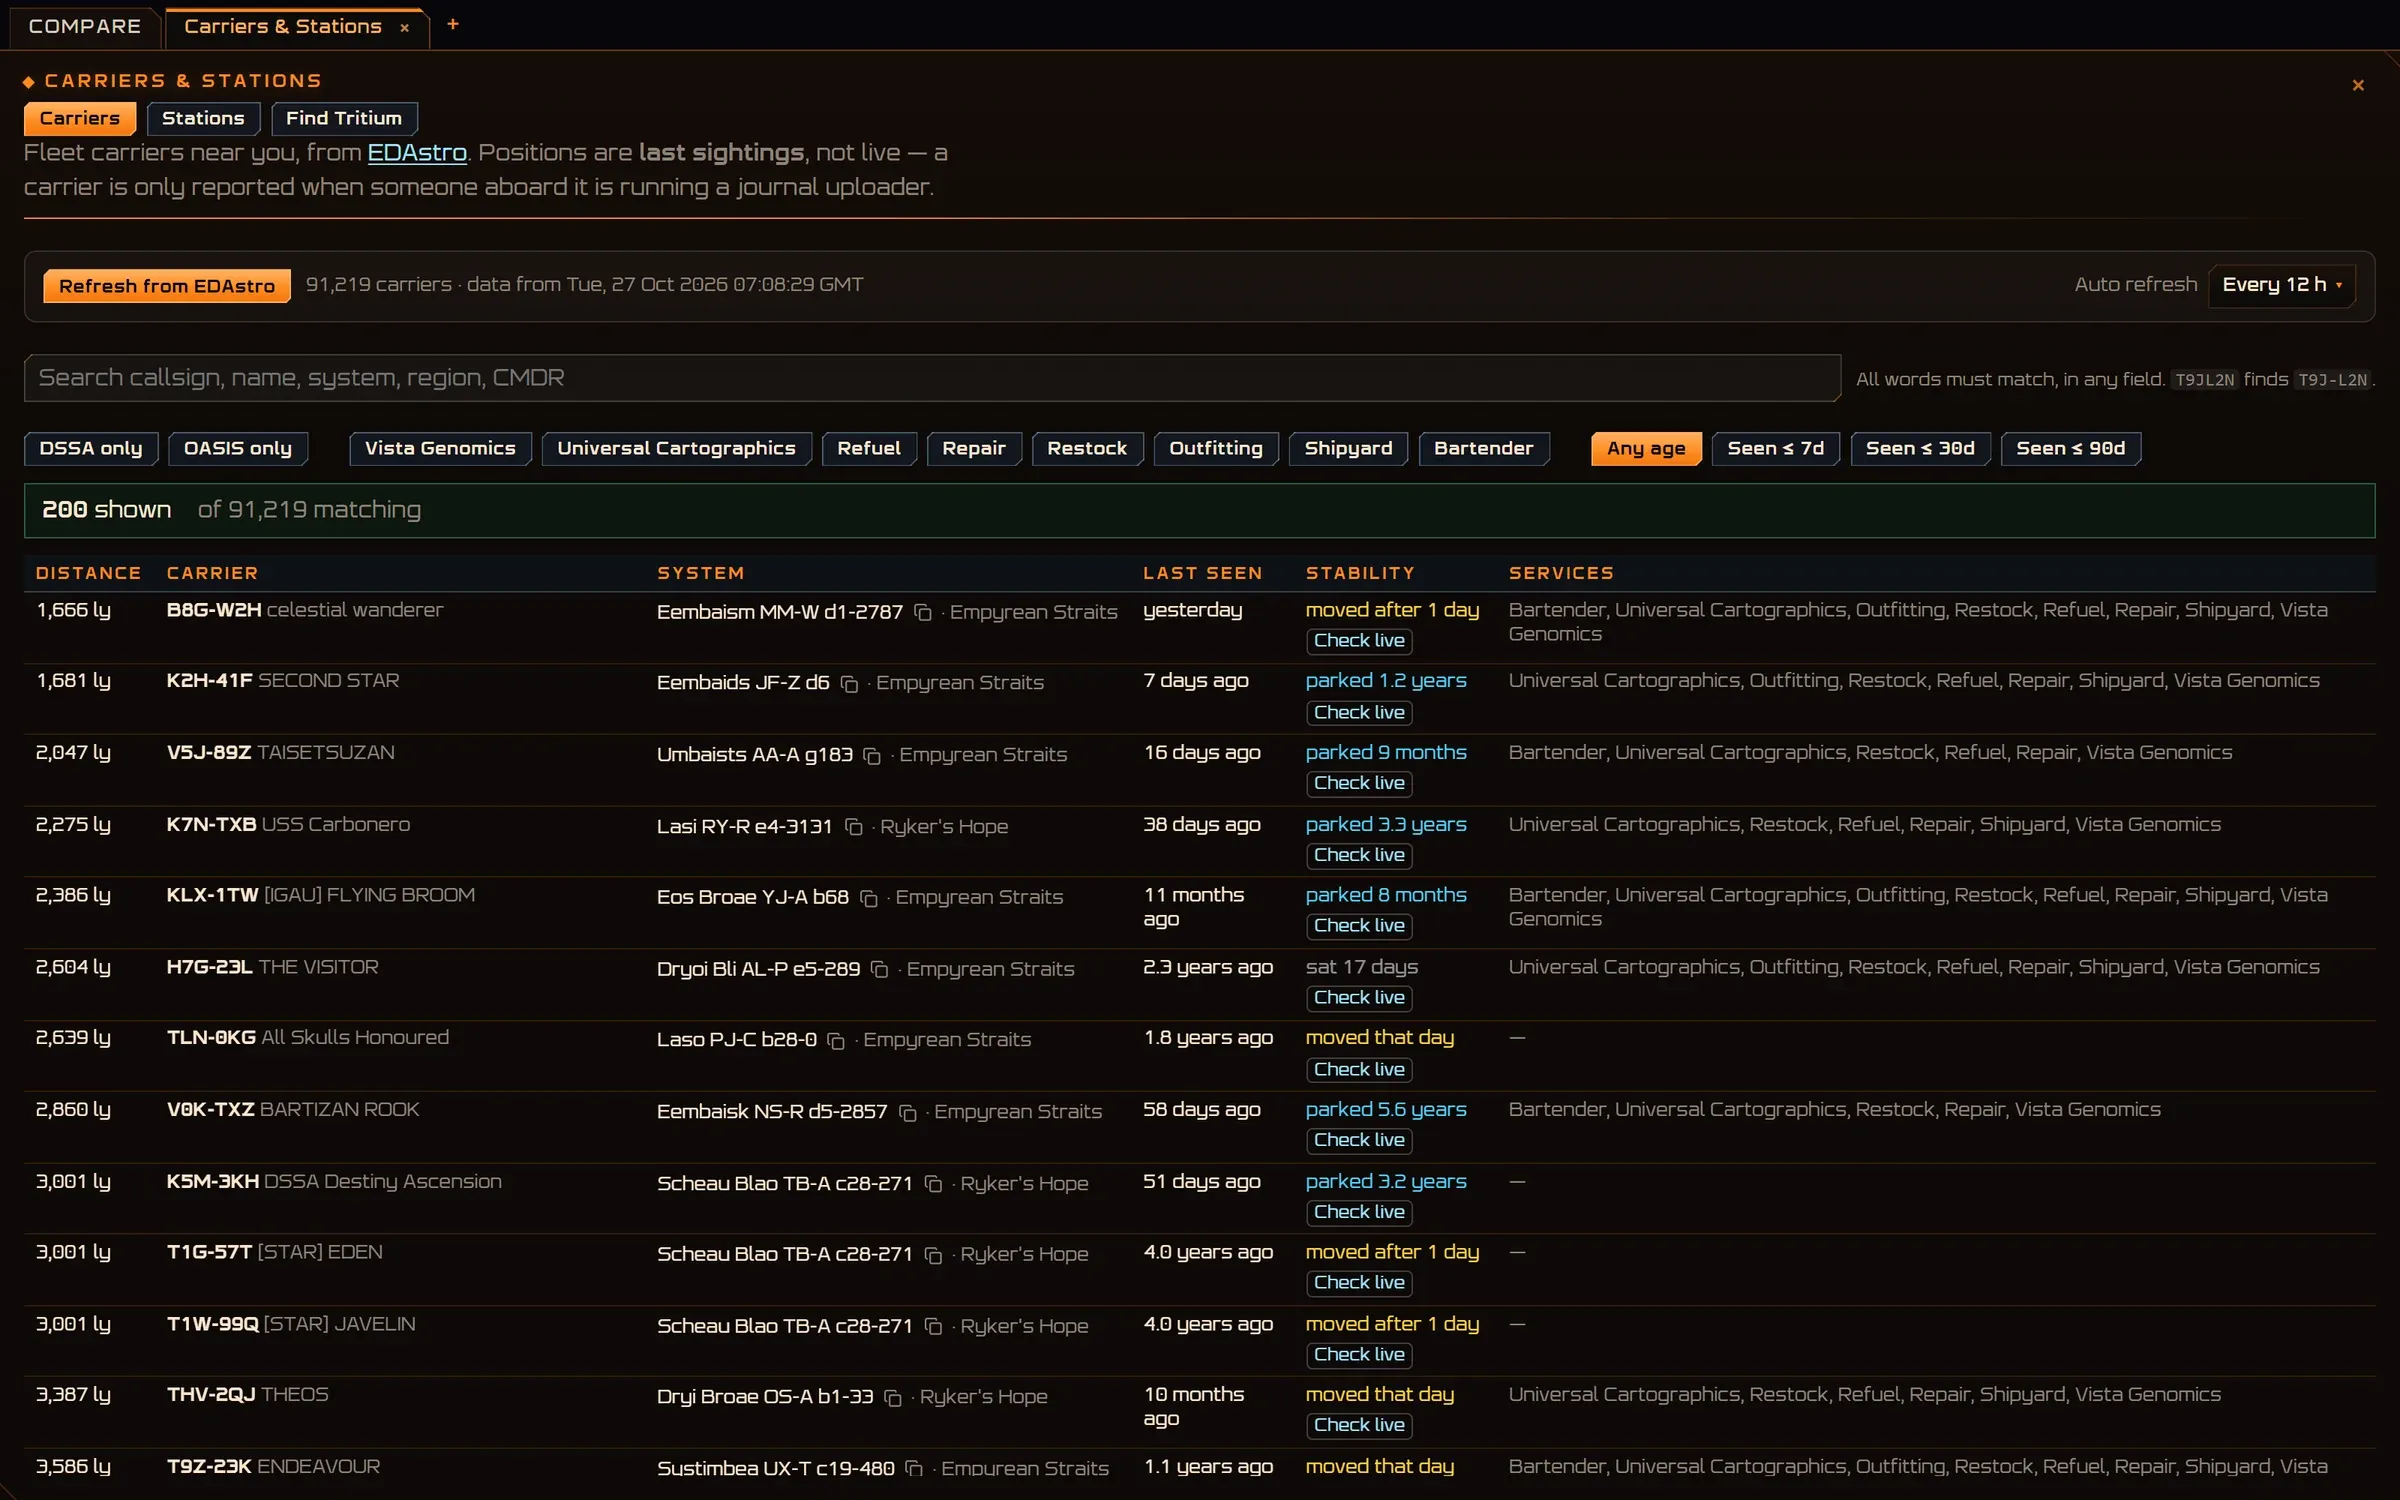
- Carriers, stations, tritium. Three searches, from EDAstro’s data, refreshed on a timer.
- Services. Vista Genomics, cartographics, refuel, repair and more.
- Stability. How long a carrier tends to stay put, so you know whether it is still there.
Points of interest
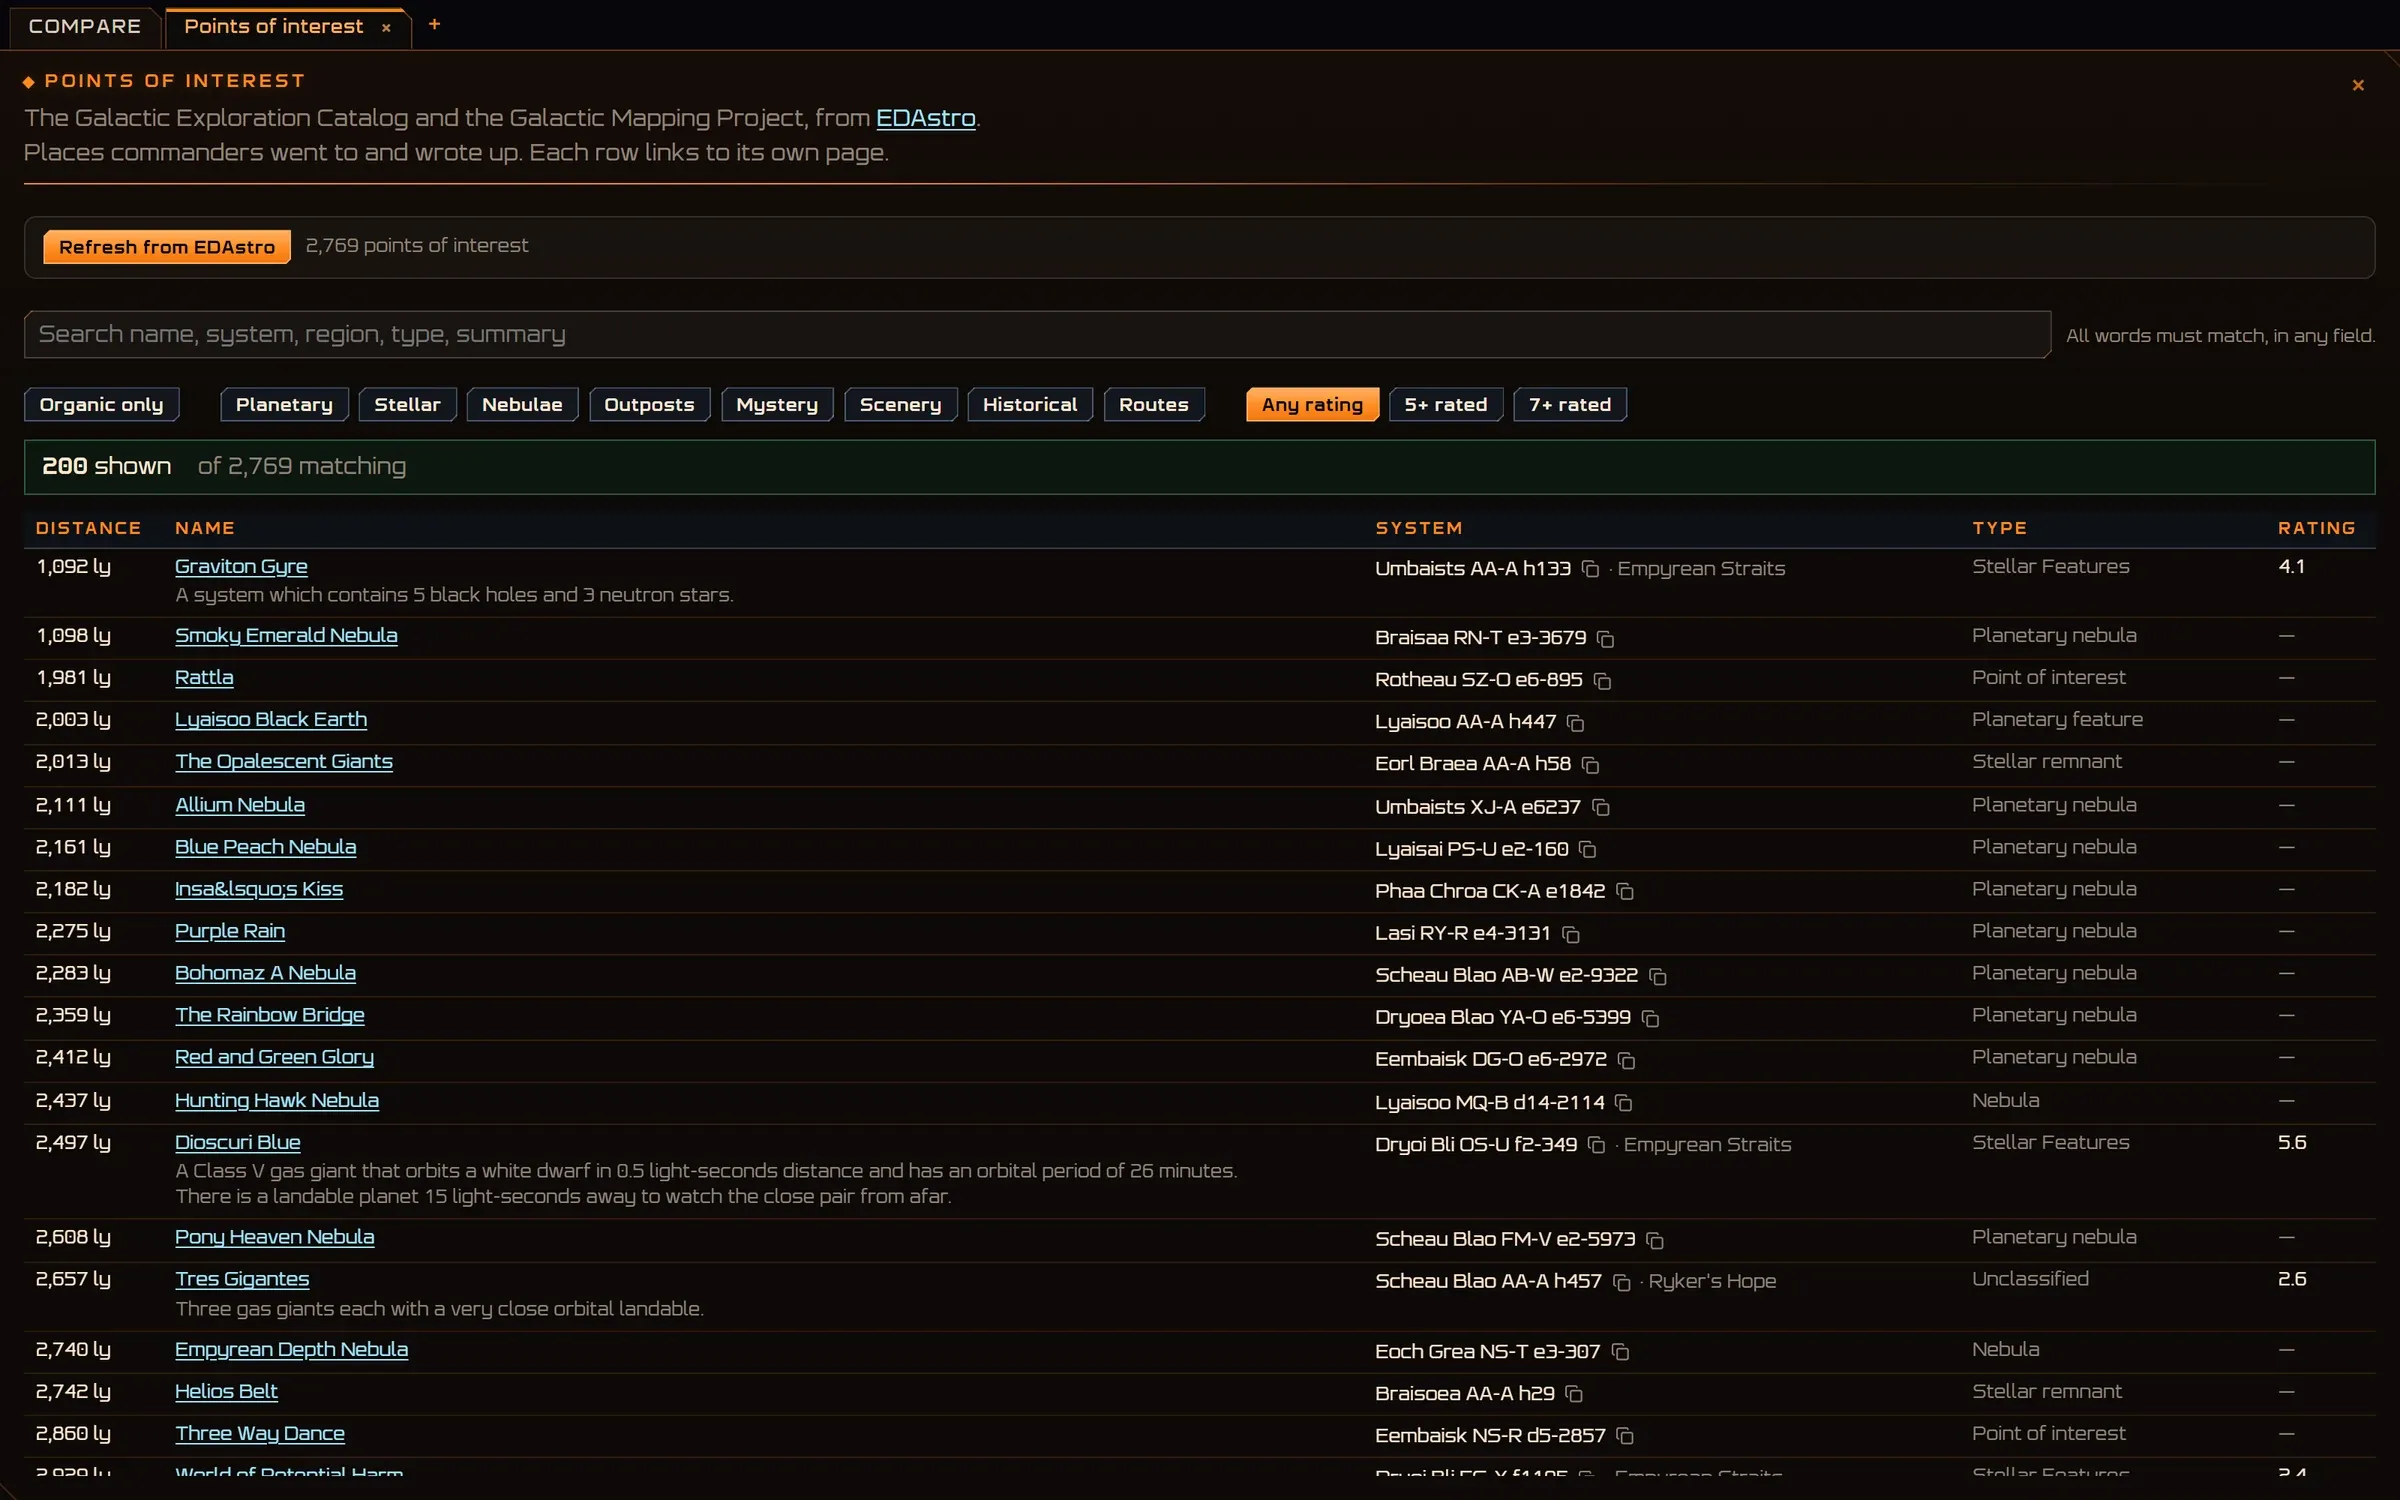
- Two catalogues. The Galactic Exploration Catalog and the Galactic Mapping Project, through EDAstro.
- Types. Planetary, stellar, nebulae, outposts, mystery, scenery, routes; by rating.
- Each place. Its distance, system and a link to its page.
Achievements
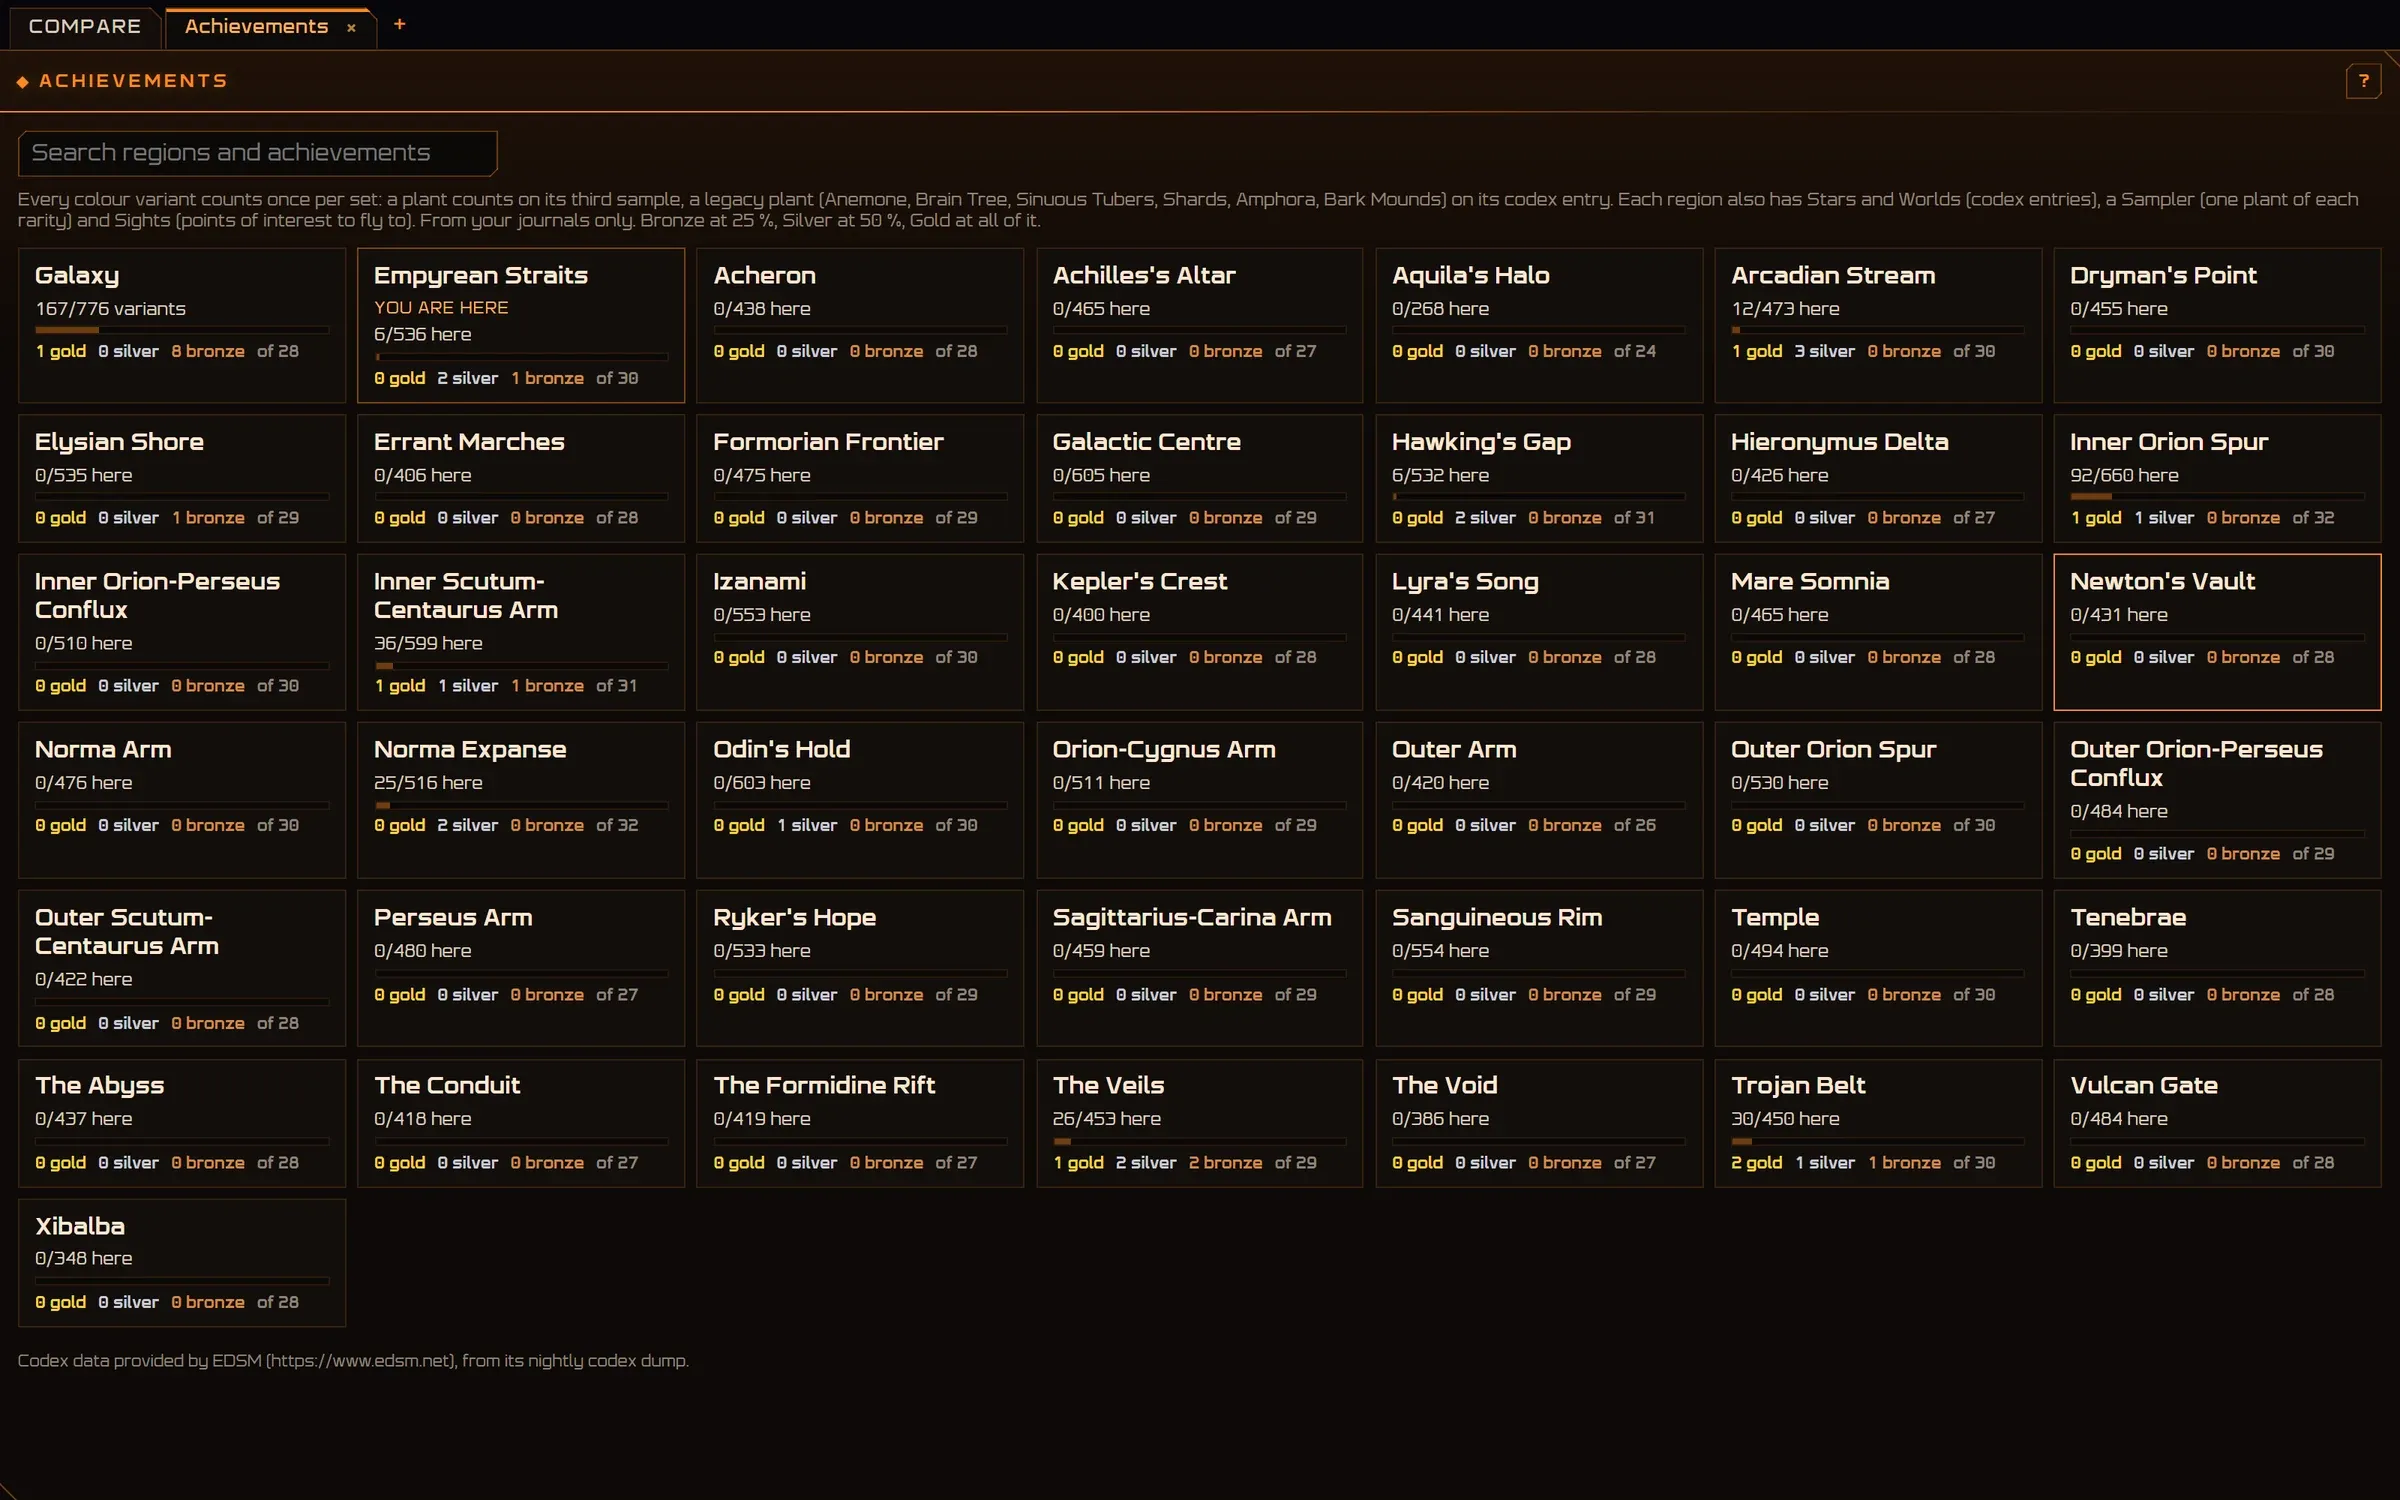
- Galaxy. Every colour variant, once per set.
- Each region. What you logged there, and the medals of its sets. Pick one for its sets.
Options
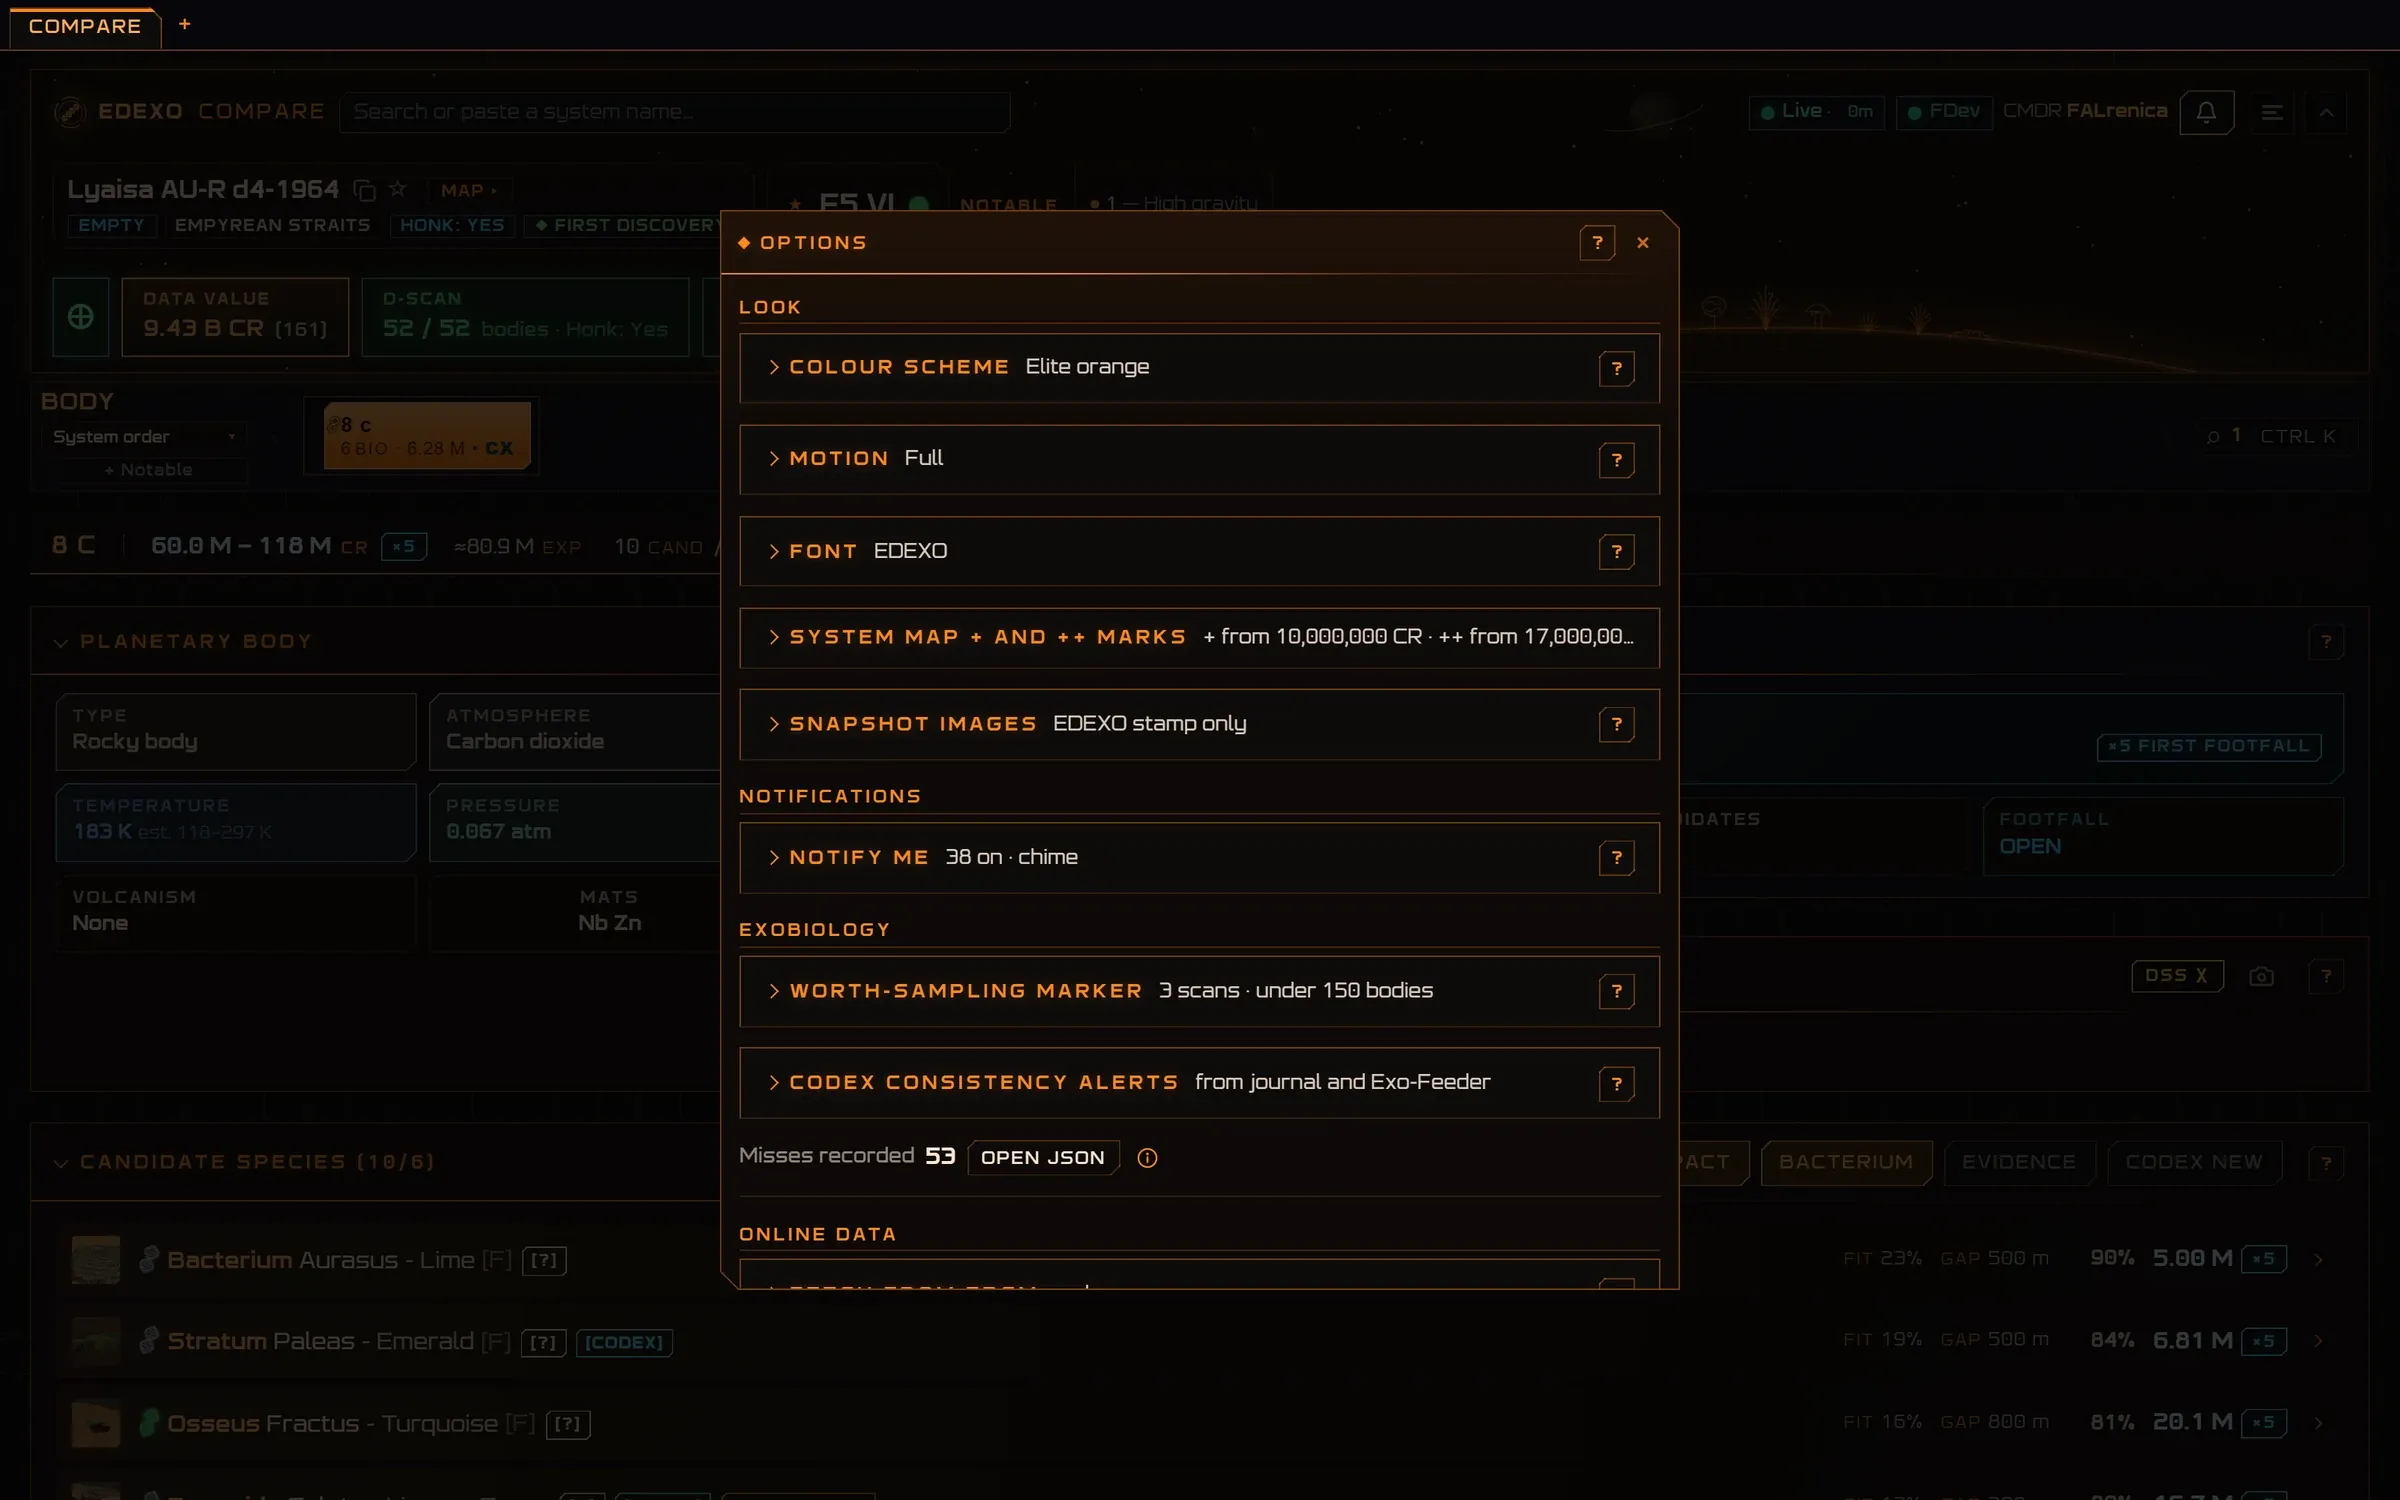
- Look. Colour scheme, motion, font, the system map’s + and ++ marks.
- Notify me. Which events chime or pop up.
- Exobiology. The worth-sampling marker and the codex alerts.
- Online data. Every upload and download, each off until you turn it on.
Launcher
The window EDEXO opens with. Both apps start from here, and everything that is not about a body lives here.

- Version. Check for updates and read what is new.
- System status. Whether the journals are being read, and how many.
- Open Compare. The exobiology app.
- Open Colonize. Construction sites and the haul plan.
- Overlay. The HUD drawn over the game, and its sections.
- Journal folder. Where the journals are and how often they are read.
- Exomastery. Refresh, download or share your exomastery.
- Backups. A folder for automatic backups, and restore.
- Network settings. Open the app to your LAN for a phone or a second screen.
- Key binds. Keys that work in the game: HUD on or off, previous and next body.
Colonize
The second app. It follows your construction sites from the journal and plans where to buy what they need and how to haul it. Nothing to tick: the journal says when the cargo is aboard and when the site has it.
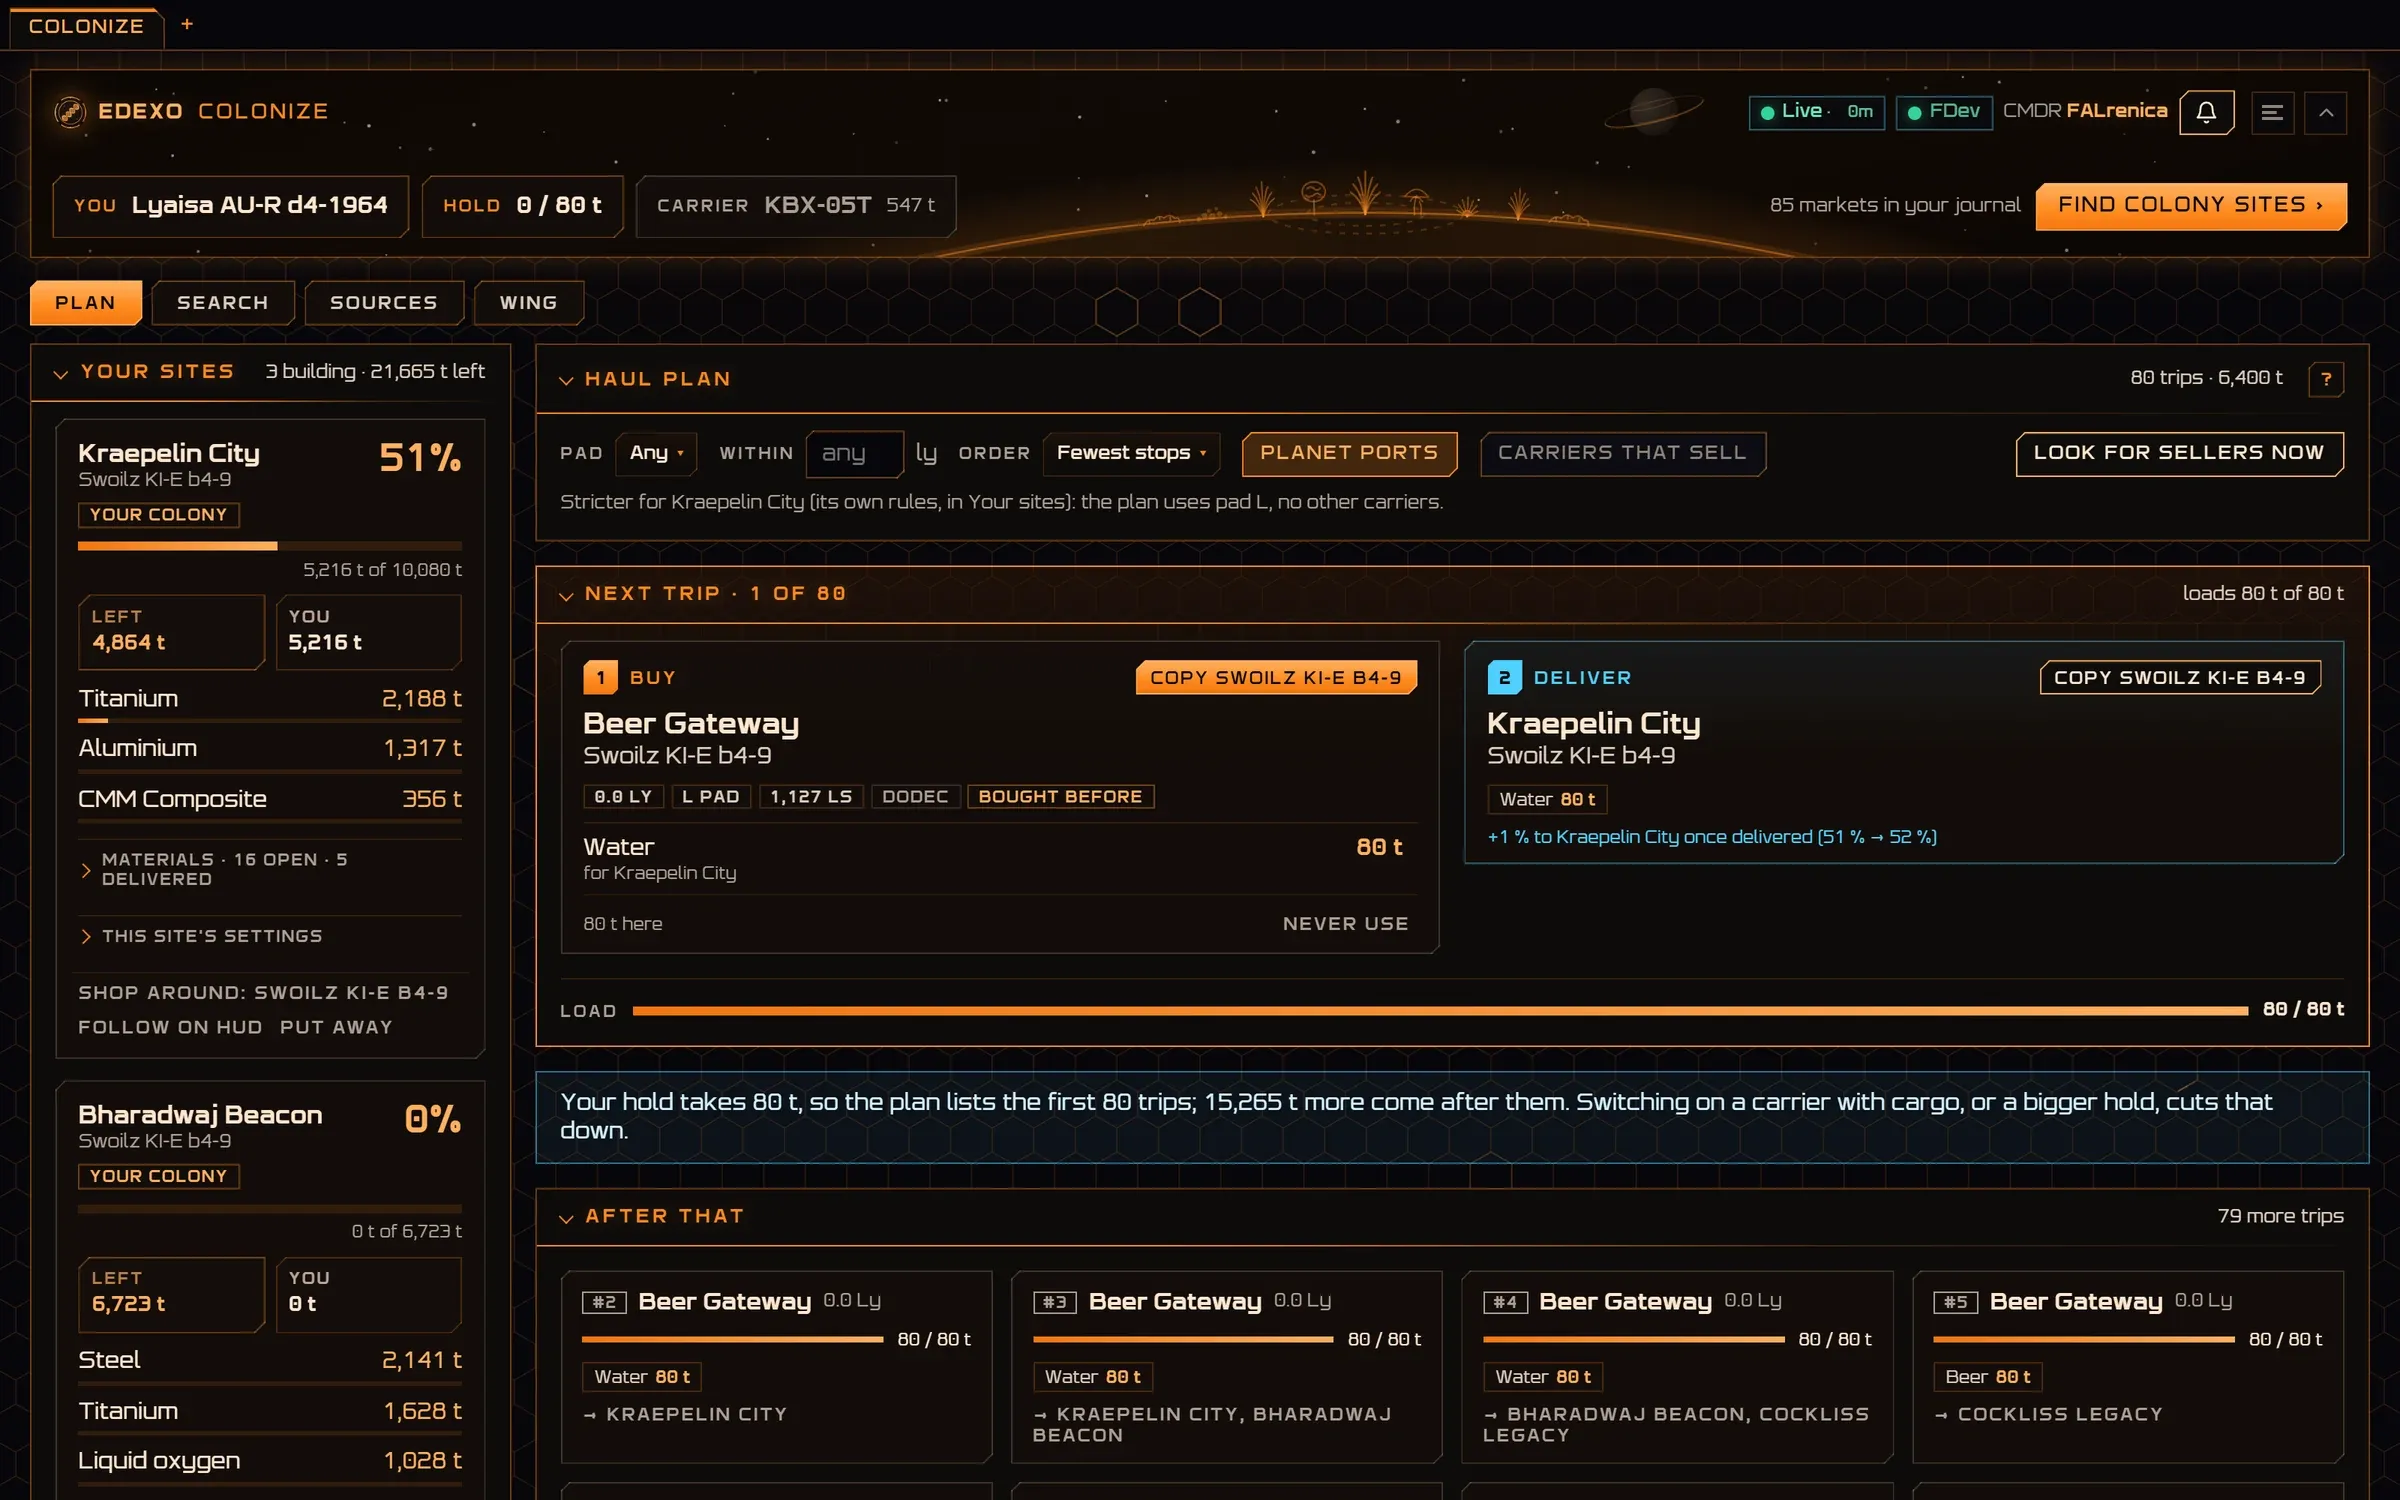
- You. Your system, hold and carrier.
- Find colony sites. Opens the galaxy map’s candidate search.
- Plan, Search, Sources, Wing. The haul plan, who sells what, where prices come from, and who in a wing hauls what.
- Your sites. Each with how far along it is, what is left, what you hauled and its biggest needs.
- Haul plan. Pad size, distance, fewest stops; stations or carriers.
- Buy. Where, how far, its pad, and whether you bought there before.
- Deliver. Which site, and how far it gets once the load lands.
- Load. How much of the hold this trip fills.
- After that. The trips that follow, as cards.
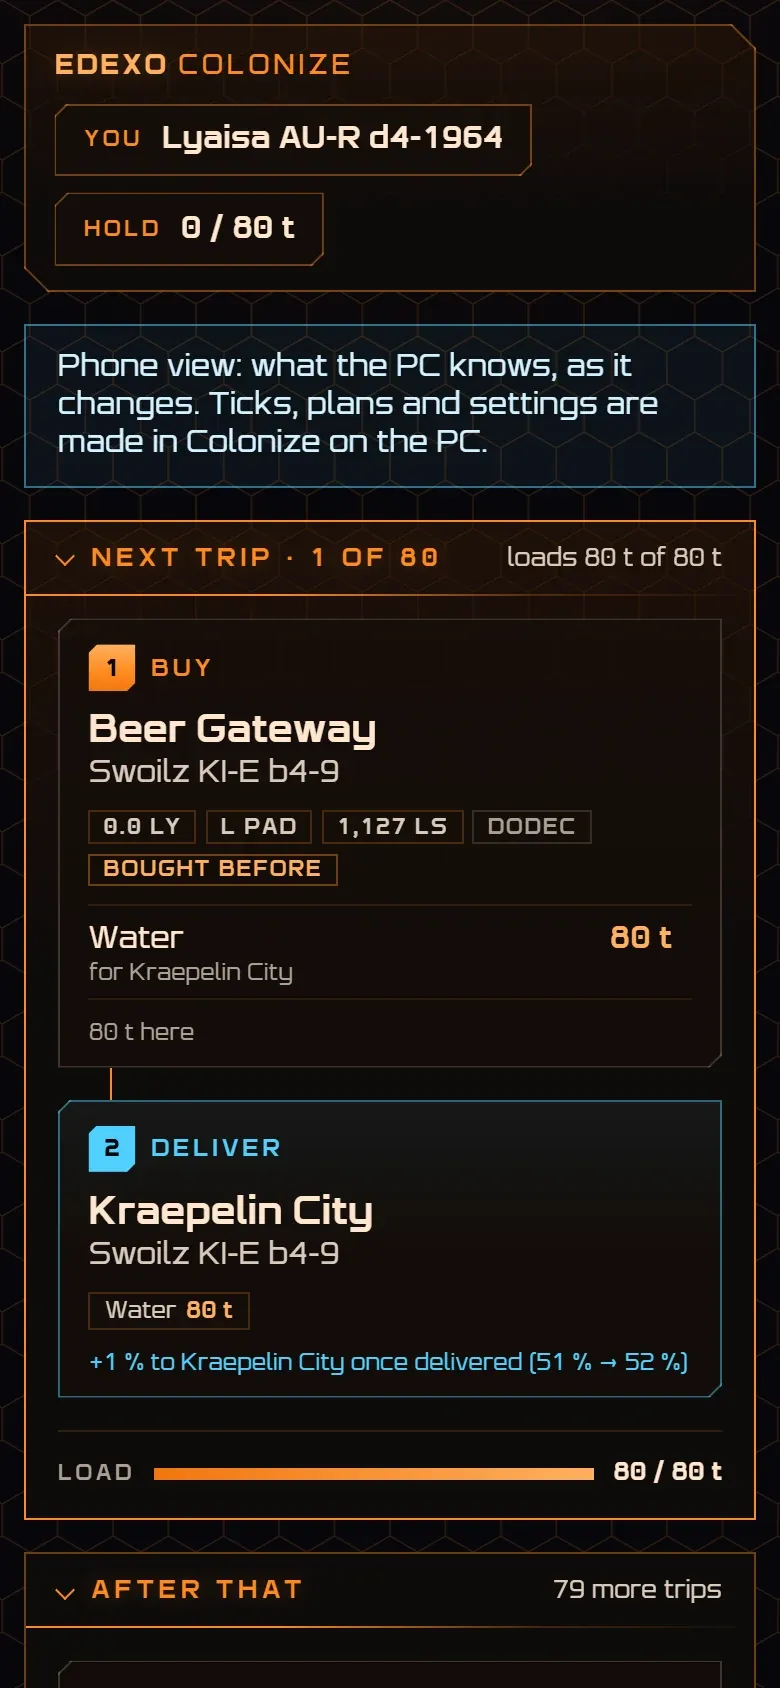
- On a phone. Open the app’s LAN address on a phone, and Colonize shows what the PC knows as it changes.
- Read-only. Ticks, plans and settings are made on the PC; the phone never changes them.
- The next trip. Buy here, deliver there, at a size you can read from the cockpit.
HUD
A click-through overlay drawn over the game, so the ship still gets your mouse. Pick its sections in the launcher; this is the Elite-style frame.
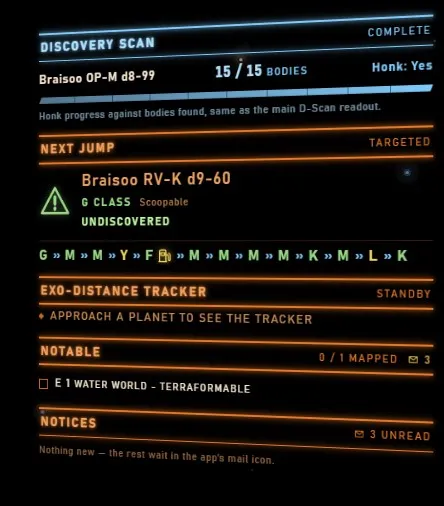
- Discovery scan. Bodies found against the system’s total, and Honk.
- Next jump. The star class of the system you target, scoopable or not, undiscovered or not.
- The route. Star classes all along it; the fuel can marks where to scoop.
- Exo-distance tracker. On a planet: a radar, the three sample distances against the genus’s gap, and the payout.
- Notable. Bodies worth a look, and how many you mapped.
- Notices. Records and alerts; the rest wait under the app’s mail icon.